Steampunk seems tobe everywhere these days, and though on many days I'd bewilling to give it a try, walking around decked out infull gear-tastic regalia isn't exactly the norm (societycan be such a buzzkill sometimes). Still, there are somefun an sneaky ways of getting some steampunk goodnessinto your everyday wardrobe. Especially, I feel, in fall.Cooler weather affords all kinds of layering options. Take forexample, the cute shoes and tights at right. Cute? Yes. Fun forfall? Absolutley. Steampunk? Not nearly enough.
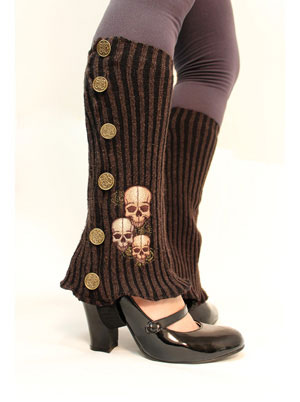
With one simple addition of upcycling, we can change that with a pair of handmade embroidered sweater spats.
No ray guns required!
What are spats exactly? Well, they were common boot coverings in the late 19th and early 20th century, (originally called spatterdashers, which I think is going to become my new favorite swear word) and they've become a popular fashion accessory for modern day Victorian fans. They're great because they can be worn over all kinds of shoes, from boots to heels, and can function as a fashion accessory and a leg warmer. Sadly, the coolest accent to most of these, all the buttons, is also what makes them cumbersome to put on, and to make (just thinking about all those stitched buttonholes gives me a headache...) Thankfully, with a little upcycling and some ingenuity, you can get all the benefits of spats with half the work. No buttonholes required!
Supplies
To make your spats, you'll need:
- A nice stretchy large sweater -- you'll want the sleeve opening large enough to easily fit your calf, maybe even with a little extra room, probably men's size - thrift stores are great for these!
- Embroidery design of your choice - I used the Clockwork Skulls design.
- Elastic
- Decorative buttons
- Scissors
- Needle and thread
- Cutaway stabilizer
- A raygun....just kidding
Designs Used
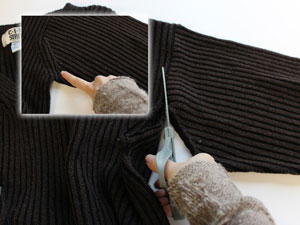
To start, let's look at your sweater. To give yourself maximum height possibilities with your spats, let's cut your sweater off just where the arms meet the body. Hopefully, as with most sweaters, the arm is going to taper from the body towards the sleeve -- the perfect shape for most spats.
Let's find out just how tall you want your spats to be. Take one of your sweater sleeves and slide it over your leg, sleeve first, with the seam of the sweater at the back. Then, wait for one of your coworkers to walk by and ask you why you're trying to take a picture of your leg with a bit of sweater on it.
Oh, that's just me.
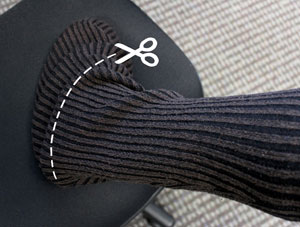
Pull it up until the wider part of the sweater is draping nicely around your foot, with only a little bit of excess. The rest should be semi fitted but not too snug, as we're going to lose about an inch of width when we cut and re-sew the spat. You can get away with fudging things a bit if your sweater is nice and stretchy. Mark where you want your spat to end (depending also on how high you want your spat to be).
Can I just pause and point out here the awesomeness of our office carpet in the background? Don't let the fancy overwhelm you.
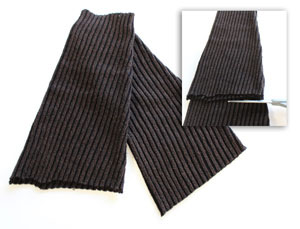
Cut your sleeve to length (perhaps curving it just a little bit downward, to accommodate your foot shape), and then place it on top of the other one to cut it the same size.
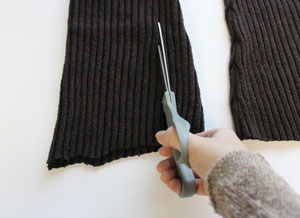
Lay your spat out flat, with the seam along the side --that's the back of your spat. The row of buttons on a spat usually go more towards the back (which also leaves more room for embroidery) so when we cut up the side of our spat, measure about 1-2 inches away from the seam. This is also a good time to have a look and see where you'd like to add some of that awesome embroidery.
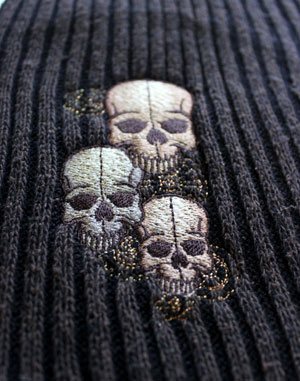
With your spat cut open, lay it out flat and mark where you'd like to add your design. Hoop it up with some cutaway stabilizer and embroider away! Take care that you don't stretch or distort your knit when you hoop it, or your knit will come out all wonky. A good steampunk captain does not have wonky spats. He will be ostracized by the other captains and deprived of his goggles.
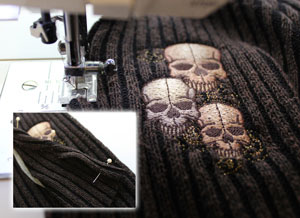
So, if you do want to create the look that your spat is folded over and buttoned up like a real one (but don't want to mess with ALL those buttons everyday..ick) we're going to create the illusion of a folded edge. To start, we need to clean up that side. Fold the raw edge in (of the side closest to the design) pin it in place, and sew a seam down to give it a finished look.
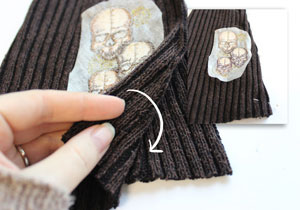
Lay your spat right sides together. Fold that edge you just stitched in on itself by about an inch or less (less for sure if you don't have a lot of room to give). With that part folded underneath, pin that edge and the raw edge of the spat together. Or, stare blankly at those instructions because I know what I just said was a little confusing.
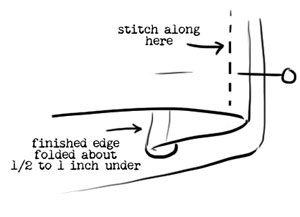
Here's a little diagram to show what I mean. Basically what this will do is stitch your spat into a complete loop once again (like a legwarmer) but leave a little flap hanging that we can "button" in place to make our spat look more convincing. A little clearer, right? It will all make sense when you start stitching it together. Trust me.
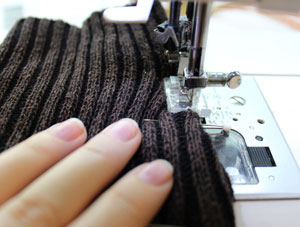
Once you have it pinned in place, sew a seam down the side. Take care to catch both edges! Working with knit can be tricky sometimes. This is usually the point I remember that I hate working with stretchy knit fabrics. I found this an opportune time to try out spatterdashers as a new cuss word.
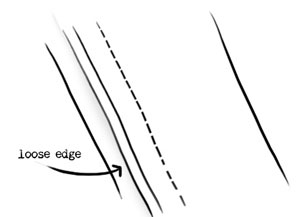
So, once you turn it right side out, you should have a continuous loop, and where the seam is, there's this neat little fold that looks like your spat is wrapped around itself. (OK, admittedly that illusion is a little lost in photos when your knit is ribbed like mine, but you can tell in person, I swear!)

You can either tack this down with buttons only, or if you don't want that edge popping up too much, you can lightly tack it down with a few quick hand stitches.
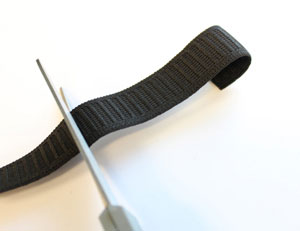
Spats of course also had that little strap at the bottom to keep it flush with your shoe. While buckles worked in the past, we want these to be easy to put on, so I'm using a piece of elastic. Cut it so it's just a little bit wider than the width of your foot.
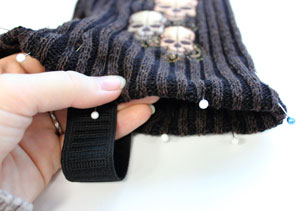
To finish off the bottom edge, fold the last edge under and pin in place. And while you're at it, pin your elastic strap in place. Keep it near the back (it's supposed to go just ahead of the heel of a shoe). You can try on your spat and shoes to find the best placement.
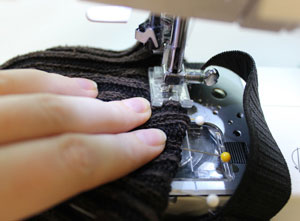
Stitch a seam all the way around the bottom of your spat, carefully catching both sides of the elastic as you go around.
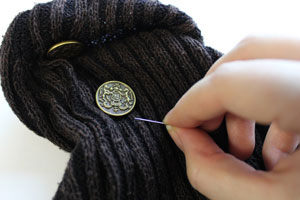
Finally, buttons! No spat is complete without buttons, otherwise all we've really made is a schmancy leg warmer... and we're going for steampunk people! Not an '80s workout video. Carefully block out where and how many buttons you're adding down your spat (I'm doing six down each side) and stitch them in place, right though all your layers. This way, it will "look" like you've always buttoned your spats in lace. In reality, all you ever have to do is pull 'em on. OK, it's steampunk, it's just casual steampunk. Kinda like casual Friday but with cooler hats.
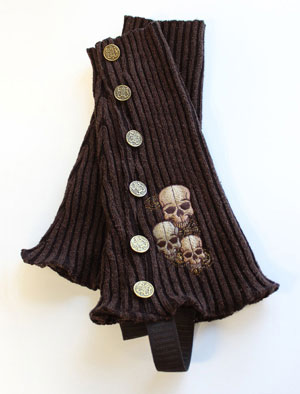
Your spats are ready to go, all with a few buttons and an old sweater. OK, and some awesome skully embroidery.
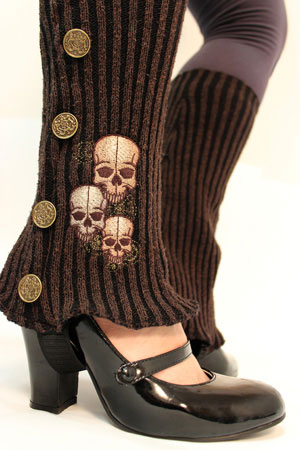
Casual enough to dress up your fall wardrobe, and easy enough to get on in a blink (even though they look like you mess with all those nifty buttons every time). Steampunk style is effortless and chic.
So, feel like a top hat and goggles is a bit much for everyday wear? With a little upcycling and some creativity, every old sweater in your closet can become something new, and you can still rock your airship captain credentials without committing to full-time gears and corsetry.


