
Discover the softer side of embroidery! Stitch specialized designs in thick thread, then use a stiff wire brush to create a textured effect. We'll show you how!
Supplies & Materials:
- Brushed embroidery design (we're using the Brushed Kitty )
- Madeira Burmilana thread, a 12 weight wool/acrylic blend (you can also use BurmilanaCo, a 12 weight cotton/acrylic blend). Similar colors will blend together best.
- 100/16 sharp sewing needle
- Fabric to be embroidered
- Medium weight stabilizer
- Temporary spray adhesive
- Stiff wire brush
The designs used in this tutorial include:
.

First, spray the stabilizer with temporary spray adhesive and smoothly lay the fabric over it. Make sure to avoid bubbling and bunching.

Hoop both fabric and stabilizer taut in an embroidery frame. Attach the hoop to the machine, and load the design file.

Before you begin stitching, loosen the top thread tension on your embroidery machine.

Use a 100/16 sharp sewing needle to accommodate the thick thread.

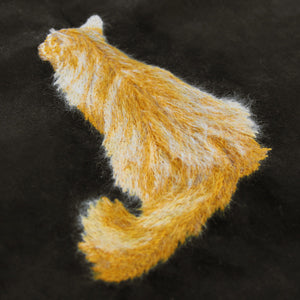
Embroider the design. Remember, similar colors will blend together best. This cat uses:
1: Madeira Burmilana 3756
2: Madeira Burmilana 3473
3: Madeira Burmilana 3756
4: Madeira Burmilana 3889

After the embroidery is finished, unhoop the fabric, and use a stiff wire brush to brush the embroidery. Madeira makes a Lana Hard Brush specifically for this purpose, but any stiff wire brush will work.
For this design, it's best to brush in a downward, motion, with the direction of the fur, just like you would an actual cat.

After you're done brushing, use a lint roller to remove loose fibers from the fabric.

Your brushed embroidery is complete! Let this unique stitching style create a soft effect on throw pillows and more.

Some brushed embroidery designs include fringe details. To make the fringe, carefully use a scissor or seam ripper to cut through the outer edge of the fringe satin column (the edge opposite the tackdown satin) after the design is finished stitching. Make sure to only cut the rayon embroidery thread and not the bobbin.

After cutting, turn the design over and fluff the fringe with the point of a scissor. This will free it from the fabric.
To see more about embroidered fringe, see the complete fringe tutorial here.
