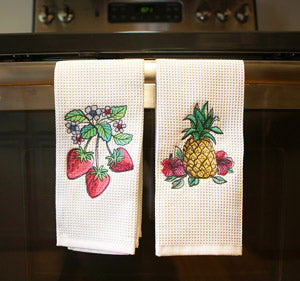
Embroidering on towels is a great and simple way to change the look of your kitchen or bathroom for the season or for special occasions. This tutorial will give you the tools to decide which designs and stabilizers work best for your towel project!
Gather Materials:
To craft your embroidered towel, you will need:
- Your favorite embroidery design(s) - I am using the 5 x 7" design of the Summer Tastes Strawberry for this example
- Towel(s)
- Thread for your embroidery
- Medium weight cutaway stabilizer for painterly and stitch-filled designs OR tear away stabilizer for light running stitch designs
- Water-soluble stabilizer such as Sulky Solvy (for heavy pile towels)
- Temporary spray adhesive
- Scissors
- Optional: Printed templates of your designs, to help with placement (here's how to print templates)

Let's start with your towel type! Different types of fabric work better with certain embroidery designs. They also are compatible with different stabilizers. Before you begin, make sure you are using the appropriate designs and stabilizers for best results...

Thinner towels such as flour sack and tea towels work best for light-stitching, open designs. You can use a layer of tear away stabilizer adhered to the back of the fabric with temporary spray adhesive for these projects.
Since medium weight cutaway stabilizer can show through thinner fabrics, tear away stabilizer can be a good choice for these towels. Tear away doesn't provide quite as much stability as cutaway, but with light and open designs this should be OK.

Terrycloth and waffle cloth towels are considered "high pile," which means the surface or nap of the fabric is "fluffy" or has a fuzzy texture. Because embroidery on these surfaces tends to sink or get lost into the fabric, we recommend painterly designs or designs with solid fills for these towels. Running stitch could easily "disappear" into the texture of the towel.
We recommend using a medium weight cutaway stabilizer, adhered to the back of your fabric with temporary spray adhesive. We also recommend using a water-soluble stabilizer (such as Sulky Solvy) on top of the towel, to prevent the stitches from sinking into the pile.

Once you have matched your materials, spray your cutaway or tear away stabilizer with temporary spray adhesive.

Lay your towel flat, and smooth the stabilizer over the back of the area you wish to embroider.

If you are using a high pile fabric, cut a piece of water-soluble stabilizer for the top of your towel.

Start Embroidering:
If you have printed a template, you can check your design positioning on your towel by lining up the crosshairs with the vertical and horizontal points on your hoop. Use an air-erase or water-erase pen to mark your crosshairs to ensure perfect positioning.
I am using the 5 x 7" design of the Summer Tastes Strawberry for this example.

Make sure all of your layers of fabric and stabilizer are hooped taut together to prevent your stitches from shifting or gapping during the stitching process.

If you are placing your embroidery towards the edge of your towel, make sure to hoop your medium weight cutaway stabilizer completely, then adhere the towel to the stabilizer with temporary spray adhesive and hoop up the bottom section of the towel fabric.
Remember to shift your center starting point on your machine to align with the template center if you are using this method.

Begin stitching! As your design stitches out, you can see how the top layer of water-soluble stabilizer is creating an even plane for your embroidery to sit on.

Once your design is finished stitching, pull off the top layer of water-soluble stabilizer, if you used it.

Use tweezers to get the hard-to-get pieces of stabilizer off your towel...

.. and finally use a damp sponge if you have any leftover stabilizer.

Turn your towel over and tear away the excess tear away stabilizer, or trim the cutaway stabilizer as close to the design as possible.

What you are left with is a beautifully stitched towel!

Get Inspired:
Stitch up a set of towels to celebrate the season, holidays, or to switch up your decor! These simple additions can change and set the mood for your room.


