The designs used in this tutorial include:
- Knittin' Kitten (Applique)
Printing Dielines
When you download an applique file, or any file with a template, you’ll see a few different kinds of files. The files with the label DL are the dieline files. You can print these dielines full size with your embroidery software, like so.
If you don’t have embroidery software to print them, don’t worry! You can skip down to the stitching dielines section.

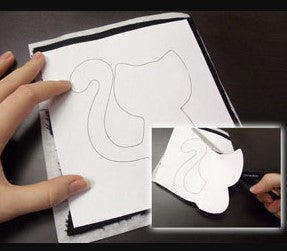
Once you have your dieline printed, spray a piece of cutaway stabilizer with temporary spray adhesive and smooth the fabric on top. Then, spray the backside of the template with adhesive, smooth it on top of the fabric. Carefully cut out your design.

When you’re done, you can peel away the paper to leave just the applique piece behind. Repeat this step for as many dielines as there are for the design.

Stitching Dielines
If you don’t have embroidery software, you can stitch the dielines directly onto your fabric. Cut a piece of cutaway stabilizer and fabric a bit larger than your hoop. Spray the stabilizer with adhesive and smooth the fabric on top. Then, hoop the fabric and stabilizer together.

Stick your hoop under your machine and load your dieline file (the one with the DL in the name). Embroider your dieline directly onto the fabric.

Your dieline all finished after stitching! It’s best to pick a thread color that will stand out a little from your fabric.

Carefully cut out your stitched shape, taking care to trim right along the sewn line.n.

That’s it! Those are your two options for using your dielines.


