The Fourth of July is right around the corner, and though you may not have been planning to stitch for the stars and stripes celebration, it’s the perfect time to try out a new design trend popping up everywhere ... Americana! It’s a vintage and chic way of reinventing the stars and stripes into your wardrobe in an old school, rustic kind of way. Americana inspired accessories are popping up everywhere, and the Fourth of July here in the States is the perfect time to try it out! All you need is a plain white scarf to transform into your next accessory to rock at a summer BBQ .
Supplies
So, what do you need to get a touch of this bold new look?
- A plain white or white-ish scarf
- A punk little star embroidery design
- Tearaway stabilizer, or heavy duty water-soluble stabilizer such as Sulky Ultra Solvy
- Red and blue fabric spray paint (found in most fabric stores)
- Masking tape
- Scrap paper
You’ll also need an area you can lay down and spray your scarf. I used old tagboard. Cardboard will work well too. You want something large enough to spread your scarf out on flat.
Designs Used
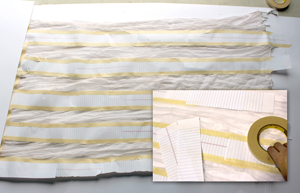
Lay your scarf out on whatever surface you’ll be painting on. For right now, block out about 2/3 of the right side of the scarf.
Then, using your scrap paper (cut into thirds lengthwise) and masking tape, block out some large striped areas for your flag's “stripes”. Don't worry about how many there are. We're not going for flag accuracy here. We're just using the flag as inspiration.
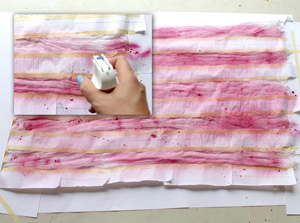
Now go to town with your messy spray paint! Don’t worry if you don’t get a nice even spray, in fact, the point of the rustic look is to make it a bit grungy and imperfect, so let it splatter and spray all over the scarf (except for the 1/3 on the left that should be covered).
Once you think a suitable amount of red is down for your stripes, leave it to dry.
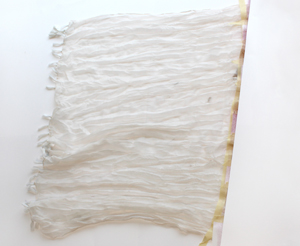
Once your stripes are dry, cover that area up, now opening the 1/3 on the left to be exposed. This whole area can be painted, no blocking or taping required!
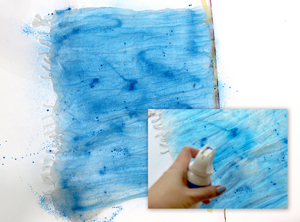
Once again, go to town with your messy self. Spray, splatter and paint this side with your blue paint. Make sure this is covered enough with blue color so your white stars will stand out from it later.
Once it’s suitably covered, let it dry.
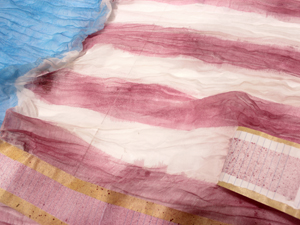
Once everything is dry, carefully remove your masking areas. Don’t worry if the paint bled a bit! We’re not going for clean crisp lines here. A little grunge is good.
Once all the masking tape and paper is removed, you can take it off your spray surface.
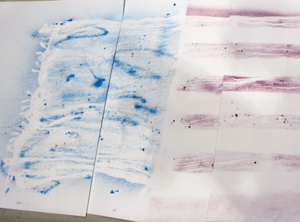
If you’re an ex art student, you may then stare at your spray scraps for too long and decide you could put it up in a modern art museum if you called it something like “The Imperialist Shadow Impressions of Post Modern American Iconography."
No? Maybe that’s just me.
Your scarf! Looking grungy and wonderful but suspiciously blank. You know what it needs. Embroidery!
Now here’s where we use embroidery a bit differently. Most of the time our designs are used on projects to make a big, graphical splash. In this case, we’re using it to make a subtle but chic effect by repeating lots of embroidered stars. Embroidery doesn’t always have to shout, and trust me, it will look totally understated and rustic on your new scarf.
OK, so a few things about embroidering if you’re using a nice gauzy scarf like mine. We’re going to use a few special tricks, but keep in mind these are ONLY for this special occasion. K?

First, given the lightness of this scarf (or likely any scarf, really) only small, light designs will work. Second, as this is obviously a sheer material, we don’t want our stabilizer showing underneath the finished embroidery. So we can do this two ways.
The way I embroidered my stars is by hooping up TWO layers of tearaway stabilizer, with a light coating of adhesive in between, to keep them from shifting. It should be noted this is never recommended for cut-away stabilizer, and only ever works with tiny designs like these.
The other option is to use one layer of heavy duty water soluble stabilizer. I didn’t want to risk my fabric paint bleeding, so I went with tearaway.
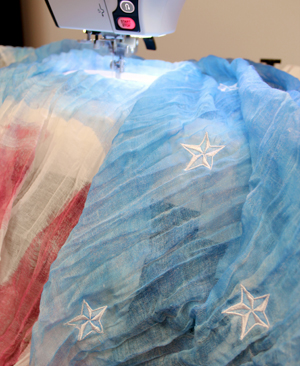
Hoop up fabric and stitch your tiny stars one by one, scattered around the blue area. Don’t worry about how many there are or how perfectly aligned anything is. Grungy, remember? Your stars will add a subtle but rustic touch and it will be hard to tell the placement once you’re rocking your scarf anyway. Just space them as best as you can.
In between each stitching, carefully tear away the excess stabilizer around the star, or if you’re using water soluble dissolve it all at the end, but remove as much excess as possible first.
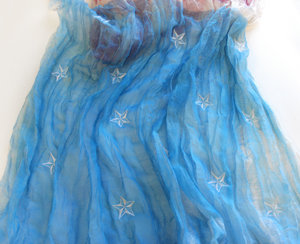
Here are my little scattered stars. Subtle, with just the right hint of punk. It may take a few hoopings, but the results are worth it, and each star stitches out quickly!
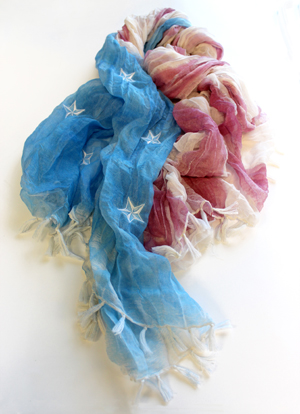
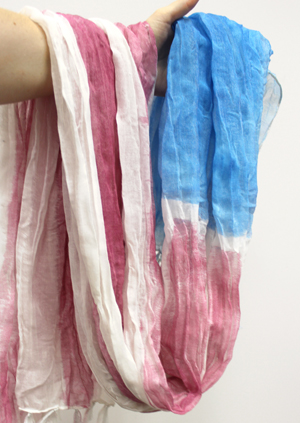
From a plain Jane white scarf to a bold and rustic accessory perfect to rock on the Fouth and beyond.

The Americana trend is sure to take you all the way from summer into fall, and lets you show a little simple star spangled pride along the way.


