Call me a sucker in the fabric store, but I adore furry fabrics. Big, plush, soft, fluffy, fuzzy, you name it. When buying supplies for this project I ended up carrying around the big bolt of extra plush fleece like a giant teddy bear until it was time for me to check out. Furry fabrics are wonderful for all kinds of projects, from projects for plush-aholics like me to soft and cozy for little ones. Fur may sometimes seems daunting to embroider on, but all you need are a few key tips and tricks to make your favorite designs as plush as ever!
So, since soft, luxurious fabrics are so nice and soothing, they make a great material for little ones! Little babies just love playing with new textures and toys, and we've got just the thing. We're going to whip up a simple little tag blanket for a little one, with an oh-so-touchable furry monster applique to boot!
Supplies
To make your blanket, you'll need:
- One yard of furry/plush fleece (the softer the better)
- One yard of soft flannel
- Various ribbons for the tags
- An awesomely fuzzy monster design
- A template for our little monster
- Some fuzzy monster fur for the applique
- Cutaway stabilizer
- Water soluble stabilizer (thin enough so that it can be easily torn away)
- Scissors and pins
You may also want spray adhesive, and if you don't want to look like you got in a fight with something furry and lost, might I recommend a lint roller nearby. You should have seen me when I was done.
Designs Used
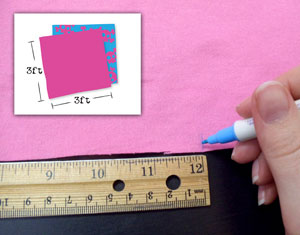
Let's start with the blanket pieces. You're going to want to cut each piece of fabric into a 3-foot by 3-foot square, just big enough for a little one to hang out on. Cut out both pieces, but you can leave the extra fuzzy plush fabric aside for now. In case you're wondering about my print and design choices, no, I don't think it's ever too early to get a little one into skulls and monsters. The earlier the better, I say!

So, now let's deal with our given challenge for today... stitching with fur! First, we're going to need a dieline for our monster. Now, because trying to stick a dieline on top of furry/lumpy fabric is a nightmare, let alone trying to cut a straight line, we're going to use a little trick. If your software allows, mirror the template design before you print it. If you don't know how, you can print it out, hold it up to a window, and re-trace the design on the back. Now we have a mirrored dieline ... can you guess what the trick is yet?

That's right, we're going to stick the dieline on the back of the fabric, where it will stick easily and let you more carefully follow your lines. Carefully cut out your furry monster shape! Yes, it will make a mess. That's half the fun of it, right?
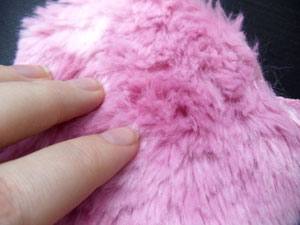
Yay! We have a furry lumpy shape that will soon be a monster! But first, let's take a closer look at that fur. If your chosen furry fabric is 1/4" inch or less, you can skip this next step, but if you chose long, extra furry fur, you might want to follow this next trick.
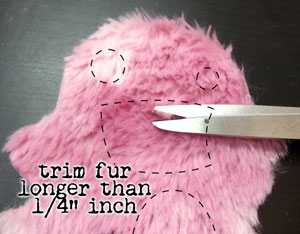
We'll need to give our monster a haircut! In areas where you know there's going to be heavy embroidery, you can take a scissors and trim your monster hair down a little. This fur is just going to get stitched over anyway, and too much of it might eventually get in the way of the stitches. So if your fur is extra long, take some time to shave it down so it plays nicer with your machine.
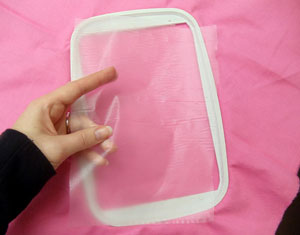
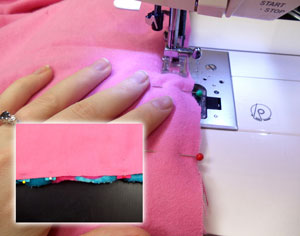
Now, all that remains is to hoop up your fabric with some cutaway stabilizer. I'm putting my little guy in the corner of the blanket. But wait! You'll also want to cut a piece of the thin water soluble stabilizer. You're not going to hoop this piece, you just want it to be a little bit larger than your design is going to be.
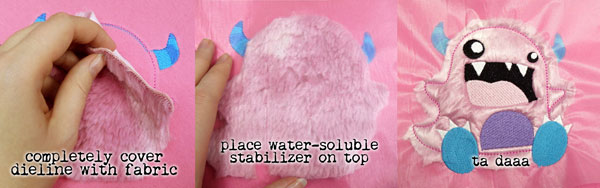
Here's how stitching on fur goes. Start stitching your little monster. A few elements like his horns will stitch first, and then eventually a dieline. Spray the back of your furry applique piece, and carefully place it over the dieline so it completely covers it. Try and keep it as centered as possible. Next, and this is important! Lay the piece water soluble stabilizer on top of your furry monster, making sure it covers him up. No need to tape it or hold it in place, the stitches will do that for you. Set your machine to sewing again, and it will continue stitching right on top of the stabilizer, keeping your fur from messing with your pretty stitches! Ta daaa. A monster.
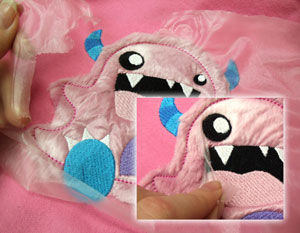
He's kind of a shiny monster right now instead of a furry one, but that's easily fixed. Carefully tear away the stabilizer from the top. For small areas, you might want to use a small scissors and tweezers to get everything pulled out.
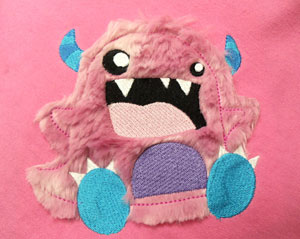
Your furry creation lives!! You can even take a needle and tug at some of the areas around the dieline that don't have fur sticking up. It will pull up some of the loose fur from underneath without disturbing the stitches, letting your monster be as furry as he can be!
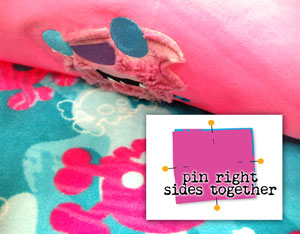
Now it's time to put it all together into a blanket! Take your awesome skully plush fabric (Or you know, non-skully plush fabric. It's OK, I'm not judgmental.) and place it on top of your embroidered fabric, right sides together. Line up the edges.

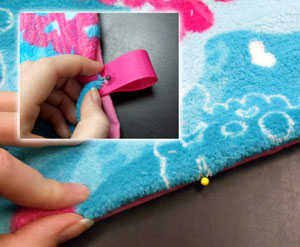
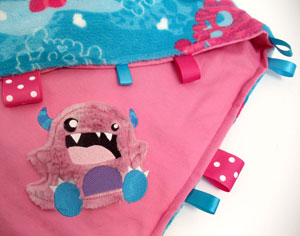
You're going to want to pin together the two layers along three sides of your square. As you pin, you'll also want to cut small loops of ribbon, and pin the loops facing in, like shown, every few inches or so. Continue the pinning and looping around the three sides.
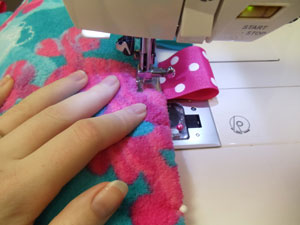
Once you have your blanket pinned, stick it under your machine and stitch a nice wide seam around those three pinned edges. I recommend a nice wide seam because we want to make sure we catch both sides with all that thick plush going on. Be sure you're also catching all the ribbons as you sew along.
Once you've stitched those three sides, turn your fabric right side out and push out the corners. Check out one of my finished corners! Nearly there...
Take that last open end and fold the raw edges in. I would recommend pinning it shut, and then adding the loops in between the layers. Remember, the loops face outside this time, like the rest of them!
Put your blanket under your machine one more time. Start at the top of your open seam, stitching down and closing it off, and continue all the way around! It's as easy as that.
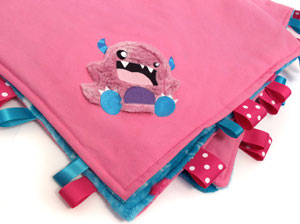
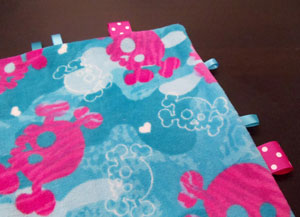
You're done! A totally adorable, totally plush, totally touchable monster tag blanket! Everything about it is inviting and touchable. Little baby will love playing with all the little loops and tags, touching the luxuriously plush fabrics, and even petting their own furry little monster! Who, by the way, looks just thrilled to be on this blanket, doesn't he?
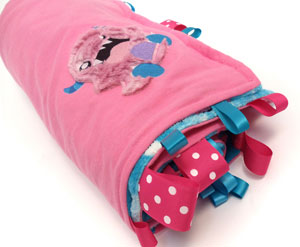
Plush and fleece fabrics are all the rage in fabric stores these days, and there are usually endless supplies of patterns and colors to choose from. There's no end to how many different blankets you could make!
Plus, now you now the secrets of stitching on plush and furry fabrics! A little trimming and a bit of thin stabilizer means you can stitch on the furriest of furs with ease. Don't fear the fuzz! It's a fabulous way to make your designs awesomely tactile.


