Designs Used
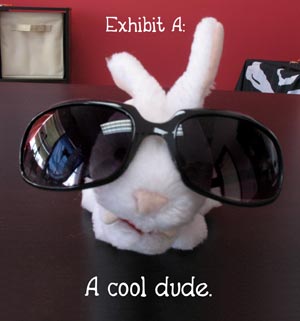
Presenting exhibit A: a cool dude.
Well, craft bunny is probably a dude. I always just assumed, and didn’t think it was polite to ask. And he’s cool, no denying that. So for all intents and purposes, we have here a cool dude.
Dudes are notoriously difficult to craft for. For some reason the embroidery industry hasn’t much tried to cater to dudes, and likewise they don’t seem to be too crazy about the idea of cute applique bunnies sewn onto their shirts. So, largely they have been ignored, which is a shame, because many of you have boyfriends, husbands and sons, or maybe you’re even a crafty dude yourself, and there’s very little out there for guys’ fashion. Well Urban Threads is a brave new world for guys and gals alike, and it’s time for the guys to get their fair share of crafty goodness. Today I’ll show you how to make a super hip guy’s shirt using dude-friendly designs and techniques.

To make your cool dude shirt, we’re going to pull out all the stops, and use a whole arsenal of crafty techniques, including embroidery, stenciling, bleaching, and artistic stitching. Combining all the techniques in our arsenal will help to cater to those hard to please, skeptical-about-crafting guys, and create a super hip shirt you’d pay hundreds of dollars for in a high-end store. By the way, all these ideas are great for girls’ shirts too.
To make your shirt, you’ll need a guy’s plain button-up shirt, some freezer paper, a spray bottle, bleach, an X-acto blade, some fun patching fabric, and some Urban Threads designs. I’m using a couple of embroidery designs, and one stock art design as a stencil.
I always find I get best results when I work with what the shirt already has to offer. The shirt I found has cool deep red contrast stitching, and some neat back and fourth stitch patterns that add a bit of interest. I thought I’d use these already present ideas in the shirt and use them to guide color and style choices. That way when your shirt is finished it will all work together as one cohesive design.
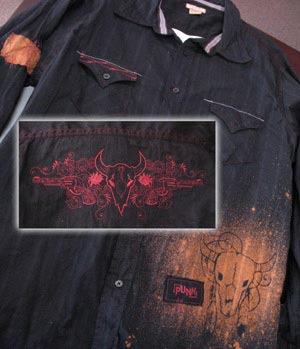
I decided in honor of our new guys’ western design I’m going to embroider on the back, I’d go with a grunge western theme. I thought I’d start with the bleach stencil first. I grabbed our other western design, somewhat ironically called Cowgirl, Baby. I removed the flower on the design, and it seemed manly enough.
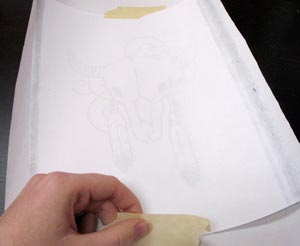
Cut a piece of freezer paper larger than your printout, and tape your design print side down on the shiny, waxy side of the freezer paper.
When you flip your freezer paper back over, you should be able to see your design from the other side. Time to grab those X-acto blades!
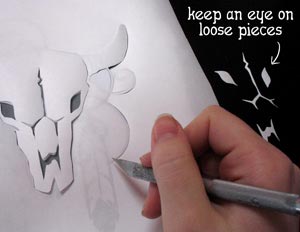
I thought it would be fun to play with a negative image of the design when I bleached it, so I cut out all the dark parts of the image instead of all the white. Be sure to keep those loose “floating” pieces somewhere safe as you cut them out. If this looks a bit familiar to you, it’s because it’s quite similar to the technique we used to make our stencil printed hoodie.
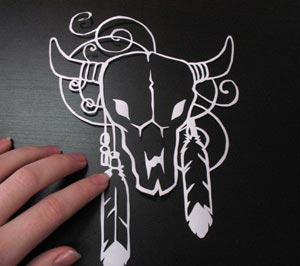
Here’s my design all cut out and ready, with the floating pieces put roughly back in place. What’s nice about this kind of stencil is that if you’re careful when you’re done bleaching with it, you can probably use it again.

Carefully place your stencil where you want it on your shirt, waxy side down. I put mine down on the lower left front of the shirt.
With your design resting on top of your shirt, stamp down on it with a hot iron. The wax will heat up and gently stick to your shirt, forming a firm seal against the bleach. Don’t try stamping everything at once, place the largest stencil piece down first, and then stamp the “floating” pieces down one at a time to get the best placement results.
There are a couple things to keep in mind when bleaching. First, it’s bleach. Work in a ventilated area and don’t wear your favorite clothes. Second, bleaching designs works best on mostly natural fibers. A 50/50 blend works fine. Third, you can never be sure what color your fabric is going to bleach into. The last black fabric I bleached in the Pen Pal Pillow tutorial turned blood red. This fabric bleached more an orange color. Try and test a tiny corner if you can.
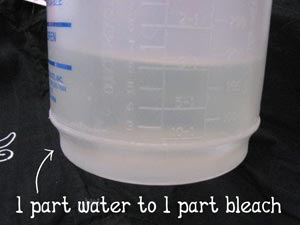
Once your stencil is ready, it’s time to get your bleach mix ready. Mix one part bleach to one part water in your spray bottle. You don’t need a whole lot of bleach mix unless you plan on saturating your whole shirt.
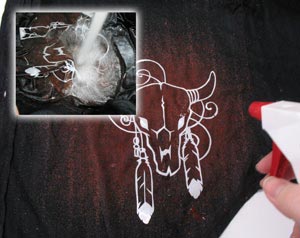
Before you begin, you’ll want to have some sort of water source nearby, to be able to stop the bleaching process as soon as it’s far enough along. Have a large bowl of water or a sink nearby.
Spray a light mist of bleach around your freezer paper stencil. Don’t worry if it’s messy, that’s part of the look. You can let big drops of bleach fall here and there, giving it a cool “grunge” look. The bleach usually only takes a few seconds before you can see results. Once your shirt has bleached visibly to your liking, rinse your design thoroughly under some water to stop the bleaching process. Don’t leave the bleach on too long. Bleach can eat through light fabrics such as cotton, if you leave it on long enough.
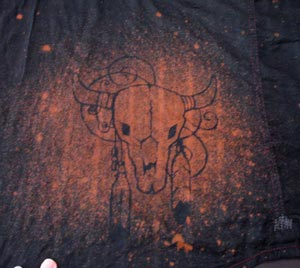
Here’s my bleached design once I patted it dry. The splatter bleach effect has a cool edgy look to it. The shirt also bleached cool stripes into my design. Lots on unexpected things can happen with bleach, but let them be happy accidents. Let them guide how you design your shirt.
For instance, I thought since the last black fabric I bleached turned red, this one would too, matching the red stitched accents already on the shirt. Instead it turned a cool rusty orange, and so I found some thread to match the new bleached color and incorporated it into my shirt design later.
To keep your shirt balanced, I think it’s nice to have another spot on your shirt that has the same bleached color as the stencil design. A great way of doing this is “patching” stuff. Rough edge patches are a popular new accent on shirts, and we can use that to our advantage...
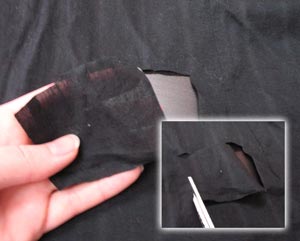
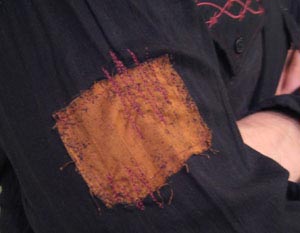
Cut out a small square from your shirt in a spot that will look cool with a patch over it. I cut this patch out from the lower back of the shirt. We’re going to bleach it and then stitch it on somewhere else on the shirt to add cool accents that match your bleached color. You won’t get the same color trying to bleach another black fabric, so you have to use a piece of the shirt itself.
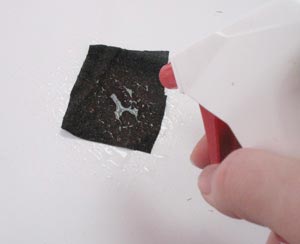
Bleach your little square scrap to the same level as your design, so the colors roughly match. Once you’ve rinsed it clean, set it aside for now. It’s best to do all your bleaching at once to keep the mess down.
When you’re finished bleaching, empty your spray bottle of bleach. If you store bleach in it, it will expand due to softening of the plastic and gasses from the reaction between the chemical and the plastic bottle. Not a great combination.
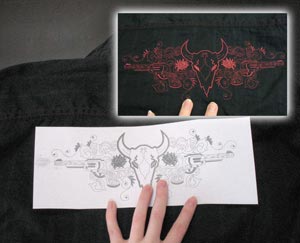
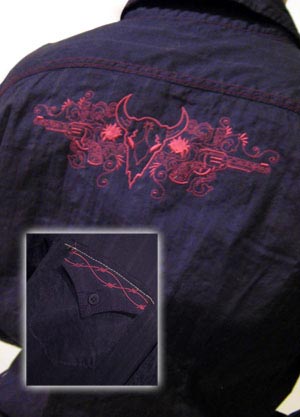
There are lots of great ways to use embroidery for men’s fashion. I’ll show you a few popular places for embellishment. One is on the back of the shirt, near the top. Long, rectangular designs work best for this. I used our cool dark cowboy design on the back shoulder blades of the shirt. Use the seam line along the shoulders to keep your design lined up straight.
If you’re not sure what color to stitch your design, look to your shirt for inspiration. My shirt had dark red seams, so I copied those colors. If your shirt doesn’t have any decorative seams, try a tone-on tone design. For men’s fashion, subtle stitching can keep it from getting overwhelming. Instead of a bold design, you’ll have a cool textural effect that adds a touch of class to the shirt.
If your shirt has pockets, I’ll show you a neat trick for embroidering borders on pocket flaps.
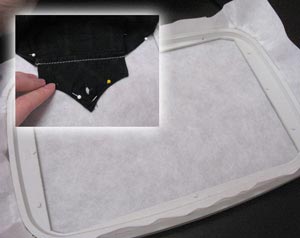
Hoop up a piece of cutaway stabilizer by itself. Take one of your pocket flaps, spray the back and stick it onto the stabilizer, making sure all the rest of the shirt, and especially the rest of the pocket, is out of the way.
Pin down the edges of the pocket and the excess shirt to keep everything in place. Keep the pins as far away as possible from where the design is going to stitch.
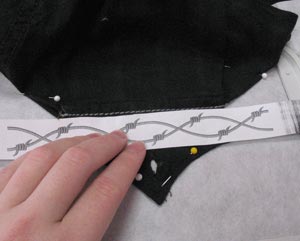
It may help to use a printed template of the design in order to know if it will fit or not. I’m using some good old fashioned punky barbed wire.
Center your border so that the design goes over the edges of the pocket. When we stitch it, the design will first stitch onto the stabilizer, then onto the pocket, and back onto the stabilizer again, so you have a complete border design that goes all the way across your pocket.
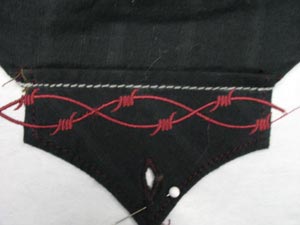
Stitch your design out. Ta da!
By letting the design stitch over the edges, you ensure a perfect fit for any border on any pocket!
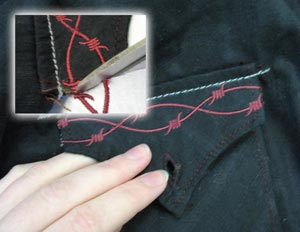
Snip off the excess stabilizer and stitching right at the edge of your pocket, cutting through the design. Snip off the rest of the extra stabilizer so it’s not visible from the pocket side.
Now you have a perfectly embroidered pocket, right up to the edges. For super thin borders like these, the threads probably won’t fray, but if you’re worried about your design coming undone, you can use special glue called “fray check” on the edges of your threads and they’ll stay put. This might be necessary if you’re trimming thicker designs.
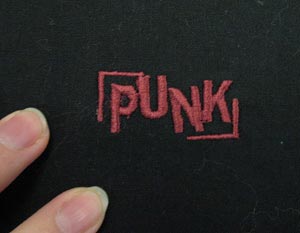
I also thought it would be fun to stitch some small embellishment designs I can patch on the shirt wherever I want. Not every part of a shirt is easily hooped, so stitching small designs and sewing them on as patches later is a great way of adding texture and interest to the shirt.
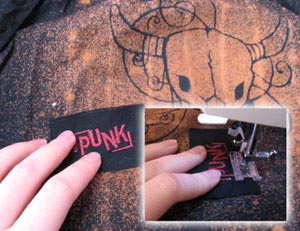
In order to bring some of the red stitching color back into the large orange expanse, I patched the “punk” mini near the skull design. Using the same color thread I used to stitch the design, I stitched around the edges of the patch a couple times.
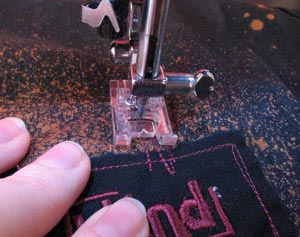
To add some more punk flair, I mimicked the large zigzag stitching I saw on other parts of the shirt over one of the edges of the patch. You can do this freestyle with your machine, just stitch back and forth a couple times at zigzag angles.
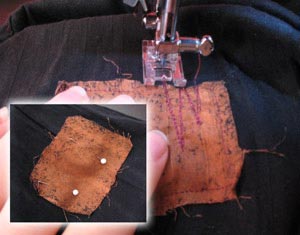
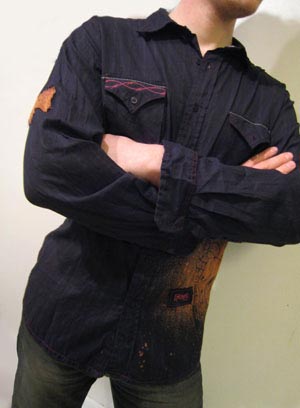
Remember that bleached patch of fabric? Time to stick it back on your shirt! I added mine to the top of one of the shirt sleeves, on the opposite side as the bleached design, to help balance out the orange color.
The side of shirt sleeves is a popular place to add patches or designs on men’s shirts. Because there’s no way of hooping a sleeve unless you rip it open, patching it a great way to add a design here. You’ll probably have to remove the extra part of your machine to fit the sleeve underneath. I used the same red color to stitch a seam around the patch, and then added some fun zigzag accents.
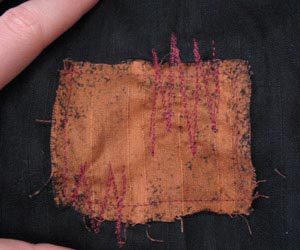
Here’s what my patch looked like after I added the fun accents. The rough edges and hand stitched details add a lot of style and character to your shirt. You have to pay a lot of money to get these kinds of details on store-bought shirts.

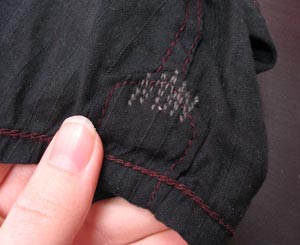
Finally, it’s time to patch that hole you cut out to make your bleached patch. Grab some fabric that’s roughly the same color as your shirt. Using matching colors but contrasting fabrics is another fun way to add funky accents to your shirt.
Cut a piece of fabric that’s about 1/2 inch larger than your hole, and pin it in place, making sure it overlaps all the edges. Sew a seam around your new patch, making sure it catches all sides of the hole. I stitched one seam in the usual red color, and then found some other thread that matched the rust orange color of the bleached fabric and sewed another decorative seam. Once it’s stitched, you can rough up the edges of your patch by rubbing a fingernail along the edge.
Your shirt is finished! At least, if you want it to be. Now you know all sorts of tricks for stenciling, bleaching, embroidering, and patching, you can combine these techniques in as many ways as you can imagine to come up with a truly awesome shirt and guy would be proud to wear. We’re not talking fluffy bunnies this time – these shirts are truly one of a kind, hip and handmade.
This rough edge grunge look is great for girls and gals alike. I would have loved to make a shirt like this for myself, but the point was to demonstrate guys’ fashion, so I guess I’ll just have to make another one.
By combining lots of the crafting techniques, and utilizing not just embroidery but stock art, you can create multi-layered effects on clothes that cost a fortune in boutiques! Plus, by blending it in with features your shirt already has, no one will ever be able to tell where the shirt begins and your embellishments end.

You know how to bleach in cool stencils for a professional screen printed effect you can achieve with the simple household ingredients of freezer paper and bleach...
You can add awesome embroidery embellishments anywhere on the shirt, through normal hooping, special ninja techniques for things like pockets, and even patching for those parts you just can’t figure out how to hoop.
And of course you can just add cool touches through artistic patches and neat hand done stitching!
Your embroidery machine can be used to make wicked cool clothes for both guys and gals. Guys are just as into the handmade movement, just as long as they know it can be done without involving appliqué bunnies. Plus in this economy, stitching up your own designer shirts is a super swank and thrifty way to still look your best.


