Capture the beauty of framed butterflies like a real entomologist with a little organza and your embroidery machine! This tutorial will walk you through the steps to make a vivid three-dimensional wonder on fabric, perfect for shadowboxes and much more.
Get close to the action -- check out the Embroidered Butterfly Shadowbox video to see how it's done!
Supplies
To get started on your 3D Butterfly Shadowbox, gather these supplies:
- 3D Butterfly (Applique) embroidery design(s)
- Organza fabric for the wings
- Heavy duty water soluble stabilizer, such as Sulky Ultra Solvy or Vilene
- Fabric for your backdrop
- Medium weight cutaway stabilizer
- Temporary spray adhesive
- Printed templates of your dielines
- Thread and matching bobbins for each color
- Scissors
- Ruler
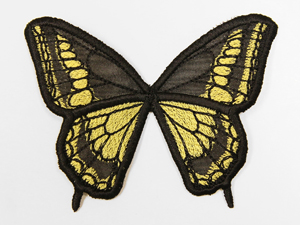
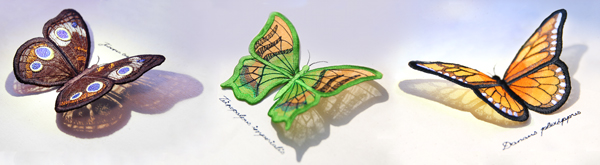
Designs Used
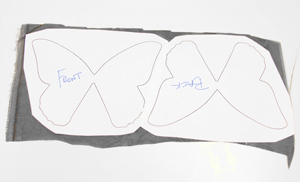
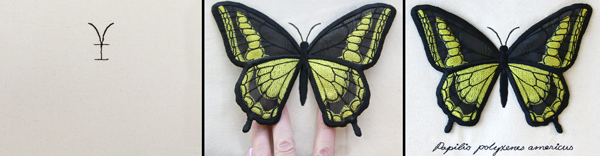
First things first: Use the dieline templates, labeled with a "DL" in your zipped design files (for example, UTZ2241_dl) to cut out the applique pieces from your organza fabric. There will be a "front" and "back" side.
Note: It helps to use a little temporary spray adhesive on the back of the paper, adhered to the organza before cutting.
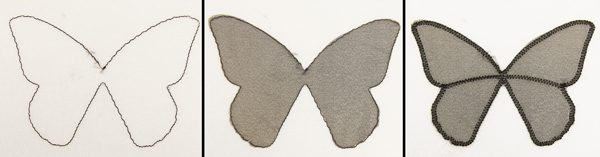
To begin your embroidery, hoop up a piece of heavy duty water soluble stabilizer, taut in the hoop. Make sure to match the top and bobbin thread color to your organza color for best results. The first color change will stitch a dieline onto the stabilizer. Spray the back of your "front" organza piece and carefully place it within the boundaries of the stitched dieline. The next color change will stitch the front piece tackdown.
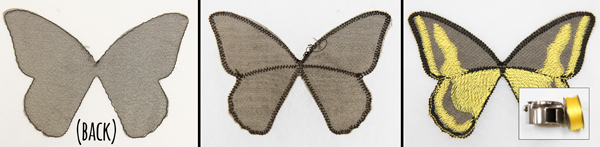
Next, carefully slide your hoop out from the machine (do not unhoop the stabilizer) and use temporary spray adhesive to adhere the "back" piece of organza to the back side of your embroidery. A back piece tackdown will then secure the fabric in place.
Once this is finished, change your top and bobbin thread to your selected wing color (in this case, yellow). This will then stitch the wing details.
Change your top and bobbin thread back to your first color to finish embroidering the wing details and satin border of the wings.
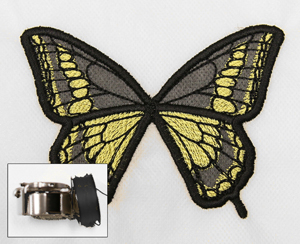
After the butterfly wings are finished embroidering, remove the water soluble stabilizer by soaking the embroidery until the stabilizer dissolves.
Make sure your wings are completely dry before proceeding to the next step.
To achieve the 3D effect of your butterfly, we will use the wings as an applique piece to your final project fabric. Start by adhering a medium weight cutaway stabilizer to the back of your fabric with temporary spray adhesive, hoop both fabric and stabilizer taut for best results.
The first thing to stitch is the wing placement dieline. Spray the middle section of the wing piece with temporary spray adhesive and place the center of the body within the middle two horizontal stitched dielines. A wing placement tackdown will stitch, along with the butterfly body, then the text in the design.
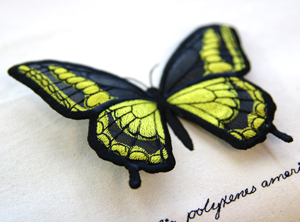
The result is a delicate 3D butterfly!
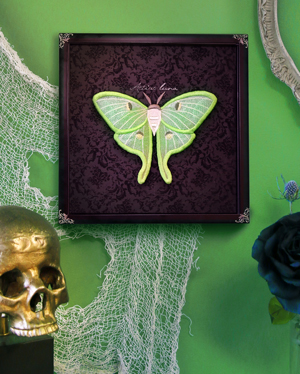
Finish off your piece by framing it in a shadowbox! This beautiful piece is ready for your home gallery or simply adding a boutique feel to any room.
Create a whole collection of different butterflies and moths with the Winged Curiosities collection, available now!


