When attending business or networking events, I prefer to wear items from my collection or something that resembles my designs -- It's how I like to represent myself!
Most times we don't have the time or energy to create an entirely new outfit (especially when the event is just around the corner) -- that's why I love the embroidery designs being created here at Urban Threads! Rather than design a whole new look, I am able to pick a design that suits my sensibilities and elevate an existing garment, like using mirrored embroidery designs to dress up the shoulder caps of a shirt.
For this tutorial, we'll use a simple design to elevate an old item and create a fresh look for you!
Supplies
To get started on your embroidered capped sleeve sweater, gather these supplies:
- Your favorite applique embroidery design (We used the 5" x 7" version of the Aquarius - Compass)
- A sweater (new or used)
- Sheer mesh cutaway stabilizer, such as Sulky Soft 'n Sheer or Floriani No Show Mesh
- Temporary spray adhesive
- Printed templates of your design(s) for placement
- Thread for your embroidery
- Scissors
- Ruler
- Air erase marker or tailor's chalk
NOTE: Tailor's chalk is best for marking dark colored fabric, as it tends to last longer and show up better. However, this wax-based tool may leave residue if used on some synthetic fabric. It is best to test a small corner of the fabric before committing to chalk.
Designs Used
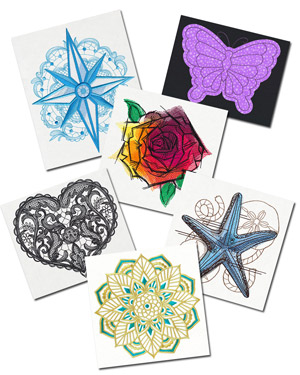
Here are a few things to consider, when selecting a design for this project:
- Consider the area the design will cover, before selecting the size of the design
- For balance, a design with symmetry may work best
- Avoid using a design with a large, open areas
- The design shouldn't be too dense, or it will look and feel stiff on your shoulder
- Consider how it will look mirrored - it's best to avoid designs with text
Shown here: Aquarius - Compass, Flash Stitch - Butterfly, Blazing Rose, Delicate Lacy Heart, Nauticus - Starfish, and Bohemian Gold - Lotus Medallion.
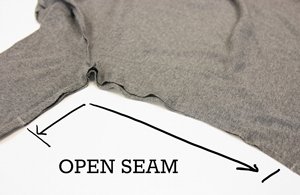
Let's get started! In order to successfully hoop our fabric and stabilizer, seam ripping is a must! Start about 1.5" away from the shoulder sleeve seam and open the side seam(s) of the sweater. Avoid opening the seam further than 12" below the armpit.
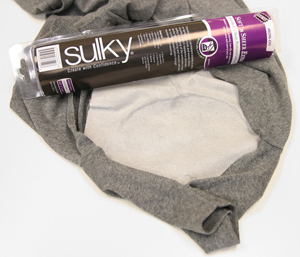
A sheer mesh cutaway is your best option for lighter-stitching apparel designs. It is more flexible and softer against the skin than regular cutaway or tearaway stabilizer.
To apply stabilizer, turn the garment inside out; laying the sleeve cap out as flat as possible. Spray your stabilizer generously with temporary spray adhesive, and smooth it onto the back of the sweater in the area to be embroidered.
When applying the stabilizer, avoid stretching the fabric as much as possible.
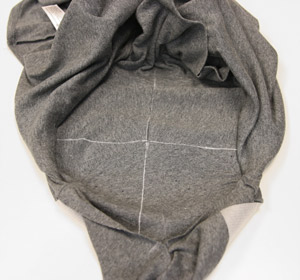
Now for placement. Using printed templates of your design will make it easy to map out exactly where each embroidered piece will go. (Here's more on how to print templates.)
Turn your sweater right-side out and place the design template on the cap of the sleeve. You may be able to use the shoulder seam to align your design. In this case, the seam lays directly at the center of the shoulder. (Note, this may not work for all sweaters.)
Using chalk, mark the center and the vertical axis points of the design onto the sweater. Use a ruler to draw a straight line connecting and extending the two vertical marks. You will need these to line up exactly with the crosshairs on your embroidery hoop.
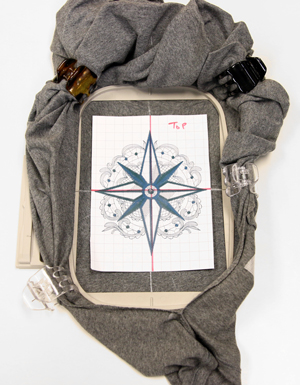
Line up the vertical and horizontal axis points you've marked on the shirt with the crosshairs of your embroidery hoop. Hoop your fabric and stabilizer together, taut for best results.
Keep excess fabric out of the way and clear of your embroidery needle with hair claw clips.
Center the needle with the center point of the design. Start stitching!
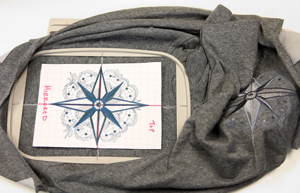
To mirror your capped shoulder from one side to the other, use the existing seam on top of the shoulders as a guide. On your embroidered shoulder, measure the distance from the seam of the shoulder from the neck to center point of your embroidery design (using your template). Note the distance from one side to the other to ensure even placement.
Use that measurement to mark the center point on the other shoulder and place your mirrored design template.
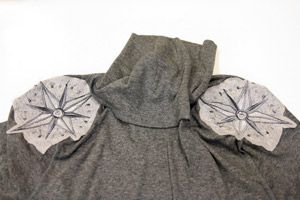
Hoop and embroider the other shoulder cap and embroider a mirrored version of the design.
Once the embroidery has finished, snip loose threads and carefully remove excess stabilizer around the back of the design.

Time to close those side seams! Use pins to hold the seams together evenly.
For sweater with a lot of stretch, use a tight stitch (10-12 stitches per inch). Leave the same amount of seam allowance that the sweater had before seam ripping and don't forget to back-tack!
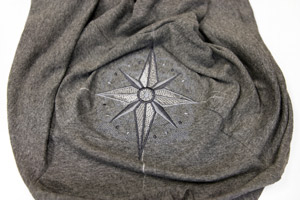
Snip any loose threads and use steam to remove any left over chalk lines.
You've successfully created a stylish new garment!

Whether you're looking to leave an impression in the office, or out on the town, this is a great way to upcycle plain or old garments into exciting new statement pieces!


