
Dress up gifts and more with uniquely stylish fabric bags, stitched entirely in-the-hoop!
This tutorial will show how to make two different kinds of in-the-hoop bags -- drawstring bags , and tie closure bags . Make sure you know which kind of design you're working with before you start.
Supplies & Materials:
- Fabric for your bag - something on the light side such as quilters cotton is good
- Printed dieline templates ( here's how )
- Tearaway stabilizer
- Ribbon or cord to close your bag
- Temporary spray adhesive
- Scissors and tape
- Safety pin or paper clip, if you're stitch a drawstring bag
The designs used in this tutorial include:
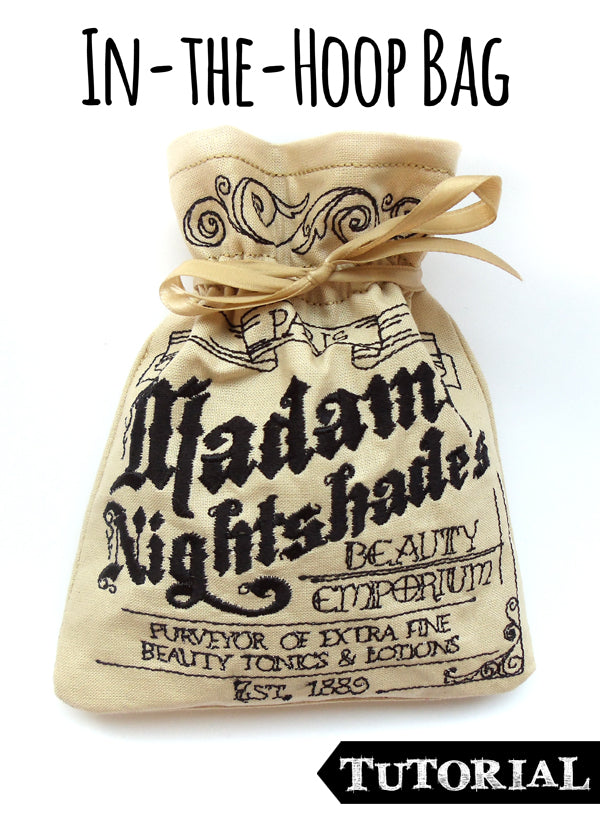
- Madame Nightshade's Bag (In the Hoop)
The instructions for the drawstring bag and tie closure bag are pretty similar -- we'll call out the differences as we go along.
For either kind of bag, start by cutting out the fabric pieces for the bag. Take a large piece of fabric, enough to fit your template (or both templates, if you want to do to them at the same time) then lightly spray the back of your printed paper dieline template and place it on top of your fabric.
You do not need to back this piece of fabric with any stabilizer.

Carefully cut out your bag shape, following the printed template. Repeat this process again to cut out another one for the back.

Now we need to add a fold to the top that will become the run for the drawstring. You can see on your template where it folds, just at the top. To make the fold nice and crisp, it’s best to press it with an iron.

Repeat this process so you have the two sides of your bag, pressed and ready to go.

To give your bag a nice polished edge on the top, take one of your fabric pieces, lift up the pressed flap, and give it a nice even coating of spray adhesive underneath. Then, smooth the flap closed so it’s stuck in place.
For a drawstring bag , do this to only one of the pieces (for the back -- the front needs to be open for the drawsting).
For a tie closure bag , do this to both pieces.

On to the assembly! Here's how you make your bag. We're showing the drawstring bag here -- the tie closure bag is pretty similar, but we'll show that in the next step. Hoop up a piece of tearaway stabilizer. The first thing to sew will be the dieline that tells you where to place your fabric.
Once that has sewn, grab the fabric piece for the front of your bag (the one you didn't seal the flap on) and lightly spray the side with the fold with temporary spray adhesive. Place the fabric inside the dieline, with the flap hidden in back.
A tackdown will stitch, including a channel for your ribbon, and then all the inside details.
Now it's time to grab the back piece you prepped before. Lightly spray the front of that piece with temporary spray adhesive, and place it flap side up inside the same dieline, right on top of your other fabric piece.

The tie closure bag , below, works similarly. First the dieline stitches. Lightly spray the back of one of your fabric pieces with temporary spray adhesive, and place it flap side down inside the dieline. Then a tackdown stitches, followed by all the design details.
Here's the part that's different: after that happens, you'll want to tape your two cords/ribbons over the side seams near the top, long sides facing inward (and held out of the way of the seam line), one on each side.
After that, grab your other fabric piece, lightly spray the front with temporary spray adhesive, and place it flap side up inside the same dieline, right on top of your other fabric piece.

For both bags, the final dieline will sew, and then you can un-hoop your bag!
Carefully tear your bag free from the stabilizer.

For the drawstring bag , before you turn it right side out, you'll need to feed the ribbon through the channel.
To start, tie one end of your string to a paper clip or closed safety pin. This will help you feed the ribbon through the track.
This part is a little bit tricky to find. You want to feed it through the folded edge of the stitched side (NOT in between the two main layers!) It can be a little difficult to find at first but you can tell once you’ve got your ribbon in the track.

Once you’ve found your way into the track, work the ribbon through out to the other side. Pull the ribbon so you have a little bit coming out each side. Leave the safety pin on for now; we’re not quite done with our ribbon...

Turn your bag right side out, and push out all the corners. You’ll notice your ribbon ends up inside your bag. Don’t worry, we’ll fix that...

Now you’ll want to feed the end of your ribbon back out the little hole on the side of the bag. This is probably the same place that you accidentally tried feeding it through once before. Or maybe you’re better at this than I am, and got it right the first time.
It’s not nice to brag.
Once you have this side fed through, tie your safety pin to the other side of the ribbon and feed it through the other edge.

That’s it! Your drawstring is ready...
To tighten up your bag, grab one end of the ribbon and bag to keep it in place, and cinch up the other end. Repeat this process for the other side to cinch it up tight.
The back piece, though not cinched, will mostly close on its own with the rest of the bag.

To get an extra secure closure on your bag, wrap your ribbon around the back and then tie it up in the front. Easy!

An adorable little drawstring bag, made all in the hoop and perfect for all those little beauty products and soaps around the bathroom.

Use it to hold fancy soaps, little makeup tubes, or whatever you like! Everything will look extra cute, a little bit vintage, and even a little bit French with this adorable bag.

Stitching a tie closure bag ? Here's what it looks like once you tear it out of the stabilizer. Turn it inside out...

...and you've got this! A neat little fabric bag, with one cord coming out of each side seam.

Fill your bag with whatever treats you're putting inside, scrunch the top closed, wrap the cords around the top, and tie 'em in a pretty bow.

Ta daaa! Your gift is extra festive wrapped in a fabric bag that you made yourself.

No matter the season or occasion, these bags are the perfect way to present little gifts in style!
