The holidays are a time to eat, drink, and be merry! These occasions usually come surrounded by friends and family, and often these gatherings mean you’ll be bringing over a small token to your gracious hostess. A bottle of wine is always an excellent choice, but it’s Christmas. You can’t just let it sit as is! Everything gets a little bit of a jingle bell touch, and this easy to make wine cover is a crafty and chic way of presenting your wine at any party.
Supplies
So, to make your festive wine cover, you’ll need:
- Outer fabric
- Lining fabric
- Awesome festive embroidery design (I used the Baroque Noel tree)
- Cutaway stabilizer
- Scissors and pins
- Ribbon
- Safety pin
- Ruler and fabric pen (which I discovered later are very useful to have around! I didn’t think of them at the beginning)
Designs Used

Let’s start with that embroidery! Hoop up your outer fabric with some cutaway stabilizer. I picked this festive shiny red. I thought it would make my bag look extra luxe for the holidays. Stitch your favorite festive design, like this Baroque Noel tree. Designs around 5"x7" or smaller are best for a wine bag.

Once your design is done stitching, un-hoop it and carefully trim away as much excess stabilizer from the back as possible. This will help keep from making your bag too stiff.

Now we can cut our pieces and make them ready for sewing.
Cut your fabric into rectangles 6 inches wide and 14.5 inches tall. Try to keep your embroidery at about the middle of your rectangle, like so.

So, each of these pieces needs to be stitched a little bit differently to get everything to line up at the end. For your cover, you’ll want to leave two gaps along your seam, about a half inch wide, like so. For the lining, you’ll want to leave a small gap in the bottom for turning. Got that? Cool. Let’s get started...

Here’s my lining pinned right sides together. I added a pin at the bottom to remind myself not to stitch that gap closed!

You’ll also want to pin your cover pieces right sides together, so the embroidery is facing in.
Use your ruler and pen (a fabric pen would be much better, but at least this is the inside of my fabric) mark that half-inch gap on your fabric, so you know exactly where to stop stitching. A ruler will make sure your gaps are evenly spaced on both sides. You’ll want this gap about 3 inches down from the top of your fabric.

Now that everything is marked and pinned, we can get to sewing!
I started with my lining, sewing around the three sides but leaving a gap at the bottom.
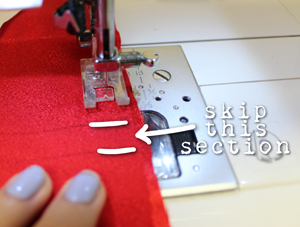
Next sew around your cover fabric. Sew a seam around the sides and bottom, but be sure to skip those marked sections to leave a gap on either side! This is an important step when we add the drawstring later.

When you’ve sewn your cover piece, there’s an extra trick we can use to make those drawstring holes nice and tidy.
Press those seams open on either side so you can clearly see the opening. Then, stitch a small rectangle all around the opening, catching the seams. This will hold those seams flat and ensure your drawstring opening won’t fray. Do this on both sides.

Now we have the lining and the cover ready to become one!
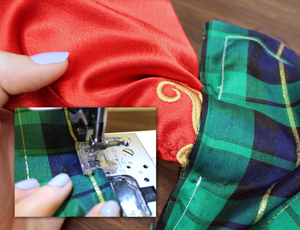
With your lining fabric facing wrong side out (which is how you stitched it, so you shouldn’t have to do anything) slip your cover fabric inside.
Your cover’s side with the embroidery should be hidden against the lining, so that when you look inside, you can see the back of your stabilizer. Carefully line up the tops of these two fabrics, and sew a seam across the top to make them one.
Remember that hole you left in the bottom of your lining? Now is where it’s important! Once you’ve sewn your seam around the top edge of the bag, pull your bag right side out through this opening.
Once it’s right side out, take a moment to stitch that small opening closed before you stuff your lining down inside the cover.
Once your lining is pushed back inside the cover, you can sew around the top edge again to get a nice, flat seam.

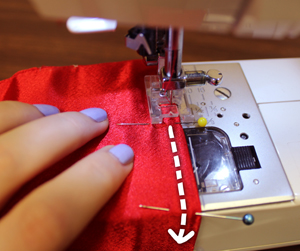
Now it’s time to stitch that fancy drawstring run. Stitching through both layers (your cover and your lining) sew a straight seam all around the cover starting at the bottom edge of your drawstring hole. If it helps, you can use a ruler to mark it so you make sure it lines up on both sides.
Then sew a second seam around your bag starting at the top edge of your holes.

When you’re done, you should have a straight track for your ribbon to run, lining up with the neat and tidy openings you left on either side of your bag, like shown.

One more step, while we’re sitting at our sewing machines...
Turn your bag inside out again, but make sure you push out the corners at the bottom of your bag, so the lining and the cover are snug together. Pinch the bottom corner of your bag like so, making sure you’re catching not only the lining but the cover too.
Pin this flat in place..

Sew a seam across this corner about one inch in from the top. This is going to square off the bottom of our bag so we don’t have floppy edges once we stitch a round bottle inside. Do this to the other corner too.
Once you’re done, you can clip off the excess fabric.
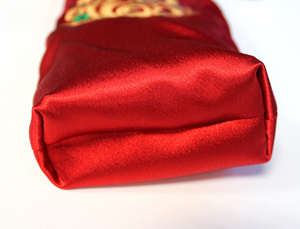
Turn your bag right side out again, and push out those new corners. You’ll see your bag is a bit more tailored now to the shape of a bottle.

Now for the final step... the ribbon!
You can use any size ribbon you like, as long as it’s not too wide to go through the track you stitched. Attach your safety pin to one side of your ribbon, and use it to guide your ribbon through the opening and around the sewn track.

I gave myself a lot of excess, and then cut the ribbon and tied it securely in a loop.

To hide this tied end, just pull your ribbon until the knot is hidden back inside the track, and you just have two simple loops hanging out either side. You’re done!

Slip your wine inside its cushy new cover, and cinch and tie your top closed. It’s now ready to become a delightful gift for your next holiday event!

The holidays are a perfect time to get crafty and cozy, even with wine bottles. It’s an easy way to show off your favorite festive designs and dazzle at your next dinner party.


