Everything needs a little sprucing up now and then...
I have these green lampshades in my bedroom that the previous owners left behind when we bought the house. The bedroom used to be green, but we painted everything a bright, soothing white. The only things left behind are those stupid green lampshades. Since I'm far too lazy and/or cheap to just go out and get new ones, let's revitalize them with a whole new look.
Some embroidery and some ingenuity and we can re-cover a lampshade with whatever design we want!
Supplies
Let's start with the basics. You’re going to need:
- A lampshade. Shocking.
- Some cutaway stabilizer
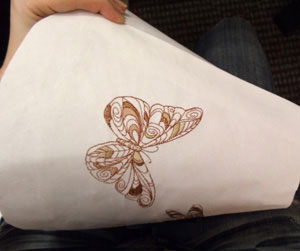
- Some fairly light-stitching designs (like these awesome doodle style designs)
- Spray adhesive
- Matching thread and thick sturdy needle
- Masking tape
- Craft glue or hot glue
- Pencil
- Fabric
- Sheet of white paper (if you want to make a template)
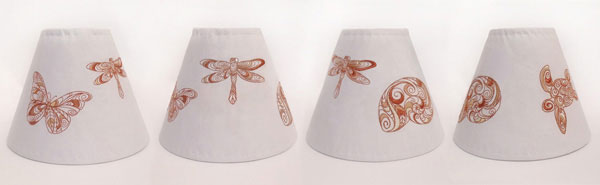
Designs Used
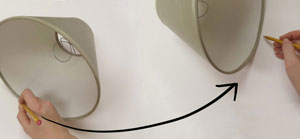
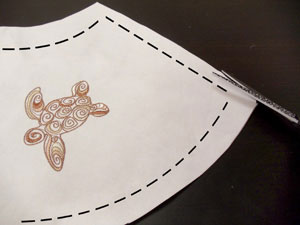
The first thing to do is to mark out the shape of your shade. If you’re only doing one lamp, you can just mark this right on your fabric, but I found it useful to draw it on a piece of paper so I can use it over again.
Start by placing your shade seam side down on a piece of paper. Slowly roll the shade across the paper, and with a pencil trace the line along the bottom edge of the shade, where the lamp rolls. Continue along this line until you meet up with the seam again. Draw both the top and bottom lines of your lamp.
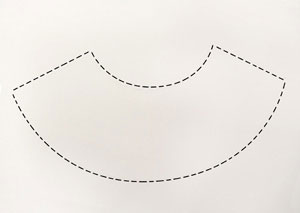
This is essentially the shape you’ll end up with when you’re done, though it can very depending on how curved your lamp is.
(No, I didn’t draw it on the paper with thick dotted lines, I thought I’d bold it up a bit in Photoshop...)
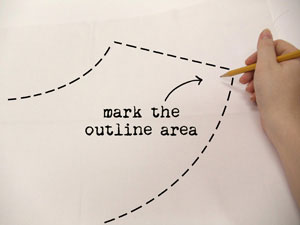
So, if you did trace it onto a template, you can either put it under your fabric (if it’s white and see-through like mine), or cut it out.
Lightly mark the edges of your template, so when you’re stitching your designs, you know where they’re going to end up on your finished lamp.
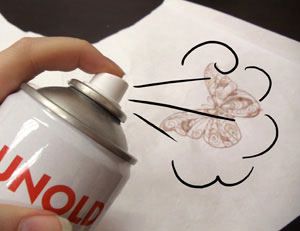
Now, if you can, cut a piece of stabilizer large enough to cover your whole lamp area. That way the overlapping pieces of stabilizer won’t show up on your finished lamp, you’ll just have one smooth surface.
Give your stabilizer a generous coating of adhesive, and smooth it onto your fabric.
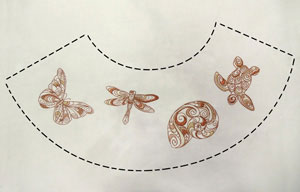
Hoop up your designs one by one, and stitch away!
Take care to keep them inside the shape of your lampshade (unless of course you’re going for a design that overlaps the edge... if that’s the case it better be a very light design!)
Once you’re done stitching, it’s time to trim it down.
Keeping in mind the marked edges of your shape, give yourself an extra 1-2 inches all the way around so you have plenty of extra fabric to wrap around the edges.
Remember, don’t cut away the stabilizer! Just cut it to shape like the rest of the fabric so it doesn’t show through, especially when you switch on the light. You don’t want ugly stabilizer shadows to ruin the look of your lamp.
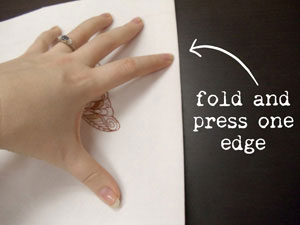
To give your lamp one finished edge when we wrap it, you’ll want to fold and press one edge of your curve. It doesn’t really matter which side, but know that’s the side that will end on top when you’re wrapping your lamp.
If you really want to make it snug and folded, you can always stick it under your sewing machine and sew a seam down the side to keep it pressed.
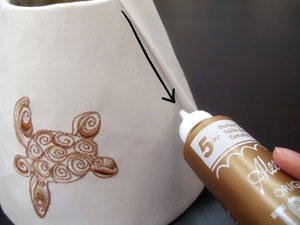
Once you’ve cut and pressed everything, give the stabilizer side of your fabric a heavy but even coating of spray adhesive. This will help it stick smoothly to our lamp shade when we wrap it on.
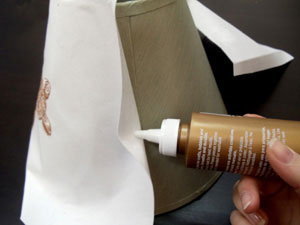
To begin, start on the side that’s unfinished (the one you didn’t press) and run a line of glue down the inside. This will hold the edge firm while we wrap the fabric.
Gently but firmly tug your fabric around the lamp shade, smoothing it along as you go. Keep the pressure snug to remove any wrinkles. Eventually, you should come back around to where you started, and only have that overlapping edge on top.
You can leave that last edge unsecured for now, just let the adhesive hold it in place.
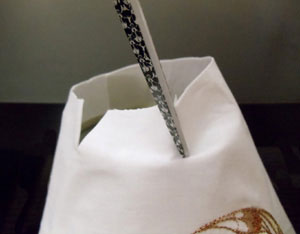
Now we need to wrap the top and bottom around our shade to make everything snug!
If the curve at the top of your lamp is pretty small, like mine, you may want to snip some notches into the fabric so it doesn’t bunch as much when you wrap it over the edge.
Grab your tape!
Ok, this may not look super professional right now, but trust me, the tape will hold your fabric nice and snug until we’re ready to finish it.
Tugging and wrapping the edges tight, carefully tape your way all the way around the inside of your lamp, both the top and the bottom. Don’t tape too close to the edge of the lamp, just tape the top of your fabric to hold it in place.
When you’ve worked your way around to that pressed edge, run a line of glue down the back of the fold, press it in place, and then use the tape to tightly wrap the last of the fabric inside the lamp.
OK, so from the outside, your lamp should be looking pretty rockin. The fabric is snug and smooth to the shade, with no wrinkles or lumps and bumps.
However, if you ever look at your lamp shade from an angle where you can look inside, well...
ick.
All that messy tape doesn’t look so good. Let’s put something in place to hold everything together in a much neater fashion!
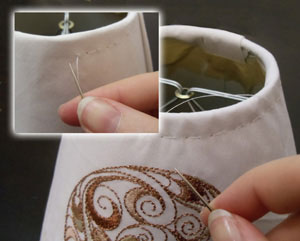
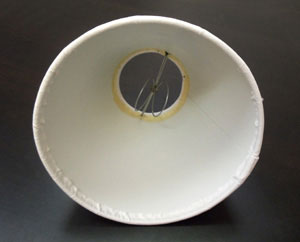
Grab that big ol’ honking needle and thread! That’s right, we’re going to stitch this puppy in place so it doesn’t go anywhere!
Don’t panic, it’s actually quite easy. Just stitch below the natural seam of your original lampshade (it’s usually much too thick to get a needle through near the very top) and use nice large stitches to sew your fabric in place. You don’t need to make them super tight or small, big stitches like these will hold everything in place just fine.
I started at the top of my shade, at the smaller opening. This one is a little tougher to get into if it’s a small shade, but pretty quick to go around.
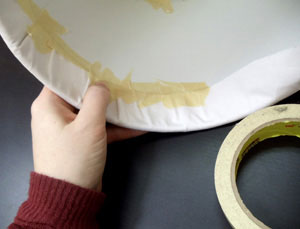
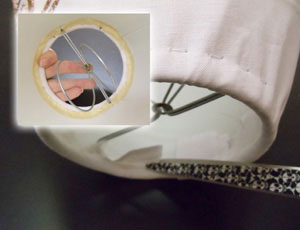
Once you’ve stitched it in place and tied off your thread, remove the tape and then carefully snip away the excess fabric. If you didn’t do a super neat job, like I’m occasionally guilty of, you can cut a thin but neat piece of tape, and run it just around the edge of the fabric, keeping it clean and even. If the color of the tape bothers you, you can even paint it to match the inside so it becomes invisible.
Now it’s time to stitch the bottom! Use the same, quick stitches to go around the bottom.
Because this area is much wider, it should be pretty simple to cut a nice neat edge to your fabric when you trim everything down.
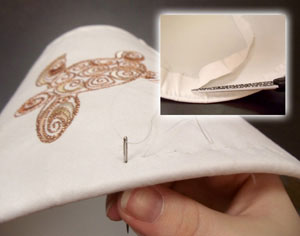
Look now nice and neat that is! The fabric is smooth and snug to the surface and everything is neatly and craftily stitched in place.
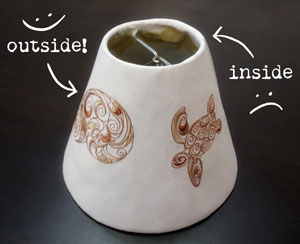
And now you have a brand new beautifully recovered lamp shade that can match any room or decor. Simply cover it with fabric, or embroider all your favorite designs and show it off!
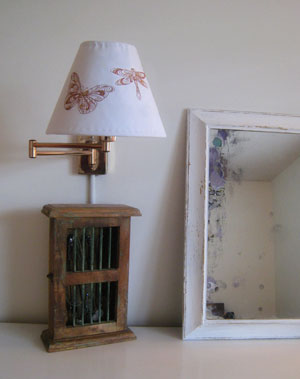
There! Much better. My lamp shade now matches all the rest of the pretty white of my bedroom, with just a bit of metallic embroidery to make it pop.
It’s easy to add a little embroidered style to anything, isn’t it?


