At some point, all guys need em', whether they would like to admit it or not.And let's face it: when the choices are "striped," "blank," or (heaven forbid) "novelty Garfield," other options have great appeal. Add some crafty sophistication to your formal threads with a sleek embroidery design.
Designs Used
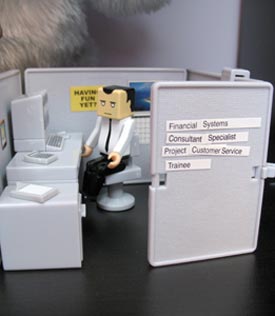
Meet Cubicle Bob. Cubicle Bob lives in our studio.
Cubicle Bob sits all day surrounded by gray walls, working hard at being a Financial Systems Consultant Specialist Project Customer Service.... er... Trainee.Hey, there were a lot of sticker options that came with Cubicle Bob.
Bob has a dull life.Bob needs some excitement. But what could Bob do to spice up his life when all he has to work with is four cube walls and a white collar wardrobe?
Lucky for Bob, Urban Threads comes to the rescue.
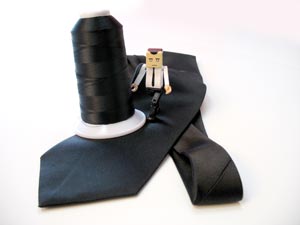
Bob needs a new tie! You don’t have to stay in the realm of tea cozies and embroidered frocks in this brave new handmade world. Crafty things can be made for man and woman alike, and our guy here would definitely appreciate the creative touch. All we need is a standard tie, and an embroidery design. There are a few designs on the site that have been specifically made for placing on ties, but you can use anything that will fit.
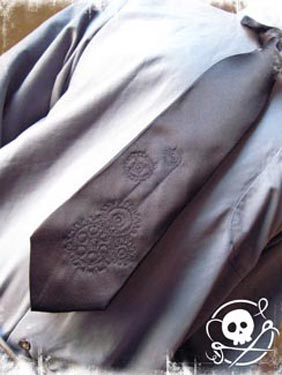
I decided to give Bob a classy tone on tone look for his tie, so I picked a thread that’s the same color as the tie fabric. For a tone on tone tie, the shinier the tie the better, because the stitching will indent the tie and the light will play off the surface nicely.
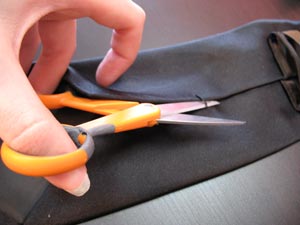
First, I flipped the tie over to snip the back seam, and opened it up.This is so I wouldn't stitch through the back of the tie -- the backside of the embroidery will be hidden inside the tie, rather than visible on the backside.
Before I cut the seam, I took a quick gander at how the tie is sewn together so I could fix it back up after I'm done.
If your design is on the taller side, you might have to snip up past the back loop, so examine how that’s sewn together, too.
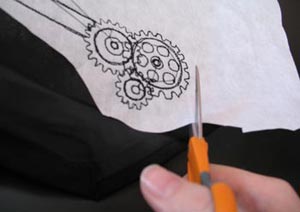
For my tie design I chose the Steampunk Cogs tie design. They should look cool, tone on tone with my nice shiny tie.
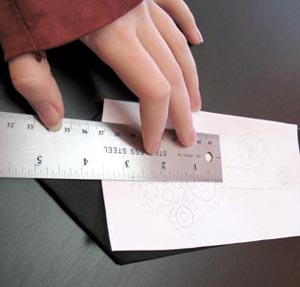
I have embroidery software that can print templates, so I printed one to figure out the exact placement. That's a great way to make sure the tie is wide enough to accommodate the design.
I placed the template on the tie and sort of "eyeballed" where it should go. I measured from the bottom point of the tie to the middle marker on the paper template. It was about 5 inches.
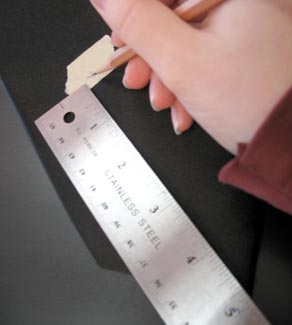
I put a piece of masking tape where the center point was. Masking tape is cheap, handy, and shows up on dark fabric.
Then, I measured up the 5 inches and made a mark on the tape.
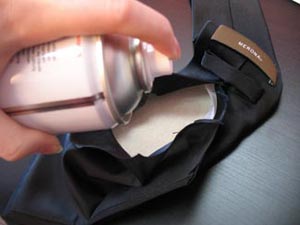
The tie has a few layers of fabric in it, and I don’t want these shifting around when I'm embroidering, and making a lumpy tie. Lumpy ties aren’t especially hip.
To keep this from happening, I pulled back the layers of the tie and sprayed a bit of adhesive behind each one before smoothing it flat again. This will keep the tie nice and sleek.
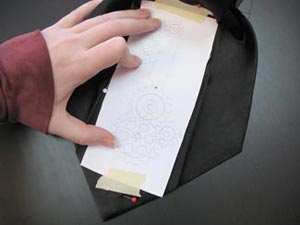
I flipped the tie back over, keeping it spread open, and used the center mark to reposition the template.I taped the top and bottom so it wouldn't move.I also pinned the fabric of the tie together as an extra precaution. I recommend that you pin the tie securely together at the top, bottom and corners.
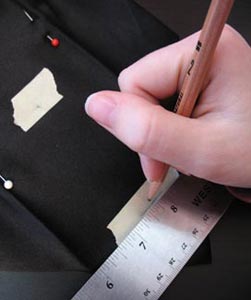
I found the widest section of the tie, right before it begins to narrow to the point, and marked that area with masking tape. I used this spot to measure upwards to the design center. It's a heck of a lot easier than trying to measure everything from the pointed end. My measurement was about 3 1/4 inches from the wide spot on the tie to the center of the design.
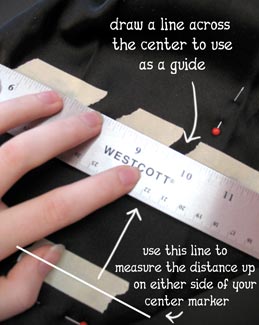
I taped two pieces of tape on either side of your center mark, roughly even with it. Then I measured up that same amount (3 1/4 inches) on either side and drew a line across the center.
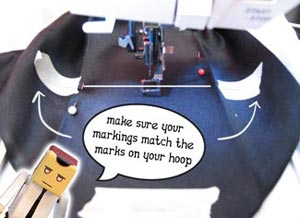
This line was very important, because I used it to line up the tie with the markings on the hoop.If you try and freestyle it, your design could end up off center or even sew off the edge.
Next, I cut a piece of stabilizer slightly larger than the hoop. Almost time for the embroidery....
So how do you hoop a tie? Simple! You don't!
Spray your stabilizer generously with spray adhesive, and place your tie on top, taking care to line up your tape marks with the markings on the edge of your hoop.Smooth the tie down so it’s nice and secure, making sure it’s stuck down everywhere you need it to be, and that no edges are caught underneath.If you’re paranoid like I am, you can use little pieces of masking tape to keep any wayward edges down. This is enough to keep your tie in place while it’s stitching out.

Set your machine to it! Keep an eye on it to make sure your tie doesn’t feel like meandering off in places, and that your design isn’t sewing off the edges.
Since the cogs design that I used is a scribbles style design, it stitched out pretty fast.
I unhooped the stabilizer and peeled it away from the backside of the embroidery.
I trimmed away the excess bulk, but left the bits around the design so that it wouldn't warp. Take care to keep any leftover stabilizer within the tie shape, so that when you fold the tie back up again, it doesn’t bulk up the edges.
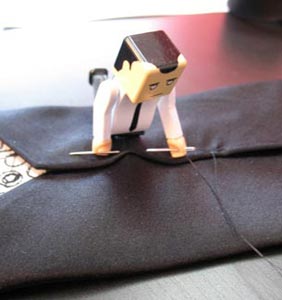
And now it's time to sew up the back seam again. I need a little help with this part, so Cubicle Bob came to my rescue.
You may need to also re-attach the back tie loop, depending on how far up you had to trim.
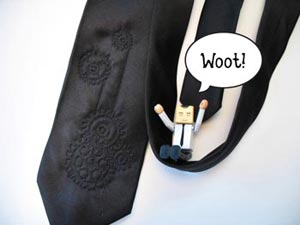
Finally, Bob has a tie to be excited about.You can go for subtle and sophisticated, like a tone on tone scribbles design, or jazz it up with stripes and a neon pink skull.It all depends on the occasion... and the tolerance of your boss. It’s a simple way to add some panache to your less casual wares.
I don’t look especially becoming in ties, a fact made all the more obvious when I try to tie one, so I found a dashing young gentleman to model mine.
But if you look good in ties, then by all means wear yours around the office or on your next hot date, and your craftiness is sure to be noticed by others.


