Recycle old clothing into new statement pieces, and get one step closer to keeping a sustainable (and environmentally friendly) fashion wardrobe. It's easy; find that old sweater and give a little update!
Pretty details like embroidered cuffs are just the trick! This tutorial will show you how easy it is to repeat, mirror and embroider your sweater cuffs evenly.
Supplies
To get started on you new sweater, gather these supplies:
- Your favorite applique embroidery design (We used the 4" x 4" version of the Lacy Drape)
- A sweater (new or used)
- Sheer mesh cutaway stabilizer, such as Sulky Soft 'n Sheer or Floriani No Show Mesh
- Temporary spray adhesive
- Printed templates of your design(s) for placement
- Thread for your embroidery
- Scissors
- Ruler
- Pins
- Air erase marker or tailor's chalk
NOTE: Tailor's chalk is best for marking dark colored fabric, as it tends to last longer and show up better. However, this wax-based tool may leave residue if used on some synthetic fabric. It is best to test a small corner of the fabric before committing to chalk.
Designs Used
First things first: Choose a design for your cuffs! Here are a couple things to consider:
- Choose light and open designs for best results
- Consider the area the design will cover -- it may help to measure the length and width of the cuff you want to embroider before committing to a design
- You can use more than one design -- you may just need to overlap them!
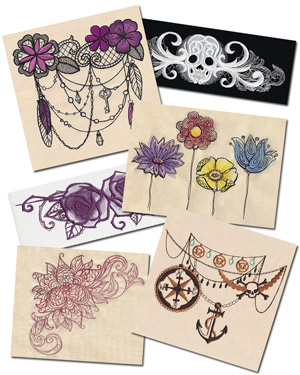
Shown here: Lacy Drape, Ghost Baroque - Skull Border, Painted Flowers, Briar Rose - Draped Border, Sea Treasure - Elegant Drape, and Delicate Bloom Corner.

In order to successfully hoop our fabric and stabilizer, seam ripping is a must! Start from the tip of the cuff to at least a foot up and open the side seam(s) of the sweater sleeve.
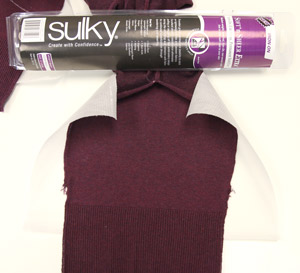
A sheer mesh cutaway stabilizer or a tearaway stabilizer is your best option for lighter-stitching apparel designs on your cuff. These will allow for more flexibility in the sleeve and be softer against the skin than regular cutaway stabilizer.
Cut a piece of stabilizer large enough to hoop your design(s), note that this may extend past the sleeve fabric.
Spray your stabilizer generously with temporary spray adhesive, and smooth it onto the back of the sleeve cuff in the area to be embroidered.
When you go to smooth out your sweater on top, make sure not to stretch the sweater fabric at all, or it will cause your design to bunch up.

Now for placement. Using printed templates of your design will make it easy to map out exactly where each embroidered piece will go. (Here's more on how to print templates.)
Using chalk, mark the center and the vertical axis points of the design onto the sweater. Use a ruler to draw a straight line connecting and extending the two vertical marks. You will need these to line up exactly with the crosshairs on your embroidery hoop.
You will also want to measure the length from the tip of the sleeve (where it meets your hand) to the center of your design template. This will ensure even placement on the other sleeve when you go to embroider it!
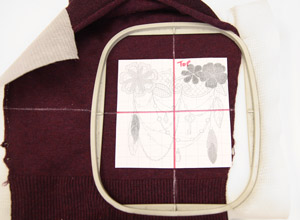
When hooping the sleeve, match the crosshairs of your embroidery hoop with the marked lines on your garment. Even if you are unable to hoop the fabric on all four sides, ensure a sturdy grip for your embroidery by hooping your stabilizer entirely.
Make sure to center your needle with the center point of the design before you begin embroidering.
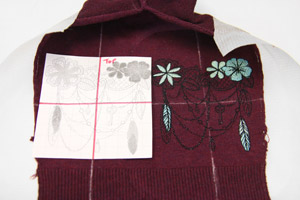
If you plan on using multiple designs or repeating a design, use the drawn axis line to position the additional design template.
Mark the vertical axis points and use a ruler to connect the two points.
Note: Overlapping may occur; just be strategic about how you'd like the design(s) to sit!
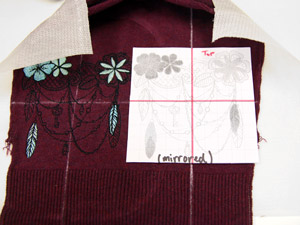
To place the designs on the opposite sleeve, it's nice to mirror the design. You can do this in embroidery software or on your machine options.
Measure and mark the distance from the sleeve tip up to the amount you measured on the first sleeve. Repeat this a couple times, then connect the marks with a straight horizontal edge. Place your templates with the horizontal access lined up, then mark the vertical access lines using your templates.
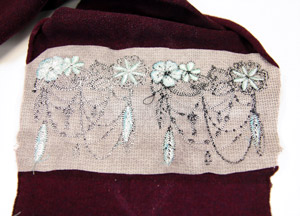
When your designs are finished stitching, carefully remove the excess stabilizer around the back of the design. The more you remove, the better so that your sleeve has the ability to stretch.
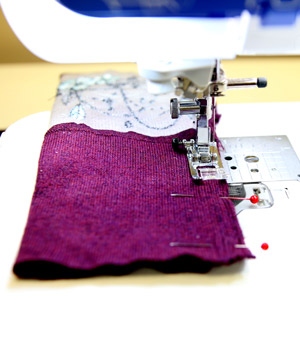
Time close the sleeve seams! Turn the sweater inside out, exposing the seam.
Use pins to secure the sleeve together before sewing. Leave the same amount of seam allowance that the sweater had before seam ripping and don't forget to back tack!
Note: For sweaters with a lot of stretch, use a tight stitch (10 to 12 stitches per inch).
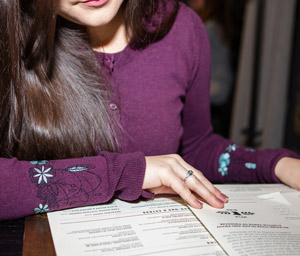
Snip those loose threads and use steam to remove the remaining chalk lines -- you're ready to rock your updated garment!

Congratulations! You've updated an old sweater and easily come one step closer to filling your closet with sustainable fashion!!


