Designs Used
Damask.
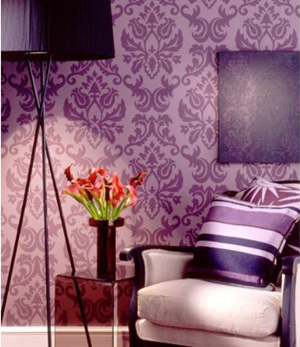
Classic or contemporary, this patterning works for all eras. It’s classic in black and white, and wonderfully trendy in bold new colors. Like all hot new trends, though, it can come with a price. That lovely purple wallpaper is from Target, but it ranges from 50 to 100 bucks a roll. How do you replicate something that’s such a large pattern? How can you take this and make it your own with embroidery? Well, this project is just one of many in our series Design Threads, showing you bold new ideas and trends in design, and how you can incorporate them into your own embroidery. With damask, you might look at a wall pattern and think... well heck, that’s a lot of embroidery... but do keep in mind, it’s a repeating pattern. Therein lies the key...
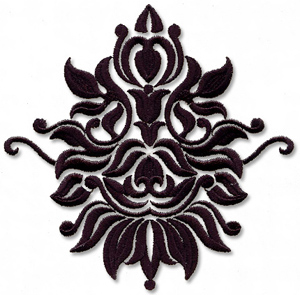
All you really need to replicate this styling is one damask design that can easily be repeated.... so, we made one. We’re clever like that.
The key to using this design is how to repeat it. There are many different ways you can place it in a pattern, but that’s not worth much if you can’t embroider a repeating pattern properly. I’ll show you how to get perfect placement with your designs, so you can take this pattern and go to town on some damask flourishes.
One of the simplest canvases for fun embroidery experimentation is pillows, because they’re easy to make and add some seriously stylish decor. We’ll make a removable zip-off cover for our pillow, so you can take it off and clean it if the occasion calls for it. Oh, how I wish all the pillows on my couch had zip-off covers...
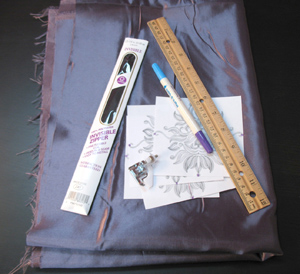
To make your pillow, you’ll need a pillow form, some fabric, a zipper, an invisible or vanishing ink pen, a bunch of template printouts, a ruler, and a zipper foot for your machine. The fabric and zipper size depend on your pillow form. For zippers, I actually much prefer using a zipper that’s a bit long for the pillow and shortening it myself – that way there are no gaps at the edges like zippers sometimes have. Get a zipper that’s at least as long as your pillow, or longer.
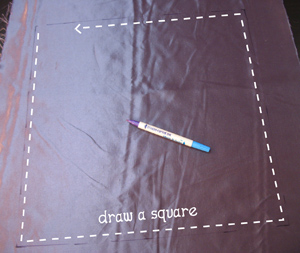
For the fabric, figure out how large you want your finished pillow to be. Mine is going to be 16 by 16 (even though I’m making it for an 18” inch pillow form, because I love overstuffed pillows). Whatever your size, draw that square out on your fabric, leaving plenty of room outside of it for seam allowance and hooping. Make sure you have enough fabric to make this square twice, since your pillow needs a front and a back.
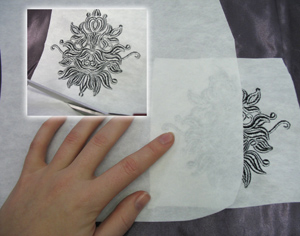
To get your placement just right, you’ll want as many templates as designs you plan on stitching out.
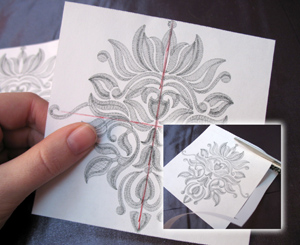
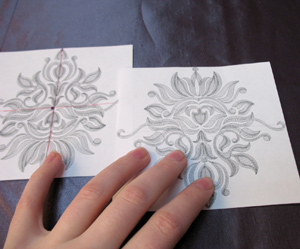
Print out the template, and be sure that you can see the crosshairs on the printout. This is essential for placement (I emphasized mine in red so you can see them better) Cut out the design on all sizes so it’s as flush to the design as it can be. Your printout will probably already have a square around the design you can use to cut it out. Do this with all your templates.
Now play with your designs a little bit. There are unlimited ways these damask flourishes can go together. I decided in the end to do an alternating border pattern. Don’t forget also that you can play with the orientation of the designs. I made every other flourish rotated 180 degrees. Lay them out on your square until you’re happy with your pattern.
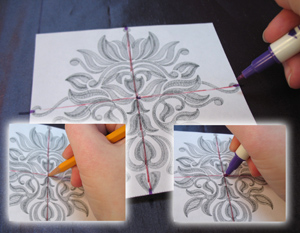
Here’s how to get perfect placement. First, make sure your design is exactly the way you want it. It helps to use the lines you drew on the fabric to make sure it’s nice and level, and not tilted. Once you have it where you want it, take a sharp pencil and poke a hole in the middle of the design, where the crosshairs meet. Then, use your vanishing ink pen to draw a dot in there. Also, extend the lines of your crosshair out onto your fabric. Now you have the middle and all the axis points marked out.
Here’s what your marking should look like once you remove the template. I added a little x in the middle for extra precision. These markings will be vital in hooping it exactly straight, and knowing where the center of your design should be.
Place your second design where you want it, using a ruler and the square on the pillow to make sure it’s level with everything. I placed the previous template back on the fabric to help me visualize the pattern.
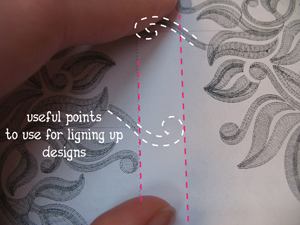
Be on the lookout for useful points of overlap. I used the edges of swirl designs to help me keep the overlaps uniform. It’s a lot quicker than using a ruler on everything if you can find measuring references like these.
Once you’re happy with the second designs placement, mark it exactly the same way as the first one.
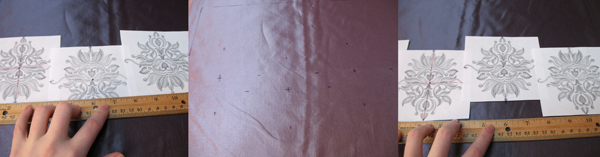
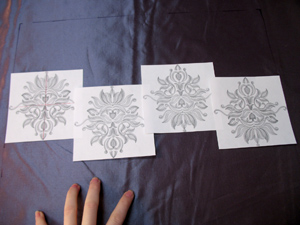
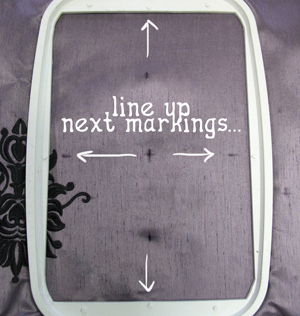
To continue the pattern, we’re going to want to make sure all our following designs line up with the previous ones. Use a ruler to make sure the next design is placed exactly level with the first one, and mark it as before. The last design lines up with the second design you marked, so on and do forth. Keep measuring, keep checking, and keep marking. If you’re careful, everything will mark out perfectly.
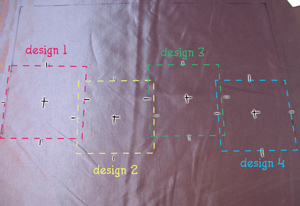
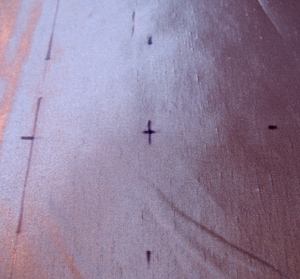
If you’re copying my pattern, you should have four strange crosshair-looking marks on your fabric. I outlined the perimeters so you can more easily see where each design is going. These marks will be essential when we’re hooping and stitching the design.
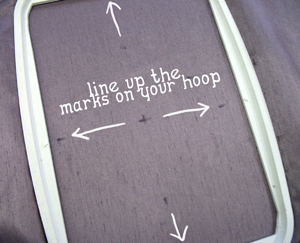
Now it’s time to hoop it. Spray the back of a piece of stabilizer and place it on the back of your fabric, where the hoop will be. Sticking it to the fabric so it doesn’t move around will make hooping it a lot easier, trust me.
Very carefully line up the marks on your fabric with the marks on your hoop. You’ll want to take your time with this, and get it just right. There’s no point in all this fancy ruler work if you don’t use it later. When you place the hoop on your machine, check and see that your needle is directly over the center crosshair when you’ve loaded your design. Sometimes with cheaper machines *coughfuturacough* the needle doesn’t always go directly to the center, so you have to check to make sure.
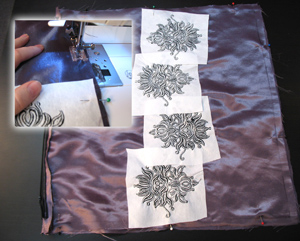
Stitch out your first design. This will be one of many, so be patient with it. It’s all one color, so it should be fairly low maintenance. Don’t let your machine hear you say that though, or it will immediately take the opportunity to eat your design while your attention is momentarily diverted.
When it’s done, flip it over and snip away the extra stabilizer on the back, and then spray some more with adhesive and stick it on the fabric for your next design. Trimming away the stabilizer as we go is a good way of keeping it from getting too bulky, or having a design trying to stitch through multiple layers of stabilizer.
Hoop up the next design according to the next markings. If your designs have a bit over overlap, you’ll probably find yourself hooping a bit if your last design. That’s not a problem – you should still be able to hoop it just fine, and it won’t do anything to the previous stitchout.
DON’T FORGET... if you did some cool rotations in your layout, don’t forget to rotate your design 180 degrees before you stitch it, and don’t forget to rotate it back before the next one.
Continue this cycle, carefully lining up each design, until they’re all stitched out.
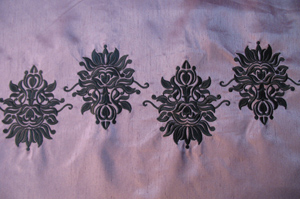
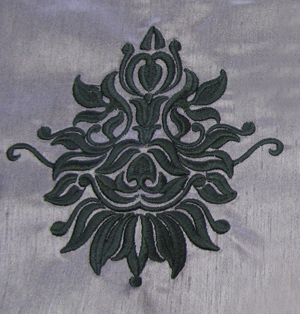
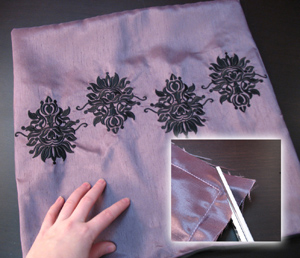
This is what all my designs looked like after everything was stitched out. There are some small inconsistencies, but overall everything lines up very nicely, all because of careful planning. What we have now is basically an embroidered fabric pattern, so let’s turn it into a pretty pillow.
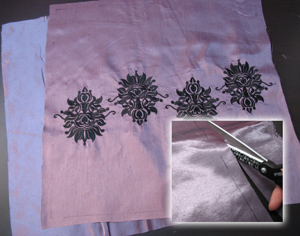
Using the markings you made before, cut around your square leaving about 1/2 inch for seam allowance. Cut another piece of fabric the same size for the back.
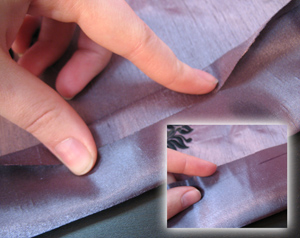
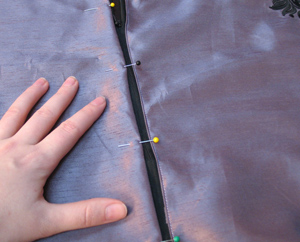
Now it’s time to add the zipper. I’d recommend placing the zipper at the bottom of your pillow, where it’s the least visible. Take that side of the pillow, and fold the seam allowance down the 1/2” inch you marked before. You’re folding the raw edge under, to the wrong side of the fabric.

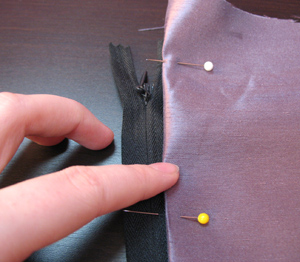
Press or pin this fold in place. Place your fabric right side up (so the design is showing), and pin it to one side of your zipper, which is also facing right side up.
If you’re using a longer zipper, measure the zipper to the length of your square (16 inches in my case) and snip it off. Sew over the zipper teeth about one inch from the end of your zipper. If your zipper is plastic, you can use your machine. If it’s a metal zipper, sew it by hand. This will stop the teeth from opening past that point.
Pin the fabric as close as you can to the teeth of the zipper. I’m using an invisible zipper, but because my zipper skills are not yet refined to the level of master, it will probably still be visible. No worries.

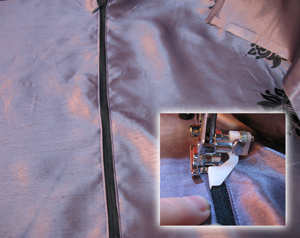
Attach your zipper foot to your machine. Now, you might say this does not look like a zipper foot. You would be correct. It isn't. This is an edge stitch foot. My zipper foot was missing, but because this was an invisible zipper, it worked ok. If I were you, I would use a real zipper foot, trust me, it's a lot easier. If however you're missing yours, well this works in a pinch.
Be sure to back stitch at the beginning and end of your zipper, to make it extra secure. Eventually you're going to get to a point where you have to pull the zipper pull past the foot. When you get to that point, keep you machine in the needle down position, but lift up the foot, and zip the zipper underneath it. This was exceedingly difficult seeing as this wasn't an actual zipper foot and had that stupid plastic guard in the way, but I managed it eventually. Once it’s zipped past you can lower your foot again and finish sewing.
So, now we have one side done. Take the second piece of fabric, the back piece, and fold and pin the raw edge as you did with the first. If you have fabric with a grain or pattern, make sure you keep them oriented the same way.
Sew the second seam down the zipper, making sure to backstitch at the beginning and the end. This is what your zipper should look like when you’re done sewing.
Fold your pillow right sides together, line up the edges, and pin it in place.
IMPORTANT! Before you sew your seam, be sure to unzip the zipper about halfway, or you won’t be able to unzip it and turn it right side out again. You’ll just sew it all shut, with the zipper pull inside. That would make you sad.
Sew your 1/2 inch seam around the three sides, back stitching at the beginning and the end.
Once you’re done sewing, it helps to snip the corners off as close to the seam as possible to prevent bunching. This is especially necessary with thicker fabrics.
Turn it right side out and press it if you want to. Now go grab your pillow form.
Stuff your pillow inside. I fit an 18-inch pillow inside my 16-inch cover, just to make it extra plump and firm. It’s always better to have a smaller cover than a smaller pillow.
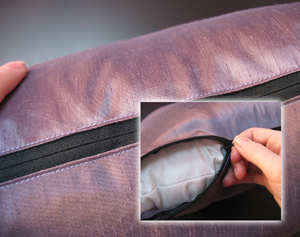
Zip it up all nice and snug. See how nice and neat our zipper looks? It’ll be practically invisible when the pillow is sitting upright.
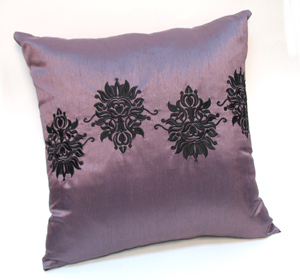
Behold our beautiful new damask pillow! By carefully measuring and repeating designs, even a small machine can make a much larger pattern. Repeat this row over the whole pillow for a full damask effect, or just use one design as an accent. It’s totally up to you.
Once you know how to carefully measure and place things, you can create much larger embroidery patterns by simply using repetition.
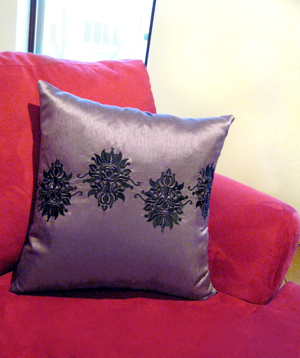
You new pillow is a super simple way of groovin’ up your couch to high fashion status. The world of stylish damask is now yours to experiment with, with as many or as few design repetitions as you wish. If you have the patience and the time, you could make a full patterned damask pillow for your digs. Have fun playing with all the new patterns you can come up with. Plus now you know how to make a super simple zip cover pillow, so you can change it out as you fancy, or when the next must-have trend comes along. Believe me, when it does, you can be sure Design Threads will be there to show you how to do it.


