There are a few things one would assume you can’t add embroidery to. Metal. Buildings. Cats. All these things are inadvisable to hoop. You might also think a hard plastic serving tray also wouldn’t be the kind of thing you could add embroidery to, but if so, clearly you haven’t been on this site long enough. We add it to furniture, clocks, and even wood boxes. We haven’t tried the cat and really wouldn’t advise it. A tray, however, can get a chic laminated addition of embroidery with just a few ridiculously easy steps!
Supplies
OK, so to make your laminated fabric tray, you’ll need:
- Tray. A cheap plastic one works best.
- Fabric large enough to cover the front and wrap a few inches around the back. A note, your fabric will get a bit darker after laminating, so pick something a bit brighter!
- A very light-stitching embroidery design (I used one of our awesome new Thread Tattoos designs)
- Tearaway stabilizer
- Mod Podge. I used matte, but on a second go around I’d probably recommend glossy.)
- Temporary spray adhesive
- Brushes
- Fabric paint (Optional, just because I was feeling fancy. We all need a little fancy now and then.)
Designs Used

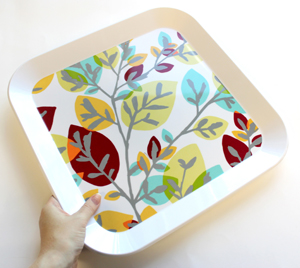
Let’s start with your tray. There’s nothing really wrong with this one, but it was cheap, plastic and on sale at Target for a few bucks. I’d recommend a rectangular shaped tray, as curved ones are much harder to wrap fabric around.
Also, cheap is good! All it needs to be is rigid and a nice shape. Anything after that is gravy.

Now for your fabric. You’ll want to cut a piece that not only totally covers the front of your tray, but gives you a good few extra inches all the way around to comfortably wrap your fabric.

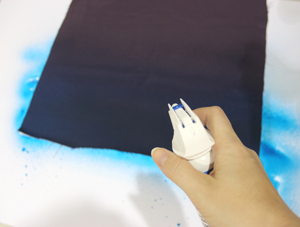
As a totally random and somewhat unnecessary step, I decided to give my purple fabric a blue ombre gradient, so my ship tattoo design had some beautiful blue waters to sail on. This is totally optional, but looks pretty cool!
If you do decide to try this step, make sure you let your fabric totally dry before moving on!

Now it’s time for the embroidery! Hoop up your fabric with your stabilizer. Remember to place the design near the middle of your fabric, or at least far enough away from the edges so it doesn’t get wrapped around the back.

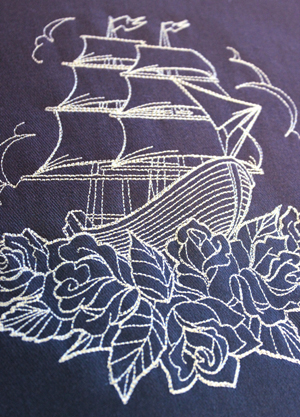
The pretty, light-stitching ship design finishes up pretty quickly. A light-stitching design is imperative here! Not only do we want something delicate for the fabric, but we need something with light stitches in order for our adhesive to have lots of fabric area to take effect on. Heavy stitched designs will not stick well to your tray.

Your design all finished! Doesn’t it look pretty sailing through the waves of purple and soft blue? That’s the fun of these light-stitching designs. They can still be big, bold and beautiful!

Now you’re going to want to remove as much stabilizer as possible from the back. You can either carefully cut it away, or tear it off depending on your stabilizer. The more fabric you can reveal on the back, the better it will stick flat.

It’s time to put it all together!
Grab your spray adhesive, and give your tray a generous, even coating. Be sure to get the middle and of course the corners where it starts to slope upwards. You may also spray the back of your fabric all over to ensure everything is nice and sticky.

Carefully lay your fabric on top of your tray, positioning your embroidery exactly where you’d like it. Once you’re happy with it’s placement, start smoothing down the fabric onto the tray, starting in the middle and pushing out into the corners.
Be super thorough, making sure there are no air bubbles and you smooth the fabric down extra firm into curves and corners. Also take extra care around the edges of the embroidery, pressing it flat.

Once the front is looking pretty good, you can spray the back edges of your tray and the back of the fabric.
Pull the fabric gently but firmly and smooth it over the edge.

When it comes to those corners, your technique may depend on how curved they are. If your corners are sharper, you can fold your fabric like you would wrapping a gift. For more curved corners like mine, you’ll have to fold and smooth it in smaller sections, to get a good hold.

Neato! From the front, your fabric should wrap smoothly and seamlessly around the tray, looking like it was meant to be there all along!
However, fabric is not a super ideal surface for a tray sometimes, so we’ll want to give it one more finishing touch to really make it shine.
This is where the Mod Podge comes in! Not only will this act like an additional glue to really smooth your fabric down tight, but it also acts like a sealer. This is perfect for a tray that’s likely to get a few splashes of water or crumbs on it as it gets some use.

Remember, my Mod Podge was matte, which worked out fine, but I honestly think it would look even better and dry even clearer if it was glossy. Just something to keep in mind!
Use your brush to give your tray a generous, even coating of your Mod Podge.

When the whole thing is covered, I also found it useful to go in with the hard handle tip of the brush and push in the corners around and inside my design, to really make sure you got a nice tight seal. If it’s not sticking, add a little more glue and press it down again. In the end, this will give your embroidery a cool raised look!
Don’t forget to cover the back and sides, especially where you made those folds! This glue will help hold them in place as more solid pieces.

This was my tray after I finished coating it. Eeek! It doesn’t look super good right now. Don’t worry, this stuff dries clear, and if you followed my advice, the glossy will dry clearer still. Set your tray aside to dry for a day.

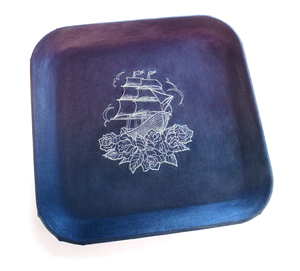
When it’s all said and done, your glue should have dried to a nice clear finish, and it will look like your embroidery design was stitched right onto the tray!
The sealed coating will help protect your tray and keep it useful, will still looking gorgeous, and that light stitching design won’t give the tray so much texture you’re afraid to use it for anything.

Just stitch, spray, and glue! You’ve got a sealed, beautiful tray adorned with some elegant raised stitches. Turn a cheap thrift store tray into a memorable memento for your home, housewarming gift, or even a beautiful wedding present! Stitch an elegant design with names and dates and let it be a beautiful handmade piece you would get nowhere else. Heck, make it a set!


