The Christmas season is upon us…
Christmas is a big deal in the embroidery world, but for that same reason, there’s a whole host of embroidery designs out there that are all pretty darn similar. Cute, happy festive Santas, bright colors, and everyone being good. Well, sometimes I long for a slightly different Christmas sentiment. Oh, I love Christmas, don’t get me wrong, but what about instead of being all sugar and spice and everything nice, we give Christmas a naughty twist. It’s hard to find this kinda Christmas in stores, so I’m going to show you how to make your own festivities with a dark twist… with our own handmade stocking!
Supplies
To make your naughty stocking my way, you’re going to want:
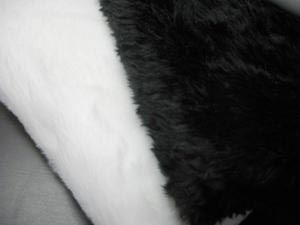
- 1/3 yard black furry fabric
- 1/3 yard white furry fabric
- 1/3 yard festive lining fabric
- No-show mesh cutaway stabilizer
- Water soluble stabilizer
- Ruler or measuring tape
- Scissors
- Stocking template (PDF)
- Awesomely naughty embroidery design
Designs Used
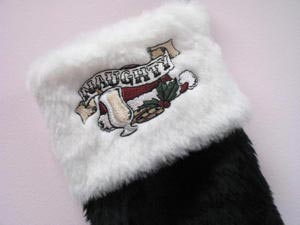
Furry fabric in this case is optional, but it makes such a wonderfully luxuriously pettable stocking so I think it’s worth it. Embroidering on furry fabric offers some challenges we’re going to address, as well as leaving your studio covered with enough fuzz to make guests think something fuzzy exploded in there, but it’s nothing you can’t handle. I would especially recommend a furry cuff for your stocking, even if you don’t want the sock part fuzzy.
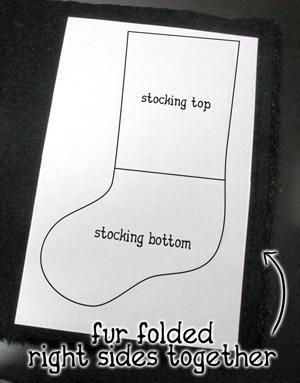
To begin, print out the stocking template (it comes in two sheets you tape together, like shown). If you want you can make up your own template – it all depends on what you want your stocking to look like and how big it needs to be.
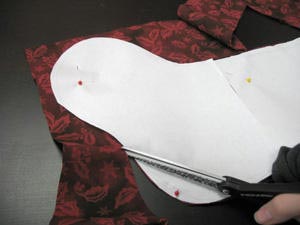
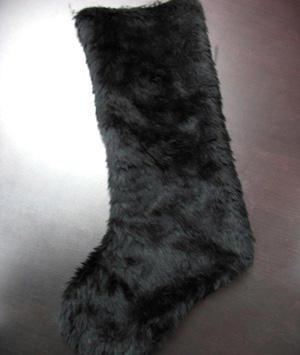
Take your black fur, fold it over right sides together so it’s in two layers, and place your stocking template on top.
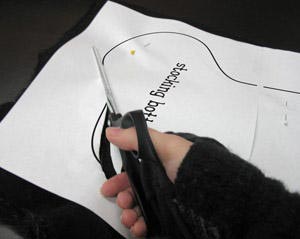
Pin your two layers of fabric together to keep from shifting, and pin your template on top, and then cut out your stocking shapes by snipping along the template lines. If your fur is really thick, you might prefer to snip each fuzzy layer one at a time. When you’re done you should have two black furry stocking shapes.
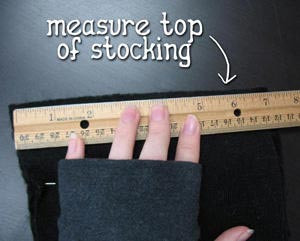
To make your stocking cuff, measure the width across the top of your stocking. Mine was about 7 inches.
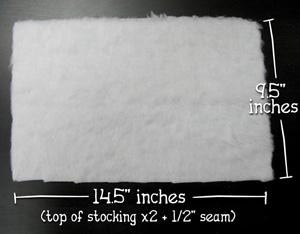
To figure out how large you need to make your cuff, take that measurement (7 in my case) double it since out cuff has to wrap around the top, and add about 1/2 inch for seam allowance. That’s the width of your new piece. For the height, I’d recommend about 9.5 inches, which leaves us plenty of room once it’s folded in half, and enough room to add a little embroidery. Cut out these measurements from your white furry fabric. If you can, take note of the direction of the fur on your cuff. It works best if the fur is running straight and down, so you should be able to pet it from top to bottom without mussing up the fur.

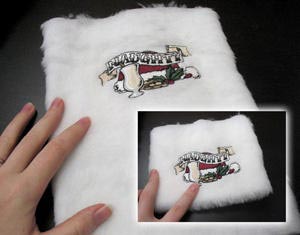
For your design placement, if you want it in the middle of your cuff on the center of your stocking, you’ll want to put it in the upper right corner of your fur, with the top of the design near the raw edge and the bottom of the design towards the middle, so that when we fold it in half it will be right side up.
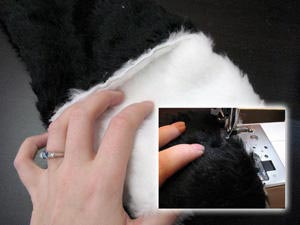
When you hoop your design, first you’re going to want to put a piece of no-show mesh or regular cutaway stabilizer underneath your fabric, and then a layer of water soluble stabilizer on top. Hoop these three layers (your bottom stabilizer, the fabric, and the water soluble topping) together with your hoop. The water soluble layer on top will help keep the fur out of your threads, and keep the design neat and clean while it’s stitching out.
A note: If you’re using really plush, long fur, you’ll want to trim the fur down a bit around the area you’re embroidering, so the fur is only about 1/4 inch long.
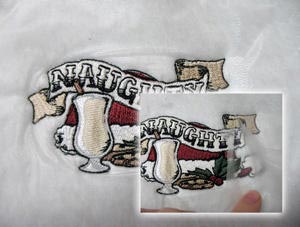
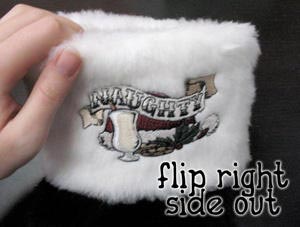
Pick your favorite festive design (I picked our wonderful Naughty design) and embroider away. When you’re done, carefully tear away the top layer stabilizer. Water soluble stabilizer usually tears away easily, all though you may need a tweezers for any small areas where it wants to stay stubbornly put.
We’re nearly ready to assemble our stocking. First we just need to make our liner. Take your lining fabric, fold in half right sides together. Take your template from before, pin in place, and snip out your lining shape.
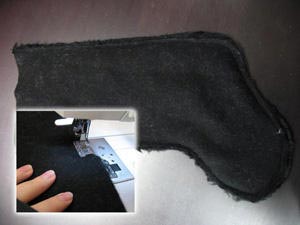
Let’s start putting it all together! Take your furry fabric, pinned right sides together, and sew a seam around the edges. If you need to, clip the curves of your stocking to help it lay flat when you turn it right sides out.
See how pretty and furry our stocking is already?
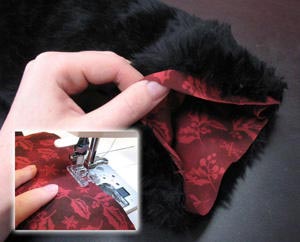
Now take your lining and sew a seam around the edges as you did before. Don’t make your seam too wide, or your lining will be too small for the stocking. When you’re done sewing, take your lining and push it into the stocking, so the top lines up with the top of your fur stocking.

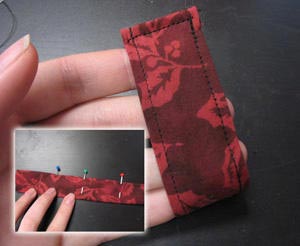
Now to make the cuff. Take your rectangle and fold it in half, lengthwise as shown. Pin it together along the edge right sides together. Sew a seam along that edge.
Turn your stocking right side out again, and then tuck half of it back inside itself, so it’s folded over, like so. This is the cuff of our stocking.
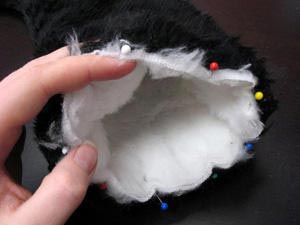
To help keep your layers from shifting, you might want to pin the lining to the top edge of your stocking. (The design is in the inside, facing the back side of the black fabric.) Take your newly made stocking cuff, and tuck it inside. Remember that the way your design is facing on the inside is how it’s going to face on the outside, so try and keep it centered in the stocking.
It may take a bit of shuffling, but line the top (raw) edge of your cuff along the top of your stocking, just like you did with the lining.
Sew a seam around the top of your stocking, securing the lining and the cuff at the same time.
When you’re done, pull your cuff outside of your stocking.
Now flip it down over your stocking, right side out again. Ta da!
If you like, take a piece of fabric, fold it over, and sew a seam down both sides to make a strap. Fold it in half to make a loop.

Place your loop inside the edge of your stocking, and sew a short seam to secure the loop in. Make sure you match the top thread to the inside and the bobbin to the outside to keep the seam hidden as much as possible.
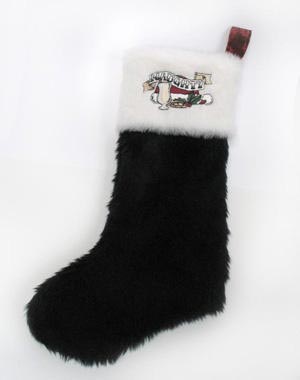
Your stocking is finished! Revel in your new festively naughty stocking you made all by yourself.
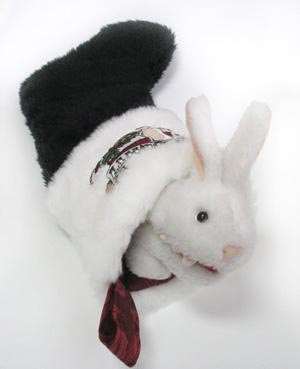
You can customize it to be any color, shape and size, to fit all the wonderful Christmas goodies you want in your stocking – like, for example, crazy fanged bunnies.
Choose from any of our Christmas designs to add to your stocking, or embroider it with a name of your loved one. Everyone loves a stocking filled with goodies, especially when the stocking is one of those handmade goods they can enjoy!


