It may be the cold depths of winter here, but that’s no reason not to part-ay! That’s right, the fabled night of Mardi Gras draws nearer, and there’s no better occasion to stitch for. What you say? You don’t know what to stitch for Mardi Gras?
I do agree that nowadays it seems to be more about beads and not having things to wear than stitching up a sweet outfit to party away the night in. Well, one thing every party reveler can use on Fat Tuesday is a good mask, and would you believe it, your machine can make you one! I know, it surprises even me sometimes. Follow along with me and I’ll show you how to stitch your fabulous lace organza mask...
Supplies
So to make your fabulous mask, you’ll need:
- Water soluble stabilizer
- Thread
- Some pretty organza (up to 5 different colors)
- Spray adhesive
- Ribbon
- Awesome lace mask design
- Organza templates
I apologize in advance that this is one project that will only fit larger hoops. It’s just the way it has to be in order to make a mask that fits. Don’t forget we do have a slightly smaller child’s size too though!
Designs Used
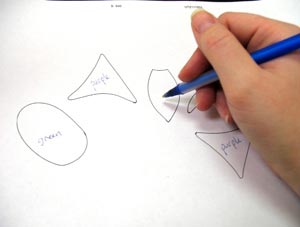
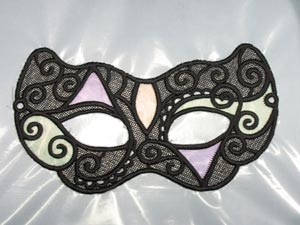
Print or stitch your dielines out, and then I’d recommend labeling them so you can keep the pieces and colors straight when you’re placing them later. You have five different pieces that could all be different colors, or you could pick a simpler color scheme. I went with three colors, allowing some of the pieces to mirror each other.
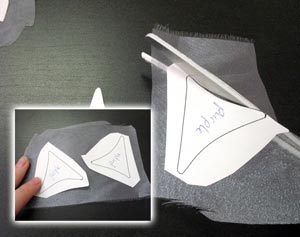
Spray a tiny bit of adhesive on the back of your template, and stick them on your organza. Don’t add too much, because the organza is so thin and sheer that sometimes too much adhesive can leave gunk on your fabric.
Carefully cut out your pieces.

Repeat with the other template shapes until you have 5 pretty pieces of organza. We’re using organza as a substitute for the lace in places to add some interest and color. You can try other types of fabric, but keep in mind it won’t be as sheer or flexible as organza is, and your mask might be stiffer. Either way, you can’t omit these applique pieces or your mask won’t work.
Hoop up a piece of water soluble stabilizer and pick the color thread you want your mask to be. Mine’s going to be black. Make sure you also wind a bobbin of matching thread color for your mask, so it’s the same color on both sides when it’s done.
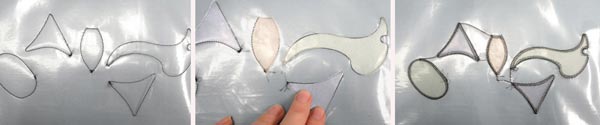
So here’s how it’s gonna go down... first, your machine is going to stitch five dieline shapes, like shown. Take your spray adhesive, and very lightly spray the backs of the appliqué pieces and lay them just inside the dielines. You have to use at least a little spray fix, because both the organza and the stabilizer and pretty slippery, and will move around if you don’t secure them. Once your pieces are in place, set your machine sewing again, and it’ll stitch a tack down stitch around all the organza.
After the tack down sews, your machine will start stitching the final lace. This will take some time, but it’s so worth it in the end! When you’re done you should have an awesome machine embroidered lace mask waiting for you…
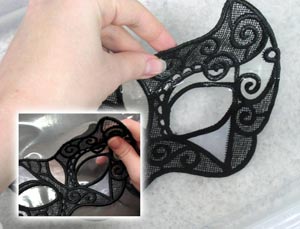
When your mask is done, cut or tear it away from the stabilizer, removing as much stabilizer as possible from the mask, so there’s less to dissolve. Follow your stabilizer’s instructions on how to remove it. I took my mask and left it to soak in some water for about 15 minutes.
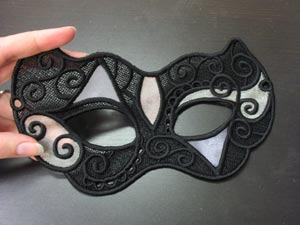
Once all the remaining stabilizer residue is gone, dry your mask off between some paper towels to remove as much excess water as possible, and then leave it to dry fully. If your mask gets a little bumpy after it’s dried, use an iron and a pressing cloth to get it nice and flat again.
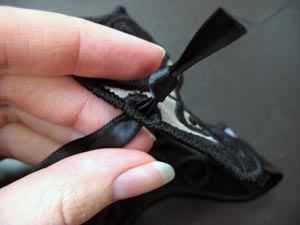
Take a long piece of ribbon, enough to tie around your head, and snip it in two at the middle. Feed one end carefully through the loops at the sides of the mask, and tie a few knots until you’re sure it won’t come out the other side. I’d recommend tying the knot at the back side of the mask, so it’s not visible while you’re wearing it. Do this on both sides. That’s it!
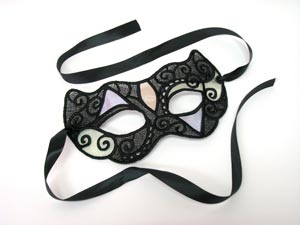
Your finished mask, all ready for a whimsical night of Mardi Gras fun. It’s simple to make, and even easier to customize, with lots of color options at your fingertips.

Grab the ribbons and tie it securely around your head to cloak yourself in lace anonymity.
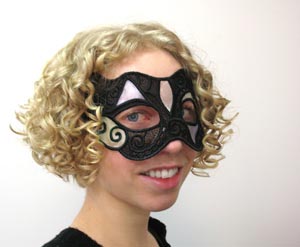
Wear it hair up to show off all the lace details of your handmade mask...
Or let your hair down and party the night away! People will be amazed to learn you crafted it yourself, with naught but thread, some organza, and an embroidery machine! Plus, the mask is ripe for adding lots of feathers and other embellishments to make your craft all the merrier.
If you really want to blow ‘em away, you could always pair it with our other lace embellishments and deck yourself out in decadent, handmade lace accessories!
Happy Mardi Gras!


