Nothing is more wonderfully gothic or elegant than black lace. It’s dark, classy and fantastically suited for all occasions. Urban Threads has decided that we like being dark and classy, so we’re offering our first lace design!
Lace is easy to make on your embroidery machine, and once you’ve made it, it can be used for so many things. We’re going to make our own little gothic lace, and then experiment a bit with what wonderful things we can turn it into...
Supplies
To make your lace, all you need is some water soluble stabilizer and a wound bobbin that matches the color you’re going to use to stitch your lace. You might also want a small container to hold warm water to soak your lace when it’s done.
Designs Used
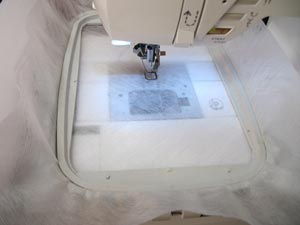
Cut a piece of your water soluble stabilizer and hoop it up. Make sure to place your newly wound bobbin in your machine, so your lace is all the same color back and front. Set it all up under your machine, and set it to stitching.
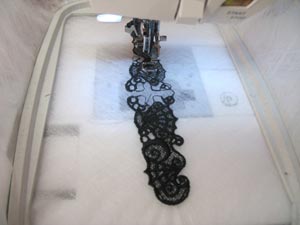
Keep an eye on your machine, because lace can be a little touchy, but it sewed out without any problems on my Futura. When it’s done, take it off the machine and unhoop it.
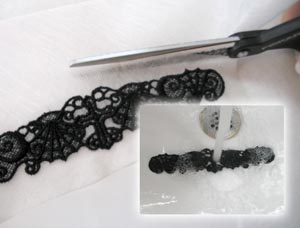
Trim off as much excess stabilizer as you can, so you have less to dissolve, and then soak it to remove the stabilizer as per the instructions that came with it. My stabilizer dissolves really fast, so I just had to run it under some warm water in the sink for a bit, but some stabilizers require a longer soak, so having a container around can be good for that.
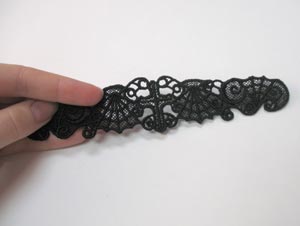
Once all the stabilizer is dissolved, pat your new lace dry. Ta da! Now we have a pretty piece of lace... now what do we do with it?
What indeed... so many options! Well, I’m going to show you my favorite use of this lace... turning it into a gothic lace choker!
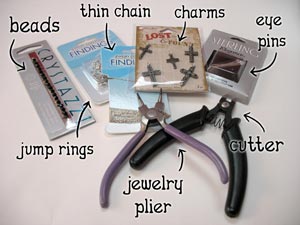
To make our choker, we’re going to delve into jewelry making a little bit. I’ll go over the things we’ll need...
First, you’ll want a small jewelry pliers and small cutter. These are absolutely necessary unless you have tiny tiny dexterous super strong fingers. Also, you’ll want a bit of small chain to hang from your choker, some small jump rings (small circles with a single cut) and some eye pins (a long thin piece of wire with one end in a little loop) Also, for extra decoration, you can pick up some beads and charms to add some extra fun and interest. You’ll also want a bit of long black ribbon about the width of the choker.
Craft Bunny spent an inordinate amount of time trying to decide if the cutter counted as scissors and if he could eat them. I stole them away before he could decide.
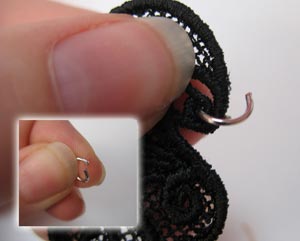
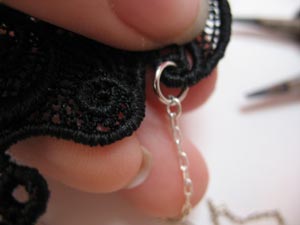
First, we’re going to start with our jump rings. A jump ring is a small metal ring that has a single cut, so it can be opened with pliers. Use your pliers to bend it open just slightly. You’ll notice on the lace piece there are some small “holes” near the bottom that are perfect for adding these little rings. Imagine that...
Feed one little ring through one of the holes on the edge of the lace, and leave it open.
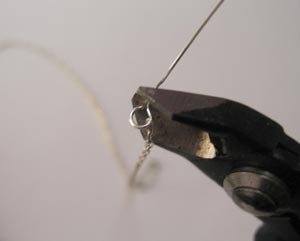
Now, my delicate chain is much too small to be able to loop directly to the jump ring, so I need to make a slightly smaller ring I can link to the larger one that will fit the chain. That’s what I’m going to use some of my eye pins for. Open the loop on an eye pin just a bit, and link one end of your chain to the hoop. Then, I found it easiest to link the eye pin to the large jump ring before trimming off the excess.
Once the two loops are linked together, snip off the long end of the eye pin, so all you’re left with is a small little ring. It may help to squeeze the rings gently with your pliers in order to make sure the rings have closed tightly.
There are a couple different ways to embellish your chain if you like. I’m going to keep my chain unadorned, but in case you’d like to spruce yours up with some beads, here’s how....
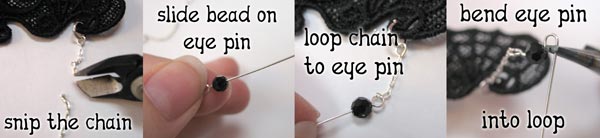
First, snip the chain where you want to add your bead embellishment. Grab an eye pin, and slide a bead down to the looped end. Open the eye pin loop just slightly, and loop it into the end of the chain you just cut, closing the loop once it’s attached. To create another loop where you can continue your chain, take your pliers and bend the rest of the eye pin into a small matching loop on the other side of the bead. This can take a bit of practice.
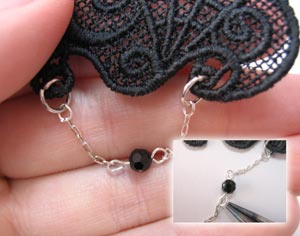
To finish your chain, attach a little bit more chain to the loop you just created, and secure it to the next lace loop using the same jump ring/small loop you did before. Ta da! This is how you can create a chain with little bead embellishments. Because my chain is so thin, the bead weighs it down a bit too much, but a slightly thicker chain works really well for bead embellishments.
If you want to simply go with an unadorned chain, just repeat the jump ring/loop process at each small lace loop. Make sure you squeeze each ring tightly closed as you go along. You don’t even need to trim the chain at each loop, you can just string it along all as one connected chain. It’s up to you how low and long you want to loop your chain.
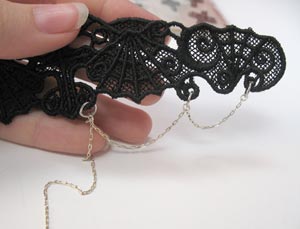
I stopped my looping at my third ring, which I attached on the small right loop just to the right of the cross. This is where I’ll finish this side, so I trimmed the chain after I attached it to the last loop.
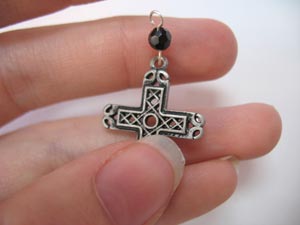
The very center of the lace is the perfect place to add a charm. If you like, you can add some bead embellishment here by repeating the bead/eye pin trick, and looping it to the top of your charm.

To attach your charm, add another small jump ring to the very center of the lace at the bottom of the cross. The nice thing about embroidered lace is that you can pretty much attach the jump ring anywhere on the sheer lace area. Hook your charm to the jump ring and squeeze it closed.
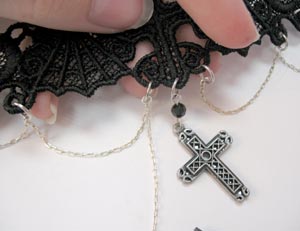
Repeat the chain process on the other side. I found the best way to make the loops look the same was to count the number of links on each one, that way they would come out even.
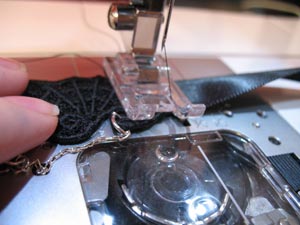
To turn your pretty chain lace piece into a choker, take a piece of your black ribbon, and place the edge of it just under the edge of the lace. Sew a seam back and forth a couple times with matching thread, and then trim the excess ribbon off the back. Take another piece of ribbon and repeat the process on the other side. Make sure you have enough ribbon on either side to tie it in a bow around your neck.
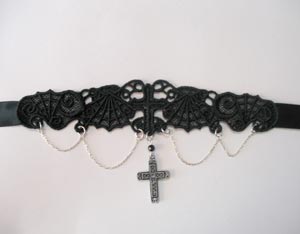
Here’s your choker all nice and pretty and finished! Take your classy choker and tie it elegantly around your neck.
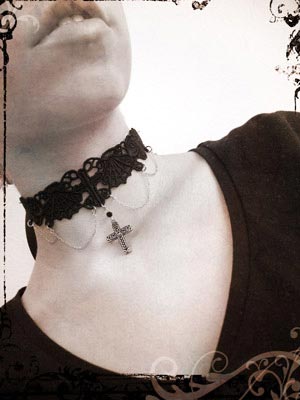
Classy and darkly elegant, you now have a beautiful lace choker you make totally by yourself! Light and lacy chains complement the dark looping designs, and you can customize the colors, charms and beads to make it your own.
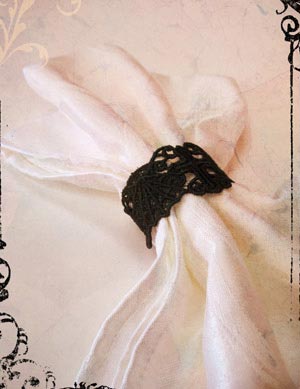
Your lace design doesn’t just have to be used as a choker... stitch a dozen and make yourself an elegant set of napkin rings...
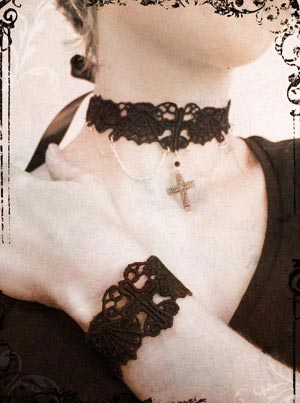
Or secure it around your wrist to make a beautiful matching bracelet so you have a gorgeous gothic set. Lace is simple to make, and there are so many different ways you can use it! Dress up your day with a little gothic elegance, and make everyday a little bit Halloween.


