Lace can be a beautiful thing. Light, airy, open, elegant, and just perfect for some embroidery.
Yup, you heard me right.
Yes, I know it has giant holes in it.
Yes, I know it's incredibly thin, and yes, I know it sounds bonkers. But, before you start judging, it might help to know exactly what KIND of embroidery it's perfect for.
That's right baby, we're stitching lace... on LACE.
*pause*
I know. I totally just blew your mind.
The genius thing about this is, lace doesn't actually need fabric to stitch on in order to hold its structure. That's why it's called freestanding lace. That makes it the perfect candidate for some otherwise un-stitchable fabric! That's lucky for us, because that lace is perfect for something else... all those little holes that make it a nightmare for regular embroidery make it a dream for holding jewelry!
Supplies
So, let me show you how to combine all these things into awesome. To make your lace on lace jewelry holder, you'll need:
- Lace, with a nice open weave
- Water-soluble stabilizer
- Frame
- Staple gun
- Scissors
Designs Used
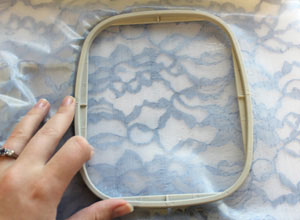
First, cut a piece of lace larger than your frame by at least 2 inches on all sides. To stitch on the lace, center your lace piece over your bottom hoop, and then lay a piece of water soluble stabilizer on top. Keeping it centered is important unless you don't want your design centered in the frame. When you place the top hoop over the lace, take care not to stretch or distort the lace at all.
The really eagle-eyed of you might spot that this is a different hoop than I usually use. That's because my Futura is sick this week, so I'm borrowing a Brother machine from my brethren at Embroidery Library. I'm hoping they don't mind.
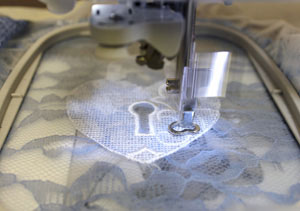
Once you've wound a matching bobbin, start your lace stitching! I was pretty mesmerized watching this shiny machine work. I wonder if they would notice if I borrowed it indefinitely...
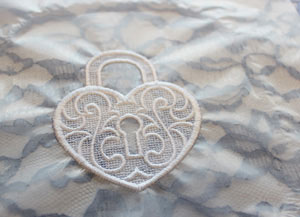
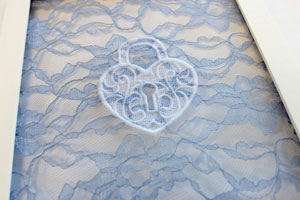
Your finished lace, on lace! Has your mind exploded yet?
No? Tough audience.
Maybe that's because right now it looks like lace on plastic on lace. We can fix that by carefully trimming away the excess stabilizer and soaking it according to package directions to remove all traces. When it's ready, pat your lace dry. No more plastic!
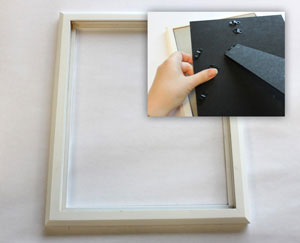
Now it's time for the frame. This can be any frame really, it doesn't even need glass. If your frame does come with things like backing or glass, you can remove them now. All we want is our nice bare frame.
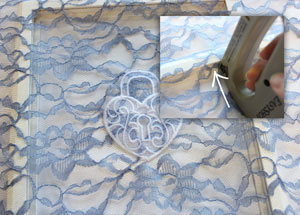
With your frame facing wrong side up, lay your lace right side down inside the frame. Center your embroidered design within the frame, and grab that staple gun. Start by carefully adding one staple to the top inside edge of your frame. Remember to staple into the frame edge, and not down towards the direction of your table. You may somehow-sort-of-possibly-inadvertently staple it to your desk. Possibly.
I admit to nothing.
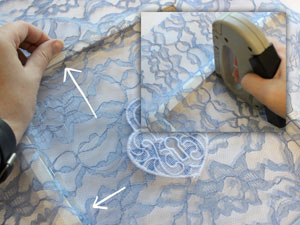
So, once you've done the first staple (correctly), go the side directly opposite (the bottom of the frame) and gently stretch the lace a bit to get the fabric to pull snug. You don't want distortion, but you do want it pulled firm. Staple it in place. Repeat that with the left side, and then the right. Once you have those four staples in place, you'll want to keep working opposite ends like that. This is just like how we stretched a canvas piece in our other tutorial. Have a peek at that tute for a clearer idea of your stapling pattern.
Once you've worked yourself all the way around, you should have a taut piece of lace with a beautifully centered design. By stapling evenly and on opposite sides, the lace should have a nice, even pull. Once you're happy with all your stapling, trim the excess off right at the edge of the frame.
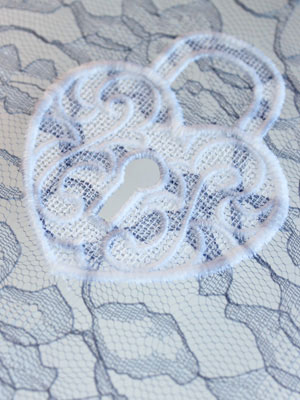
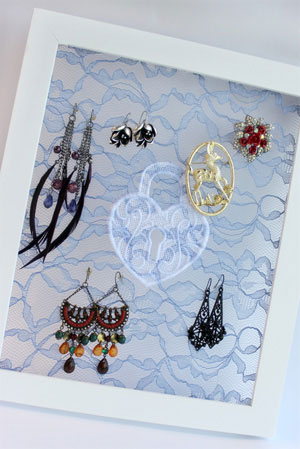
Here it is from the front, all nice and neatly framed!
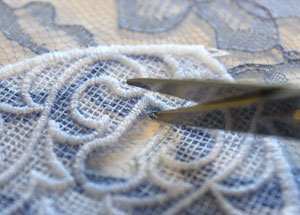
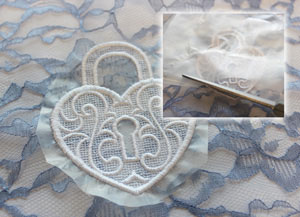
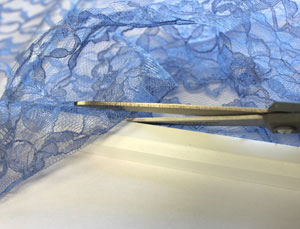
But wait... for one extra added little touch, you can knock out some of those open areas of the stitched lace for an even better effect. Find yourself a delicate pair of scissors (or maybe just a delicate set of hands) and carefully trim out the lace inside the keyhole.
Mind exploded yet? Still no? Goodness. You must watch too many Hollywood movies where stuff isn't exciting unless it's blowing up. No... I'm not adding high explosives to my embroidery. Go bother Michael Bay.
Well, I think it's cute. Just a little extra touch that makes the lace on lace even more special. However, we didn't make this just to float a piece of lace, did we? Of course not!
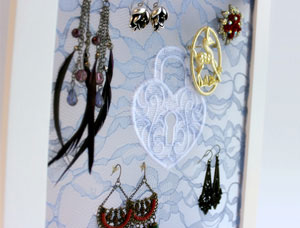
Grab your favorite pairs of earrings, and feed them gently through the loose holes of the lace for a perfect way to store and display your earrings and brooches. Once you have them all hooked up and pretty, you can hang it on the wall as a great looking way to display your favorite trinkets.
Yup, from lace-on-lace to the wonders of cheap and elegant jewelry display, this project has it all... and for only a few bucks and some quick stitching with your machine. It can be done with any frame, on any lace, with any freestanding lace design! The possibilities are endless... but then again, so is your jewelry collection, so what are you waiting for?


