Socks have always been the great frustration of the machine embroidery world. They’re so darn temping to embroider, and so darn impossible to hoop. There are creative ways of folding down the top edge of a sock for some mini embroidery, but where’s the fun in that? I want a big, splashy, bold design on my knee high socks to pair with all my favorites boots. Well, if you get a little creative about the “sock” part, you’ll find you can embroider your design anywhere you want it, and then rock your socks in a new fierce lace-up fashion. Plus, I’ll share some tips and tricks for embroidering and working with knit fabrics.
Supplies
Yup, the main way to get around the hooping problem is the direct route -- just cut 'em in half! It’s the putting them back together part where we get creative. To make your socks, you’ll need:
- Socks. (I know, right?)
- Scissors and pins
- Sheer mesh cutaway stabilizer, such as Sulky Soft 'n' Sheer or Floriani No Show Mesh
- Light water soluble stabilizer (for thicker knits)
- Small grommets and tool
- Hammer
- Cord for lacing
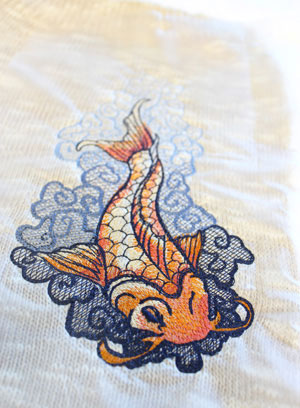
- Embroidery design that's on the lighter side, but not so light the stitches will disappear into the knit. I used this tattoo koi.
I would advise a sock that’s not too thick a knit, and one that isn’t too tight around your calf. The key to getting the lacing part to work is you don’t want a sock that you need to stretch too much to fit you. I would also advise an even tighter knit sock than mine. Mine was kind of a pain.
Designs Used
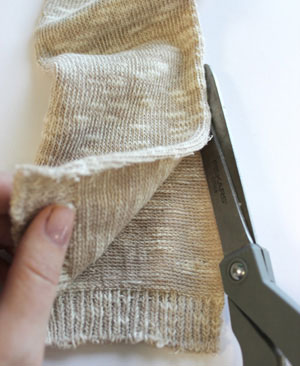
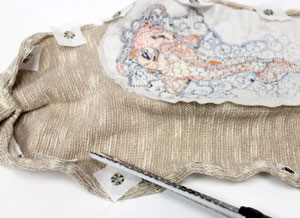
The easiest way to embroider on socks is the direct route you always thought about taking when something is difficult to hoop... cut the darn thing up. Grab your scissors, and cut open the back end of the sock (the side with the heel) from the top to just above where the heel starts.
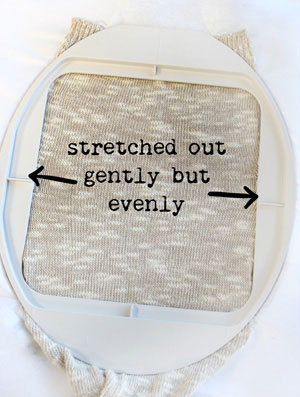
Now, in order to get a nice sew out on something like knit, you need to take care how you hoop it. Though it’s contrary to most cases, you’ll actually want to gently stretch your knit out in your hoop, because your knit will naturally be stretched when you’re wearing it. Make sure this is done evenly though, or everything will look really wonky while stitching. It may help to spray your stabilizer with some temporary spray adhesive to get the knit to lay right.
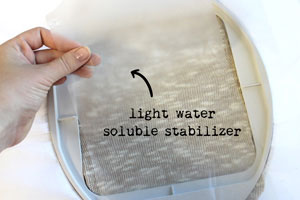
Another key to getting a clean sew out on chunkier fabrics is to use a piece of light water soluble stabilizer on top. This will keep your stitches from sinking into the fabric as it’s stitching.
If you want, you can just gently lay this on top of your fabric right before stitching. It doesn’t have to be hooped with the rest of it. Just make sure it covers the area your design will be.
Stitch away!
With some good stabilizer, an even stretch, and a light topping, your design should come out clean and true even on tricky fabrics. I would advise you not stitch anything heavier than this kind of design, though, or your lovely stretchy fabric will get too stiff.
Here’s my fishy all stitched out and unhooped. Obviously, you’re going to want to do all of this twice to get two socks, unless you’re a pirate with a penchant for peg legs.
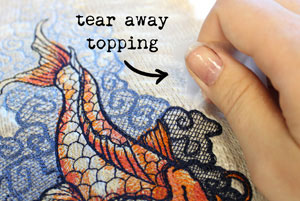
Gently tear away the stabilizer you used as topping. The light stuff should rip pretty easily off. Get what you can with your fingers or maybe a tweezers, but know that all this can be dissolved later in water too. I just like getting as much as I can myself.

Turn your sock over, and carefully trim away the excess stabilizer. Remove as much as you can, so it doesn’t interfere with the stretch and drape of your sock.
Now, the magic happens!
We could try and just stitch our sock back up, but that could be a nightmare and may not look that great. I say instead to finish it off a more unusual way, by lacing it up!
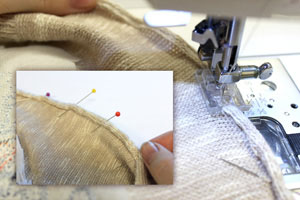
We’ll need to start by finishing off that raw, cut edge. Roll that raw edge under at least twice to secure all the loose edges, then stitch a seam around it to secure it neatly in place.
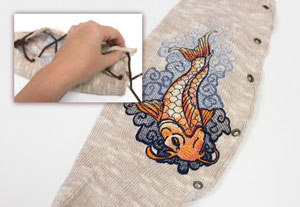
It’s time to grommet!
Before we do though, remember we are working with a particularly difficult fabric. You can put grommets into knit, but very carefully, and only on something that doesn’t need to be pulled too tight. I have a couple tricks to help you out.
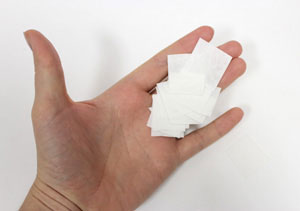
First, take some of your stabilizer (the heavier stuff, not the water soluble stuff) and cut it into little squares. We’re going to use this as backing for our grommets.
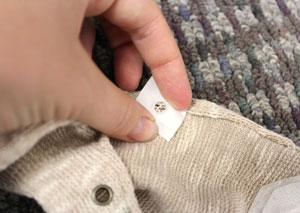
There are two tricks to getting these to work on a knit fabric. The first is to stretch out your knit as much as possible in the spot where the grommet will be. If you can, try even getting the grommet through one of the knit openings. If that doesn’t work, just stretch it out a lot.
The second is the backing. Once you have the knit stretched over the grommet, cut a hole in your little stabilizer square and put it on the back of your grommet. This will give the metal teeth a little more to dig into.
Once you have your grommet in place (good side facing down, bad size facing up, inside your sock) use the grommet tool to pound the pointed teeth down. Make sure you let it get a good grip on that stabilizer!
I added about 7 grommets on each side, a few inches apart. Once all your grommets are in place, you can trim away the excess stabilizer around them.
Once you’ve got both your socks ready, loosely lace your leather cord or ribbon through the holes, corset style. I started mine down at the heel so it would lace up at the top. Keep this loose at first, then you can tighten it up once you’ve pulled your socks on.
Ready to rock 'em?
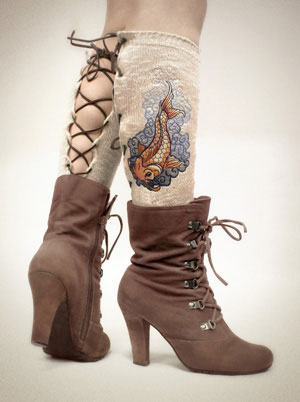
Slick right? Just slide them on carefully and lace 'em up! Don’t be too rough on your lacings, you want to tug it just enough to be snug on your calf but not enough to really stretch the fabric. Pair it with your favorite pair of boots, and you’ve got a sexy new pair of socks for fall. I think these would look super cute with tights underneath too!
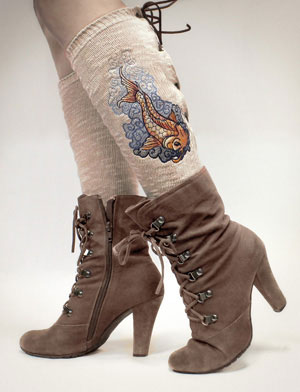
With the sock cut down the back, hooping is a breeze, and you can finally add all those cool designs you’ve been dreaming about putting with your favorite outfits. Tattoo designs like this are an extra fun, punky touch.
Yup, you and your embroidery machine can finally rock the socks. Have fun!


