Your witch hat! At this point, if you like, you can use spray starch to help your little hat keep its shape through all your witchy carousing. See the tricorn hat tutorial for details. But wait, your elaborate costume isn’t done yet! Oh no, it can get more elaborate... Snip a piece of decorative ribbon a little bit longer than your hat cone is around. I’d recommend gluing the ribbon in this crossover style because it’s easier to get the ribbon to fit the curved edge of the top. If you just make a loop, it doesn’t sit as flush to the hat. Once you’ve glued the ribbon in place, you can clip the corners to make them look pretty and decorative. You can also just cut them short and hide the overlap with your charm.
Supplies
To make your witch hat, you'll need:
- Water soluble stabilizer
- Embroidery thread
- Awesome lace witch hat embroidery design
- Needle and matching sewing thread
- Scissors
- Glue
- Feathers and charms
- Ribbon
Designs Used
So, to make your lace hat, follow along with our lace instructions, or just follow these simple steps:
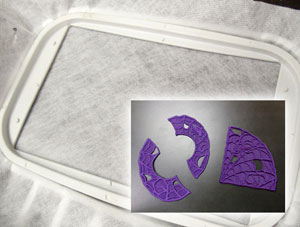
- Hoop up some water soluble stabilizer.
- Stitch out the hat pieces (in this case there are three, two for the brim and one for the top) - one lace piece per hooping!
- Soak your design to remove the stabilizer
- Pat them dry
Ta da! You now have the lace pieces needed to make your hat.

So, now to the fun and somewhat more time-consuming part, putting it all together! This can be done in a couples of ways. The most secure is stitching it all together, but it can also be glued.
Start with the cone of the hat. Fold it so the two long straight edges touch and stitch them together. I’d recommend trying to keep your stitches on the inside seam of the hat to keep them as hidden as possible.
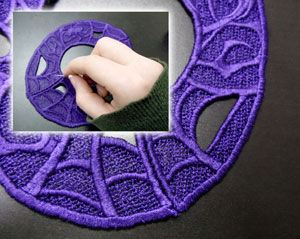
Once your top piece is done, we need to assemble the brim. You should easily be able to tell how the two pieces go together because they kinda fit together like puzzle pieces. Once you have them arranged, flip them over to the back side of the lace and stitch it there. That way most of your stitches will be hidden from the top. Stitch both sides of the brim together until you have one continuous circle.
Finally, we need to put the two pieces together. I suppose you could just keep the top and have a princess hat or pretend you’re a unicorn (this is what happens when you ask your crazy digitizer for ideas) but I think it’s best we make our witch hat.
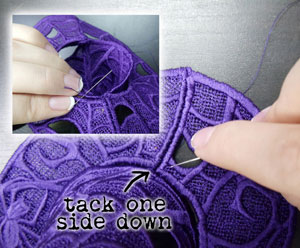
Line the back seam up with one of the seams on the brim. Start by tacking one edge in place. If you like, you can tack the other side down, or you can just start stitching in a circle until it’s all secured in place. Again, I’d recommend doing it from the inside to hide the stitches.
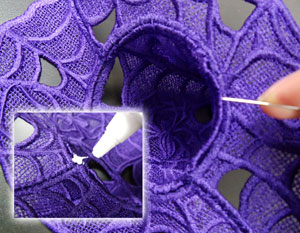
Once you’re all the way around and all your parts are stitched together, like so, I like adding a dab of glue to the ends of all my knots to make sure they stay nice and secure.

Your witch hat! At this point, if you like, you can use spray starch to help your little hat keep its shape through all your witchy carousing. See the tricorn hat tutorial for details.
But wait, your elaborate costume isn’t done yet! Oh no, it can get more elaborate...
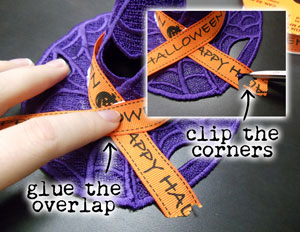
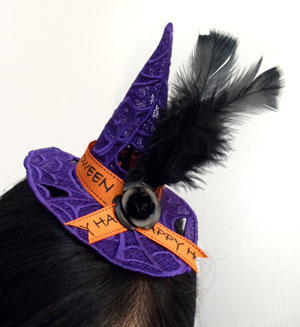
Snip a piece of decorative ribbon a little bit longer than your hat cone is around. I’d recommend gluing the ribbon in this crossover style because it’s easier to get the ribbon to fit the curved edge of the top. If you just make a loop, it doesn’t sit as flush to the hat.
Once you’ve glued the ribbon in place, you can clip the corners to make them look pretty and decorative. You can also just cut them short and hide the overlap with your charm.
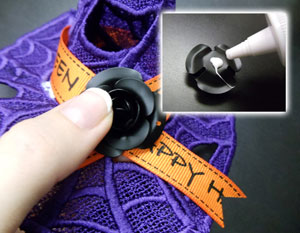
Grab a fun gothic or Halloween-y charm, and add a little bit of glue to the back. Glue it in place right where your ribbon crosses.

As a final touch, add a little bit of glue behind your ribbon and charm, and stick a few feathers in there. Every good witch needs a few feathers in her cap.
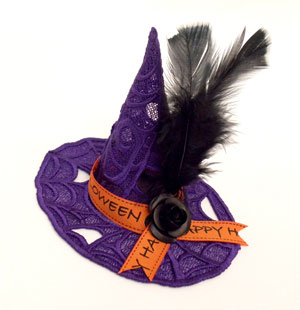
And now you have an instant Halloween costume! Handmade by you in a flash, and made to order in whatever colors are going to match the rest of your “costume.”
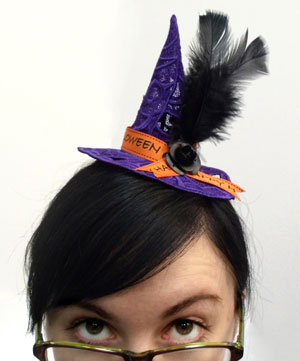
Glue on a hair clip, stitch it to a ribbon, or attach it to a headband, and wear your jaunty little hat with pride!
Stitching up a spooky accessory is easy, quick and perfect when you don't have time, money or effort to make anything else, but certainly don't want to show up without a little Halloween spirit.
Plus, if the witch hat isn't to your taste, we have a tiny steampunk top hat, and even a swashbuckling tricorn hat for all your crafty costume needs.


