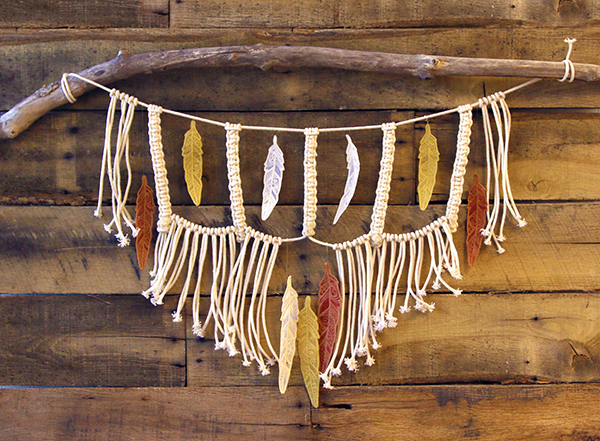
Macramé wall hangings are the latest craze in home decorating, but you can make your own macramé art using unique freestanding organza embroidery designs and your own style simply -- without breaking the bank! See this final creation displayed in the Stitching Freestanding Organza video and read on for how to make this exact piece.
Supplies
To make this eye catching wall hanging, gather the following supplies:
- Freestanding Organza embroidery design(s) of your choice. We used various sizes of the Nature's Charms- Feather 1 (Freestanding Organza).
- Heavy water-soluble stabilizer, such as Vilene or Sulky Ultra Solvy
- Organza fabric
- Macramé cotton cord (at least 35 yards)
- Scissors
- Hand sewing needle
- Clear nylon thread or fishing line
- Hot glue gun with glue
Designs Used
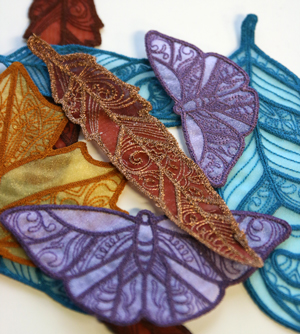
Start by stitching out your organza pieces onto heavy duty water-soluble stabilizer using 40 wt. rayon thread and a 75/11 sharp needle for best results. Once you're done stitching, rinse and dry each piece completely. (Here's more on stitching freestanding organza).
If you want to make this exact piece, you will need six 5.51" feathers and three 6.85" feathers, but the possibilities for making a combination embroidery and macramé wall hanging are endless!
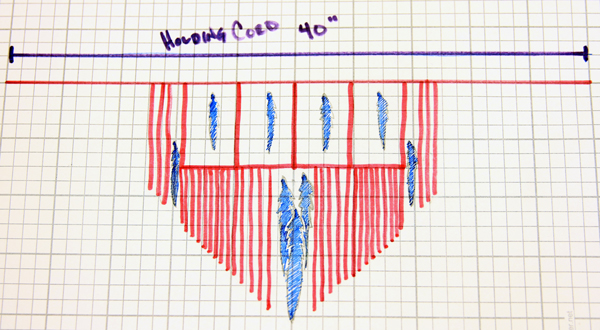
To start your project, it is best to plot the lay out of the design. Decide how many Free Standing Lace Feathers will need to be sewn out, how many strands of Macramé cords need to be cut and how long to cut them.
For this layout we started with the following:
- one 40" long holding cord
- ten 46" long strands for the top row
- six 18" long strands for the top row
- twenty-four 26" long strands for the second row
TIP: Make sure you are working on a clean, flat surface. You can use tape to hold down the two ends of the holding cord to make sure if doesn't move while you are tying your knots.
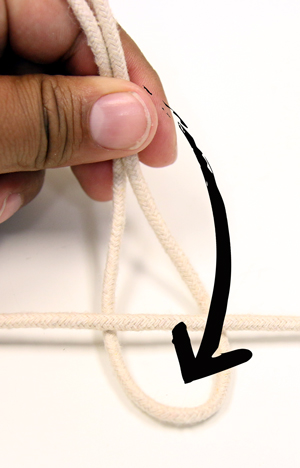
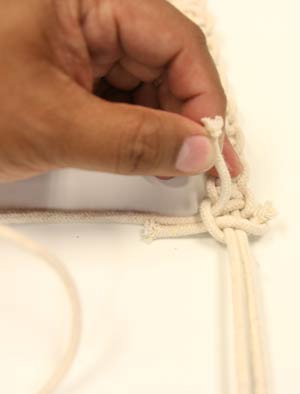
In the center of the holding cord, tie a 'Front' or 'Forward' Lark's Head Knot. This is done by folding the 46" cord in half, placing the loop underneath your holding cord, then slipping the two ends of the 46" cord over the holding cord and through the loop. Pull tight.
Tie on all ten 46" knotting cords like this in the middle of your holding cord, then tie on the six 18" strands the same way with three on either side.
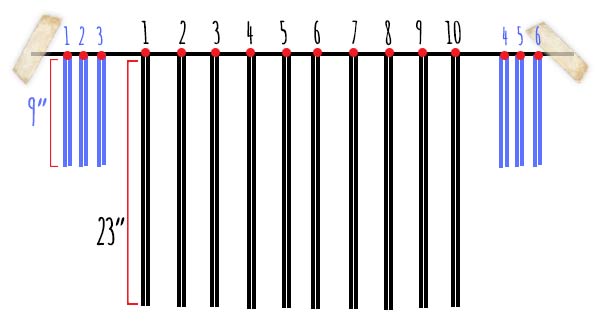
Because you are folding your cut strands in half to create the head knot, this will leave your holding cord with three Lark's Head knots (with six 9" strands), followed by ten Lark's Head knots (with twenty 23" strands), and another three Lark's Head knots (with six 9" strands).
Now to make the Square Knots!
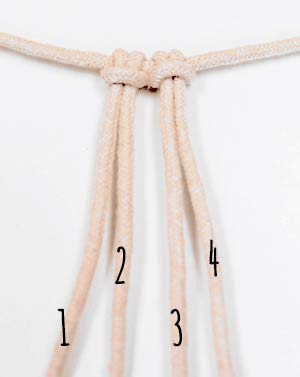
Gather the two left-most 23" Lark's Head knots together to start off the first Square Knot "bar".
We will refer to this current grouping by their strand order, 1, 2, 3, and 4.
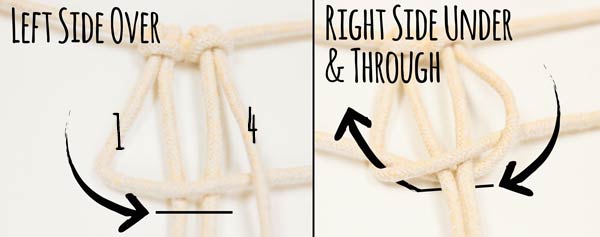
Take Strand 1 (left side) and lay over strands 2 and 3. Next, lay strand 4 (right side) straight down over the top of Strand 1, then, bring Strand 4 under Strands 2 and 3, up through the loop you've created with Strand 1.
Even out the side loops, hold strands 2 and 3 tight in one hand as you slide the loops of the knot up to the top, tight.
You've created your first Square Knot!
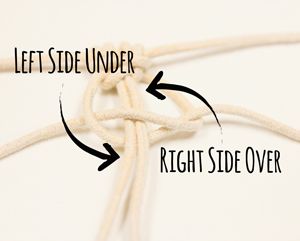
To keep the knots square (Instead of spiraling them**), repeat the same knot, switching sides each time as you go down the strand.
For example: Square Knot #2 will start by taking the strand now in position 4 and laying it over strands 2 and 3, with strand 1 going underneath 2 and 3 and looping up through strand 4.
Square Knot #3 will take strand now in position 1and laying it over strands 2 and 3, with strand 4 going underneath 2 and 3 and looping up through strand 1. And so on...
**TIP: If you stay on one side and continue knotting the same direction, you will create a spiral effect!

Keep the knots going until you reach your desired length. Because we plan on placing a 5.51" feather between our square knots, are square knot bars will measure slightly longer, at 6".
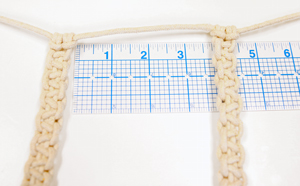
Use a ruler to space out each knot "bar" and make square knots using the rest of your 23" strands.
This will leave you with five 6" Square Knot bars, surrounded on either side by six 9" Lark's Head Knots.
Do not cut off extra string at this point.
To add a second row, you may be able to take the remaining length of strands 2 and 3 of the center Square Knot Bar, and extend one left and one right. This will be the new "holding cord" for the second row of knots.
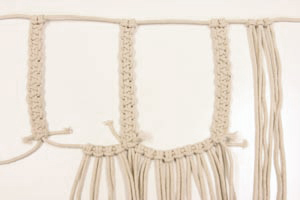
Using the twenty-four 26" long cords, tie 8 Front Lark's Head knots in between the left two Square Knot bars, 4 in between the second and third left bars, 4 in between the third and fourth bars, then the final 8 between the fourth and fifth bars (the right-most two).
Let the strands hang. Do not cut.
Use hot glue to seal the raw edges of the knots to the back of the Square Knot bars. Once the glue dries, cut the excess strand tails.
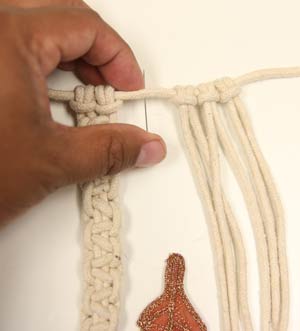
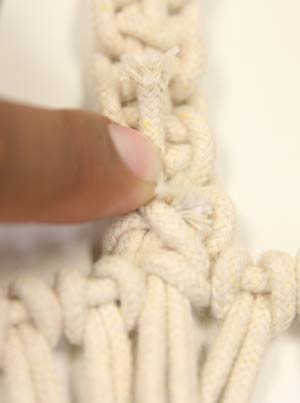
Use clear nylon thread (or fishing line) to stitch or knot your organza designs to the Macramé cord. We placed the smaller feathers at varying heights along the top row, then grouped together the three largest feathers together on the second row.
How you display your embroidery within your wall hanging is up to you though! Try different heights and varied colors and groupings to make it your own.
You can cut the remaining Lark's Head knot strands to your preferred lengths, then fray the tips of your cord using your fingers!
Use the edges of the 'Holding Cord' to tie on to a dowel, piece of wood, or simply attach to the wall... and there you have it! A unique and fashionable wall decoration, all your own.


