Mini patches! You might be wondering, what are mini patches? Well, they are patches that are mini! (I’m so helpful.)
Now that we’ve cleared that up, what exactly are they for?
Any darned thing you like! That’s the beauty of these things. However, one neat way I’d recommend using mini patches is to make yourself a bunch of super cool hair accessories. If you’d like to add a little dash of punky cool to your head, first follow along with this patch tutorial to find out how to make patches, and then follow along with me and Danielle for this super quick tute!
Supplies
To make your clip-in hair extensions, you’ll need:
Designs Used
Let's go into hair extensions for a moment. They come in lots of different kinds and colors, but the biggest difference is between synthetic and human hair. Synthetic comes in funky colors a little more often than human hair, and it’s a lot cheaper. However, most synthetic stuff WILL melt in curlers and flat irons, so you can’t style it like real hair.
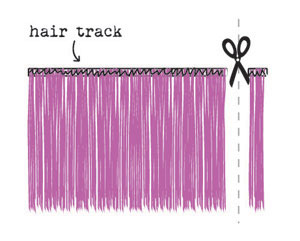
Usually when you get your hair extensions, they’ll come in a long string called a hair track. It kinda looks like a creepy hula skirt, if hula skirts were made out of hair. Eek. Never mind that I said that.
All you need to do is cut a piece of the track as wide as you’d like your hair extension to be, and you’re ready to go.
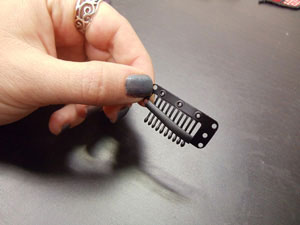
The next important thing you’ll need are these things called snap clips. They’re like a regular snap barrette, but they also have a little comb attached. These are some of the more secure clips you can get to keep your extensions in place. Usually ones with just little combs come out quite easily, and we want your swank new hair extension to stay in place while you party away.
You’ll also notice they come with little holes in them. These are specifically there so you can stitch on your little hair extensions.
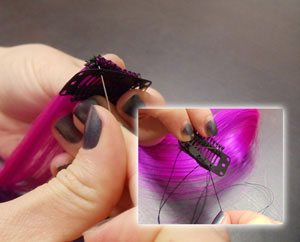
Grab your needle and thread and position the top track of your hair over the holes on your clip. Use your needle and thread to securely stitch your colorful new hair in place.
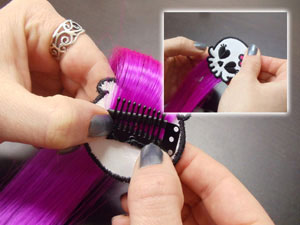
Now remember, the comb part goes at the back of your clip, so the hair piece goes on the other side.
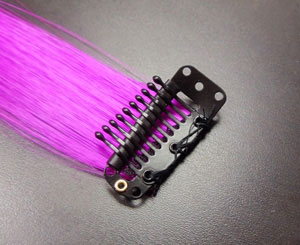
Here’s your hair piece stitched in place! Comb on one side, hair on the other. Didn’t Danielle make some pretty stitches? (Just say yes, she’s a little self-conscious about her sewing.)
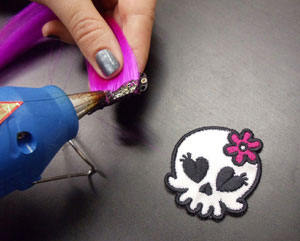
Finally, grab that hot glue gun and draw a line of glue along the top of the clip, on the same side as your hair (NOT the comb!)
Take extra care not to let the glue get in the comb part, or that it glues the barrette together. You still want to be able to snap it open and put the comb in your hair when you’re done!
You also don’t really want to glue this thing to your head. That is, how you say, not cool.
Grab your patch and press it firmly in place over the glue, making sure it covers the barrette completely. Allow everything to dry.
Finally, how do you get this pretty new hair on your pretty little head? Danielle shows us how! Especially since it would really not work on my curly noggin...
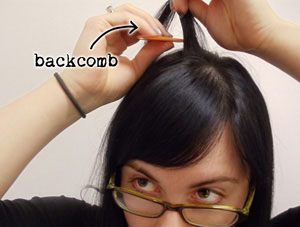
First, use a comb to separate out a small piece of hair. At the roots, lightly backcomb your hair to give it some texture. This will help keep the clip in place.
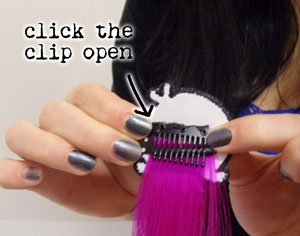
Make sure you’ve clicked your clip open, otherwise you won’t get as secure a hold.
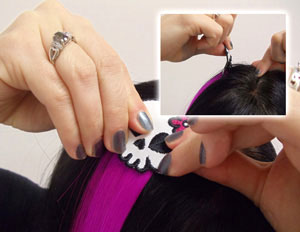
Carefully slide the comb in place on the spot you backcombed, and then press the clip until it clicks closed again. If you like, you can now trim your hair extension to your desired length.
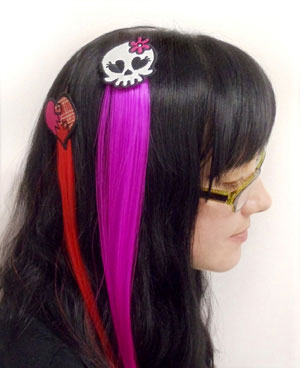
Add a dash of punky color (and some cute embroidery) to your outfit anytime!
Does your kid want to dye their hair pink, and you’re not so sure about it? This is a cheap and easy way to add some fun to hair without anything being permanent, or dyeing your sink pink.
Or maybe YOU want to dye your hair pink. It happens to all of us at some point.
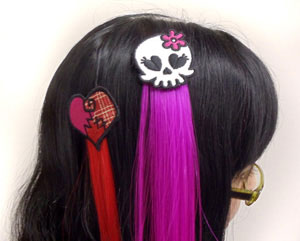
Stitch up patches and colors to suit every outfit. A punky skull, a stitchy heart, and a cute little bow will work with anything! Whip them up as fast as you change your mind, or your wardrobe.


