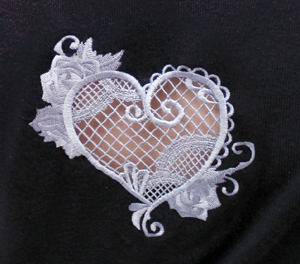
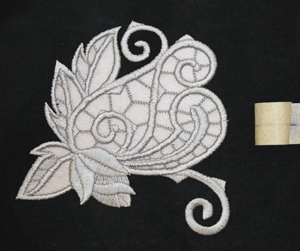
So you’ve grabbed that big, bold multi-piece skull design from the Rose & Bone cutwork embroidery collection. Now you need to know how to stitch that thing together for a dramatic statement on clothes and more! The skull is pretty forgiving about how it fits together, but we’ll show you perfect placement techniques so you can be sure to get it just the way you want it for your chic new fashion statement. Plus, we’ll show you a few other stylish ways to use the Rose & Bone designs for looks from casual to fancy, on all kinds of garments.
Supplies
The supplies needed for this project are pretty much the same as the previous cutwork tutorial...
- A garment to add your design to. I picked a drape cardigan because it’s super easy to hoop! Substantial yet drapey fabrics will work best.
- Your awesome cutwork skull embroidery design. This is available in sizes for 4"x4", 5"x7", and 6"x10" hoops, all of which stitch a big, full-back skull. Read the product descriptions for each version of the design to see the finished skull sizes, ranging from 9.3" to 12.8" high.
- No-show mesh cutaway stabilizer, such as Floriani No Show Mesh or Sulky Soft 'n' Sheer
- Very sturdy water-soluble stabilizer (we used Vilene; Sulky Ultra Solvy is another good choice)
- X-acto knife and scissors
- Regular 40 wt. embroidery thread (we used rayon, but you might also use polyester), and 30 to 50 wt. 100% cotton thread (we used Madeira Cotona)
- Temporary spray adhesive
- Masking tape and a pencil
Designs Used
First of all, the steps used to stitch these cutwork designs are the same as shown in the basic cutwork tutorial.
If you’re not familiar with that tutorial, take a second to read it over to learn the basic steps for stitching Urban Threads' cutwork embroidery designs. This tutorial will mostly focus on placement tips to line up those skull elements, but don’t worry, we’ll give you reminders now and then.
Got it all fresh in your mind? Good! Let’s get started...
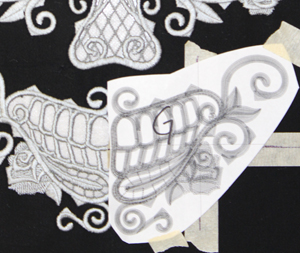
Also super important for this skull assembly are your printed templates of each design file, to help with placement. Here's how to print placement templates using embroidery software.
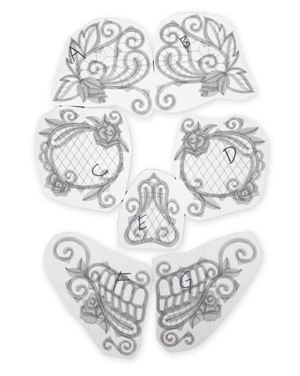
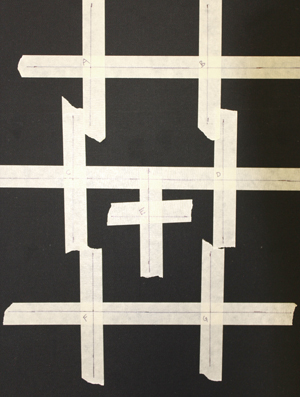
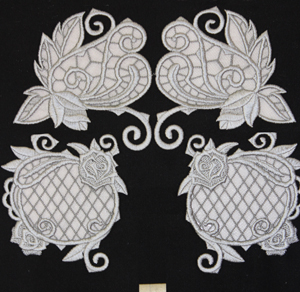
I’m going to be demonstrating the assembly and placement of the 4"x4" version of the skull, because it’s the most labor-intensive (with seven pieces to embroider), but I’ll give you tips for the larger sizes too (those skulls are divident into three pieces each).
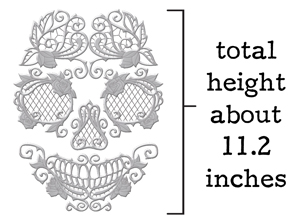
OK, so these numbers aren't hard and fast rules -- you can kind of place these pieces in any fashion you think looks like a good skull. But to get the spacing we show you on the product image, the final assembled size of the 4"x4"-hoop version of the skull is about 11.2 inches tall.
We’ll use this measurement to guide our placement.
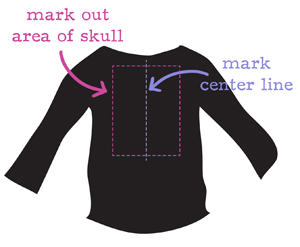
Mark the area of the skull onto whatever garment you’re putting this on. It’s helpful to mark the completed size early, so you don’t put your skull too low or high.
Once you’ve marked the area out, you’ll also want to mark the center line down the middle. We’ll use this line to measure where all our designs will move out from.
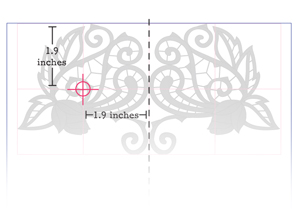
OK! For your two top skull pieces, you'll want to put the centers (the middle axis marked with the red in this example) 1.9 inches from the top of your square, and 1.9 inches away from your center line.
You’ll of course mirror this measurement for the other piece. The two pieces should be just touching in the middle, along the center line. Tape those templates in place.
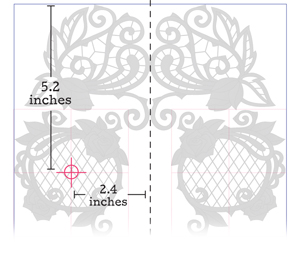
Next, your skull eyes...
Measure down 5.2 inches from the top for the center eye axis, and 2.4 inches away from the center line, on either side. Tape the two eye templates in place.
You’ll notice the little curls from the forehead pieces are kind of “slotting” into the area between the eyes. This is a good sign you’re lining things up correctly.
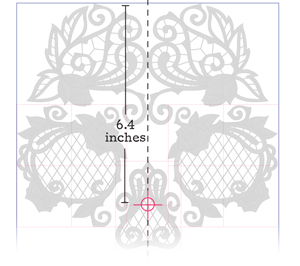
The center of the nose axis goes dead center on the middle line, about 6.4 inches from the top.
It should be sitting nice and even between the eyes, with just a little bit of space around it, as pictured.
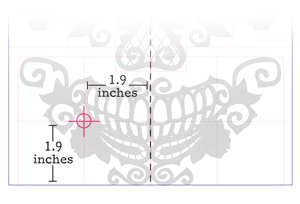
Finally, your two mouth pieces. These, like the forehead, should have their center axis 1.9 inches from the bottom and 1.9 inches from the center line.
It’s especially important that these two templates just barley touch in the middle, so you don’t get a gap-toothed skeleton! Tape those in place once you get them nice and snug next to each other.
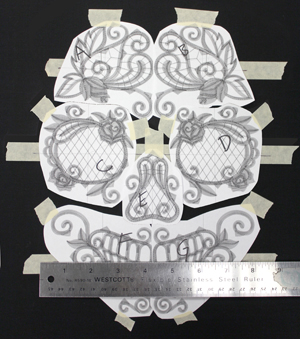
Here are all my templates taped in place!
Once you have at least one piece of tape to hold each piece down, place a cross of tape behind each template, lining up with the axis lines of each piece. (Take a peek four photos down to see the tape crosses alone.)
This arrangement will let you draw a center dot and axis lines on the tape later, and let you work and hoop with just tape, instead of paper. Trust me, it’s much easier that way!
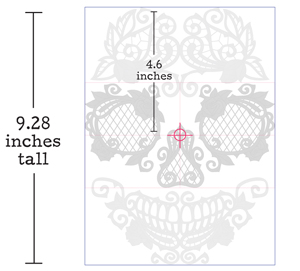
For the 5"x7"-hoop version...
This version is easier. The forehead comes as one piece, the eyes and nose all as one piece, and the mouth as one big smile. This one has just three pieces to line up!
This skull is about 9.28 inches tall assembled, so all you need to do is place your eyes/nose center axis about 4.6 inches down, and then line the forehead up with the top edge of your rectangle, and line up the mouth with the bottom.
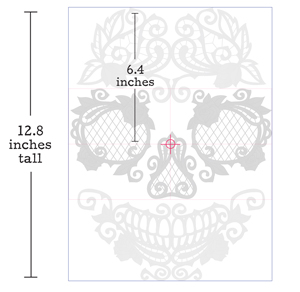
For the 6"x10"-hoop version...
Pretty much the same. This version is also just three pieces to line up, but your finished skull will be about 12.8 inches tall.
Place your eyes/nose center axis about 6.4 inches down, and then line the forehead up with the top edge of your rectangle, and line up the mouth with the bottom.
Got all your pieces taped in place? Good!
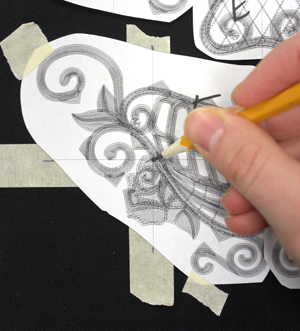
Place those tape X’s behind each template, and then mark the axis and center point on each piece of tape. You can punch right through the middle of your paper template to get your center spot if you like. Just don’t punch through your fabric!
With each template removed, complete the axis line on each piece of tape. This will ensure you get perfectly aligned, straight designs.
It also helps to mark which piece goes with which file letter. You can see if you look really closely that I labeled each template cross with a little A, B, etc. This will help you keep track of which piece goes where.
Ready to get started? OK!
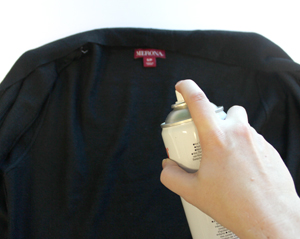
First you will just hoop up your FIRST design with no-show mesh cutaway stabilizer. Spray the back of your shirt and place the cutaway behind the area where the first design will stitch.
Hoop it snugly all together.
Do NOT try to cover the whole back at once with the cutaway. Your designs will come out much smoother and less wrinkled if you stabilize separately for each design, one at a time.
Refer to the thread list for your design to see which thread to use when. These cutwork designs use a combination of regular rayon (or polylester) embroidery thread, and cotton thread.
Wind a bobbin of your cotton thread -- you'll need this to match your cotton top thread, for the lace part of the designs.
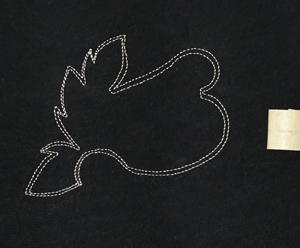
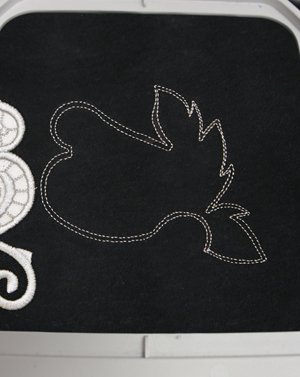
Start embroidering the first design. The first thing that stitches is a dieline that tells you where to cut away the fabric.
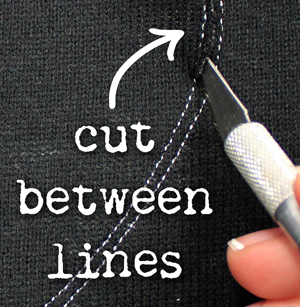
Grab your sharp X-acto knife and KEEPING YOUR DESIGN HOOPED, move the whole hoop off the machine and onto a cutting surface.
Use your blade to cut carefully between those two stitched lines.
A tip: Always aim your cutting direction in towards the center of the design. That way if you cut too far, it won’t matter. If you cut out towards the edges and slip, you may cut outside the intended area and ruin your fabric!
Once you’ve cut your fabric area out, tape a piece of sturdy water-soluble stabilizer such as Vilene or Sulky Ultra Solvy to the back (as shown in the basic cutwork tutorial).
Place your hoop back onto your embroidery machine, and start stitching! The next thing that stitches will be a tackdown to hold that water-soluble stabilizer in place. Switch to cotton thread (top and bobbin) and the lace part will stitch. Then switch back to your regular rayon/polyester thread to stitch the finishing details.
Once the design is done, un-hoop it, and cut away as much of the excess water-soluble AND cutaway stabilizer as you can. You want to remove it from the stitching area of the next design.
Time to move to the next piece! Spray the back of the fabric and smooth on another piece of cutaway stabilizer, and move your hoop over to your next marked spot.
This most likely will mean you’ll have to hoop over an area you just embroidered. That’s OK, it can take it!
This is my next forehead piece, ready to have the fabric trimmed. Just repeat the cutwork steps for each piece you stitch.
Slowly the skull starts to appear. One piece at a time lets you create a big cutwork masterpiece, using a small hoop.
Take extra care lining up and hooping your mouth piece so it’s right next to the first one that stitched. I placed my template back on top just to check that those teeth were touching. That way your skully will have a nice continuous smile.
If you can’t get it perfect, don’t worry. If there’s a bit of a gap, no one but you will ever notice it.
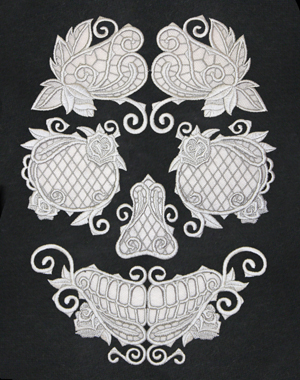
The finished skull!
After cutting away as much of the stabilizer from the back as possible, leave your skully in water to soak according to your water soluble stabilizer instructions.
Once all the stabilizer is dissolved, set it out to dry.

And you’re done!
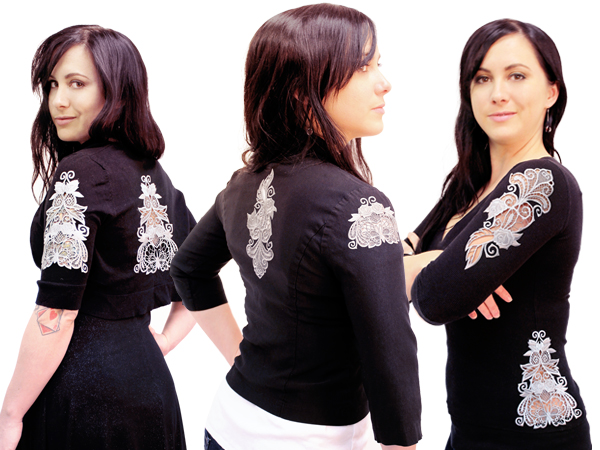
From even the smallest hoops, a bold idea can make its mark on any kind of project. I love the look of this big glam skull on the back of a cardigan, letting a colored or light shirt shine through underneath.
Want to go more subtly chic? Try a tone-on-tone version, with the skull stitching in the same color as your cardigan or sweater. Those skull features will really pop, and the embroidery will shine in subtle shifts of light.

That’s not all cutwork can do -- the other designs from the Rose & Bone set are perfect for dressing up casual wear of any type. Add corner pieces to the front of cardigans for a chic accent. Open up a sleeve (using this tutorial as a guide) and let long designs shimmer down sleeves, or use a border piece to add a thinner, elegant touch wrapped around. You can even stitch them as elegant swooped designs down necklines. These designs are perfect for adding just a bit of romance to everyday wear.
Maybe you want to go dressy! These designs can go all the way. Stitch some dramatic windows in a bolero for a dress, and let a little skin shine through for a classy touch. Stitch it on blazers and jackets to add a bit of high fashion and personality to business wear. Or go daring and bold by placing your cutwork to show off a flash of skin. Whatever you add these Rose & Bone designs to, you’re sure to get noticed!


