Learn how to create a table center set with this helpful tutorial.
Supplies
Note: The links below are affiliate links. We may earn a small commission if you make a purchase using these links.
- Main fabric: 1 1/4 yard of light-medium weight fabric (such as cotton, linen, twill, etc.)
- Accent fabric: 1 1/4 yard of light-medium weight fabric (such as cotton, linen, twill, etc.)
- Backing fabric: 1 1/4 yard of light-medium weight fabric (such as cotton, linen, twill, etc.)
- Medium weight cutaway stabilizer
- Embroidery thread
- Temporary spray adhesive
- Sewing machine
- Sewing thread
- Sewing clips or pins
- Scissors
- Rotary cutter (optional)
- Cutting mat (optional)
- Ruler or quilting ruler
- Fabric marking tool (such as a heat erase pen)
- Iron
- Ironing board
- Pressing cloth
Designs Used
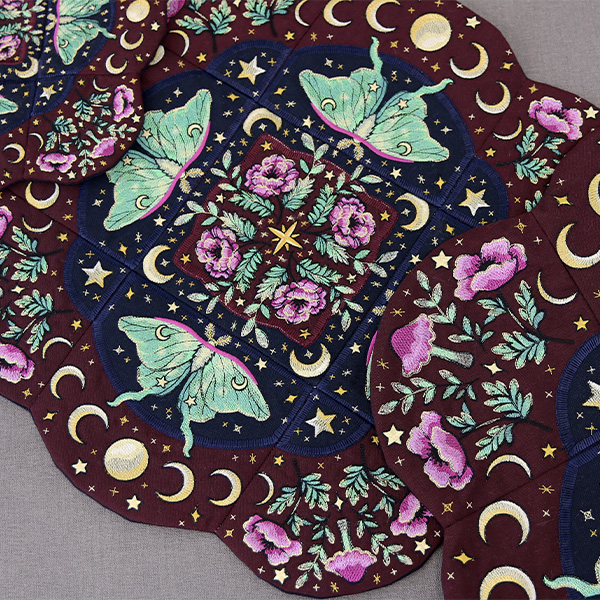
This tutorial shows how to assemble any of our Table Center Designs. These steps work for every table center no matter the hoop size, different embroidery details, or final outer shape.
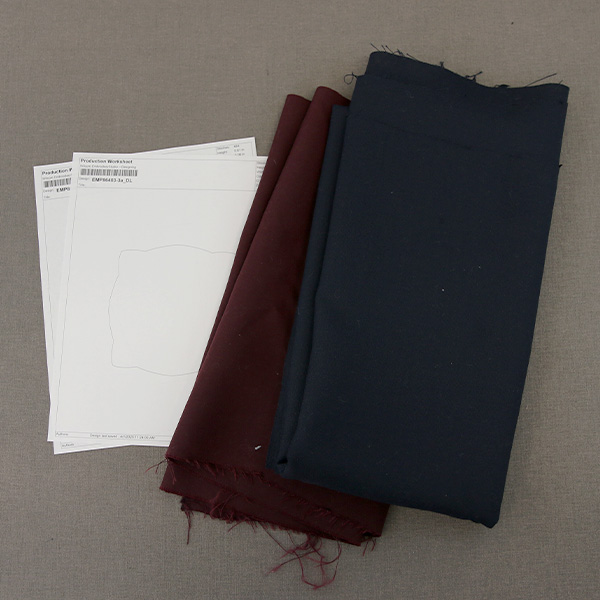
When you download the design, you will find multiple files. Some are embroidery files, and others are dieline files marked with the letters "DL". Dielines are used to cut the fabric to the correct shape and size. Open and print the dieline file using embroidery software. If you do not have embroidery software, take a look at our helpful video on using dielines.
We also recommend Wilcom's Hatch software which comes in different levels depending on what you'd like to use the software for. Hatch Organizer works well to view your designs, print dielines and templates, change design colors, and create basic design layouts. (This is an affiliate link. We may earn commission on purchases made with this link.)
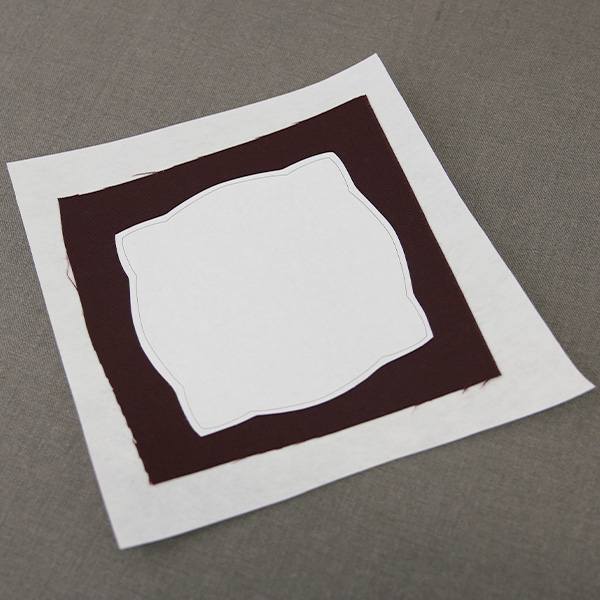
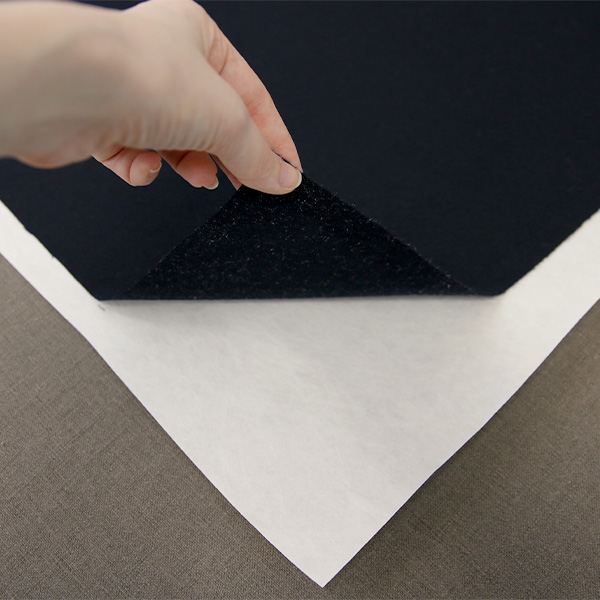
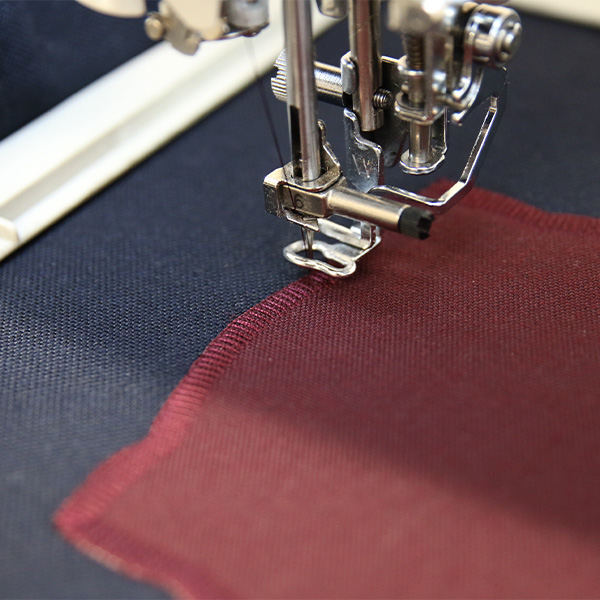
To make the applique pieces, spray a piece of cutaway stabilizer with temporary spray adhesive. Then, smooth the stabilizer onto the wrong side of the fabric piece. Also, spray the wrong side of the paper dieline with temporary spray adhesive, and smooth it onto the right side of the fabric.
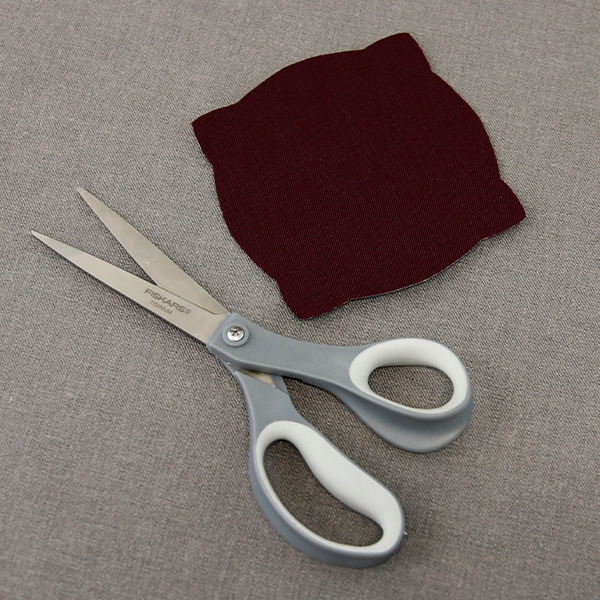
Cut the dieline shape out of the layered cotton & stabilizer. Then remove the paper dieline.
Each table center design has multiple files, and each file in the same design may use a different fabrics for the applique fabric than the others. Make sure to cut the applique out of the correct fabric for the file you are embroidering.
To prepare the embroidery fabric, cut a piece of medium weight cutaway stabilizer and a piece of the main fabric (for the first embroidery file) bigger than your hoop. Spray the cutaway stabilizer with temporary spray adhesive, and smooth it onto the wrong side of the cotton piece.
Some files may use a different fabric for the main fabric than the others. Check to make sure you are using the correct fabric for the file you are embroidering.
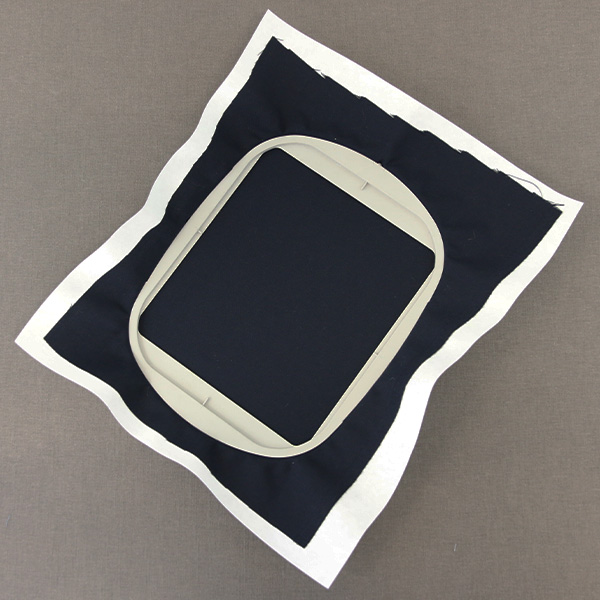
Hoop the fabric and stabilizer together. Make sure everything is hooped tightly and that there are no wrinkles or puckers in the fabric.
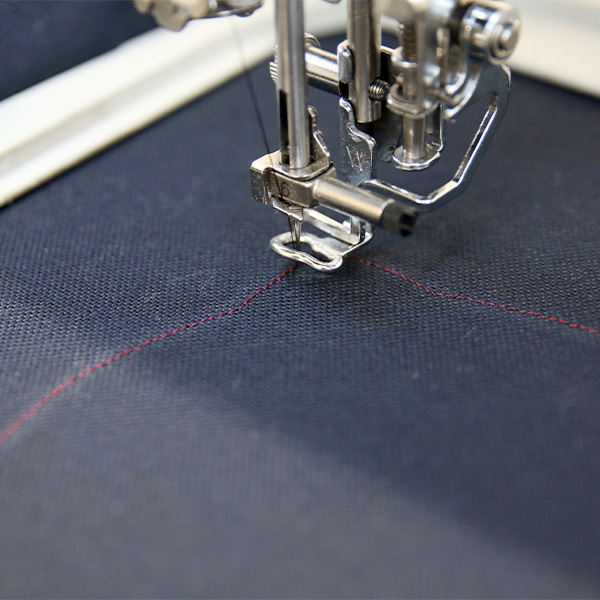
Load the first embroidery file onto the machine, attach the hoop, and begin to embroider the design. Some table center designs have details that sew before the applique steps and some do not. Watch the color change steps closely, and continue to embroider until you have sewn out the first step with "dieline" in the name. This dieline (or outline stitch) marks the area where the applique piece will be placed.
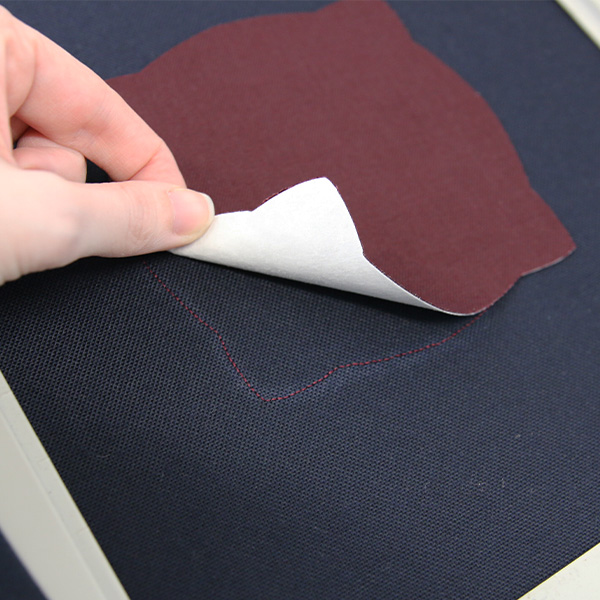
After the dieline has sewn, remove the hoop from the machine, but do not unhoop the fabric. Spray the wrong side of the applique piece with temporary adhesive. Place the applique on the hooped fabric inside of the sewn dieline shape.
Place the hoop back on the machine, and embroider the tackdown for the applique piece that was just placed. A tackdown holds the fabric piece in place for the remainder of the design.
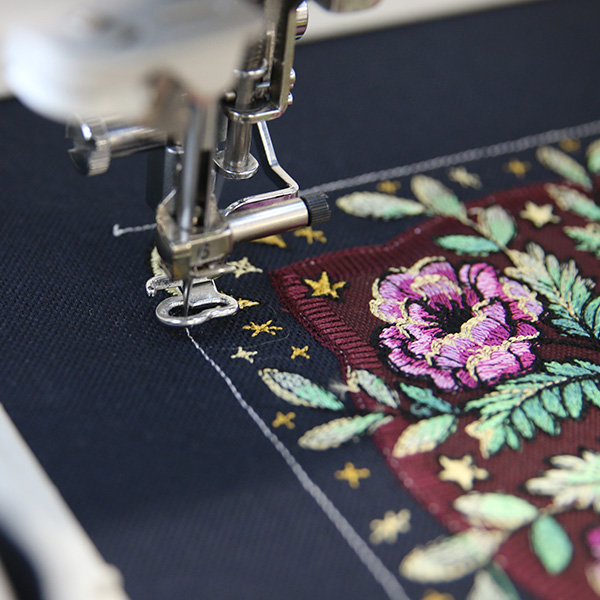
Continue to follow the color change steps, and embroider all details. The final thing to sew will be the "outer box" around the entire design. This outer border can be any shape like an actual square or a shape with some curved edges. It will be used as a guide to add the seam allowance and sew the pieces together later.
For best results, match the thread color for the "outer box" to the color of the hooped fabric.
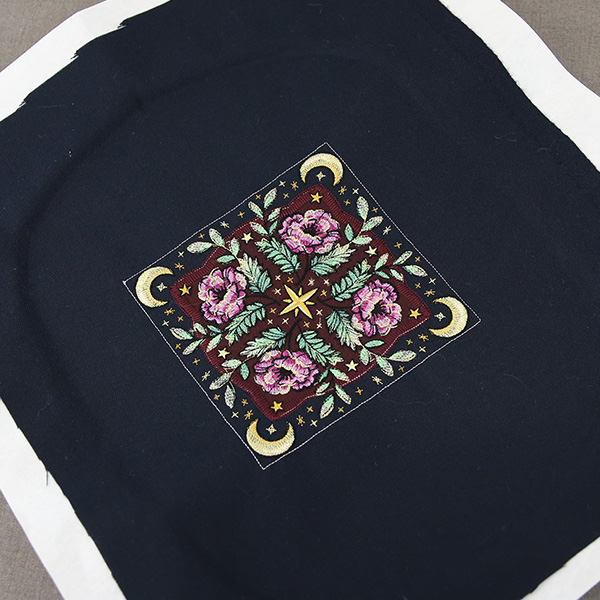
Once the embroidery is finished, unhoop the embroidered design. Do not trim the fabric or stabilizer yet.
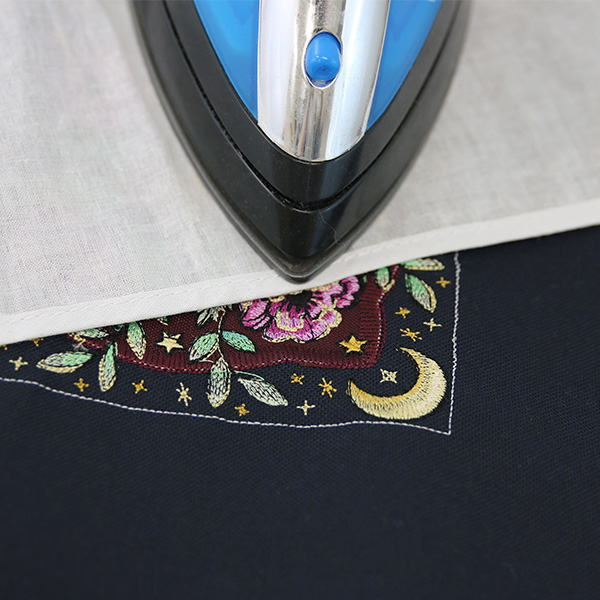
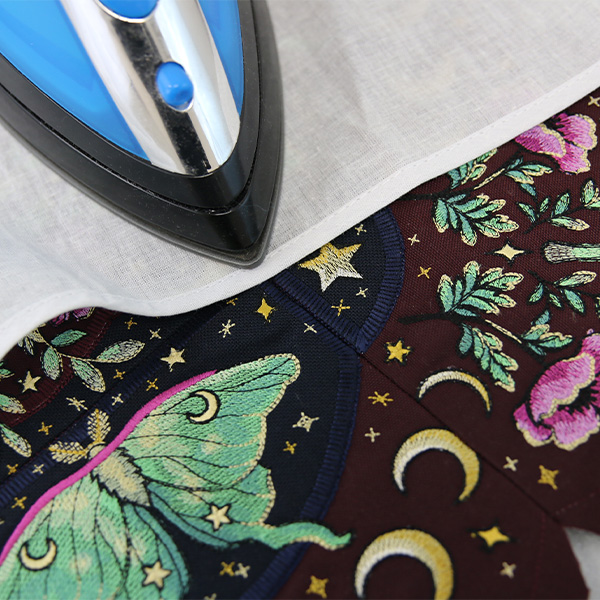
Iron the embroidered design with a pressing cloth on top. Try and remove any wrinkles, and make the sides as straight and flat as possible. Then set the embroidered design aside.
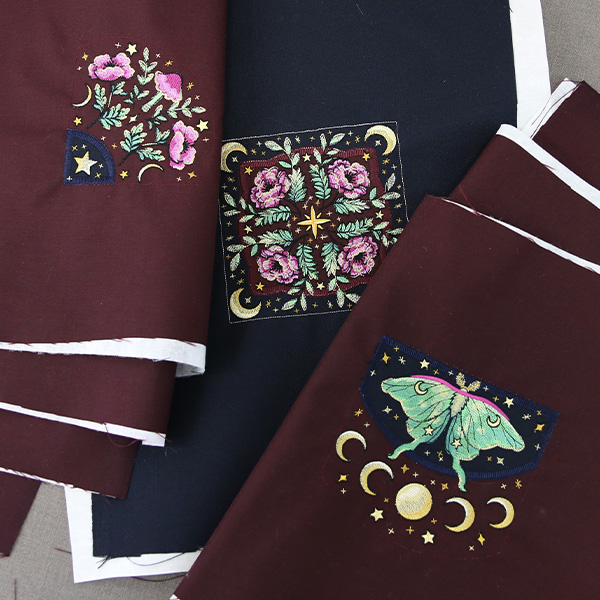
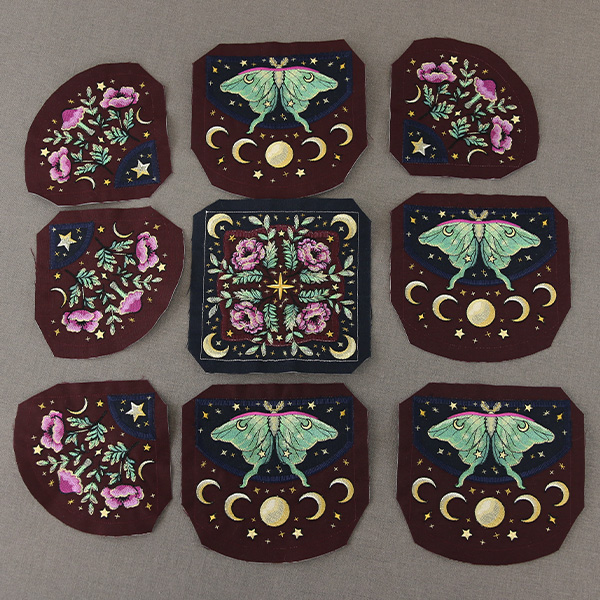
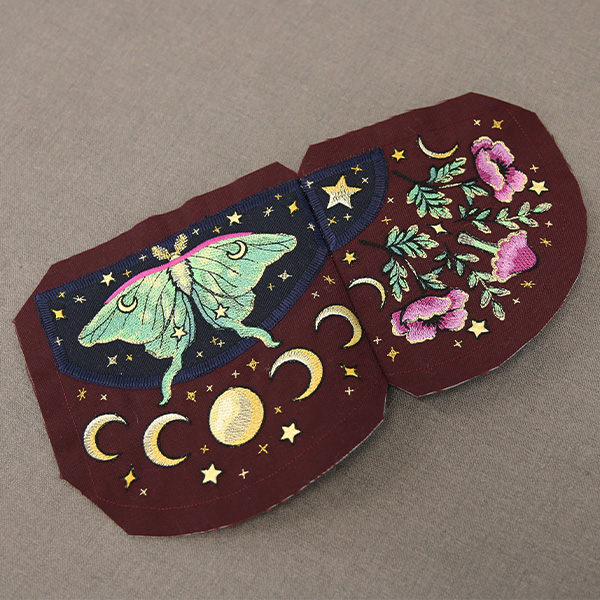
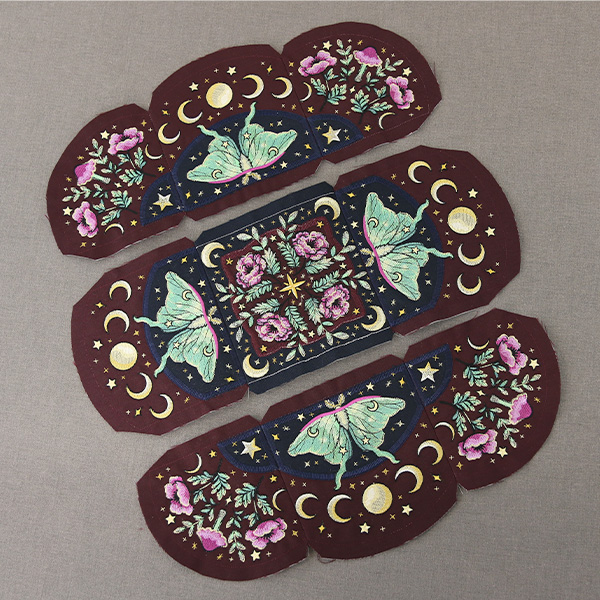
Repeat the previous steps to embroider and iron all of the embroidered pieces you will need to create an entire table center. To create a round table center like we are showing in this tutorial, you will need one center piece (file a), four side pieces (file b), and four corner pieces (file c).

In this tutorial we are using a 1/2in seam allowance. You can use whatever seam allowance you are comfortable with for this project. Simply replace 1/2in with your chosen seam allowance any time you see it for the rest of the tutorial.
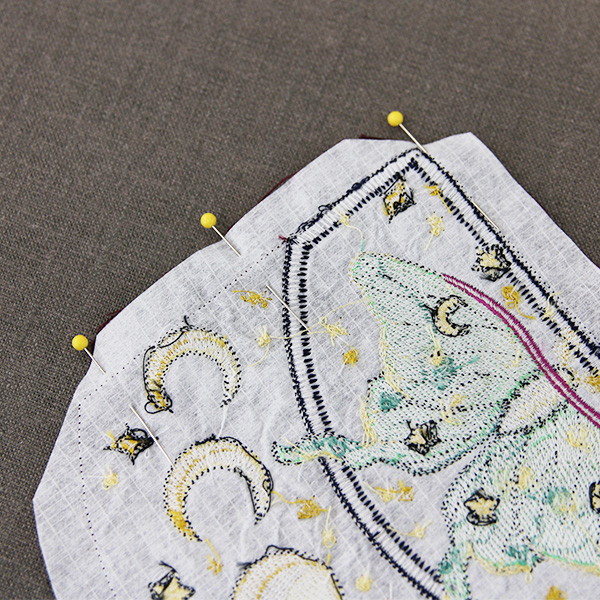
To add the seam allowance to the first piece, measure 1/2in away from all four edges of the design (the outer box), and cut away the excess material. This will leave an even border of fabric around the edges of the embroidered design. This 1/2in border of fabric will be the seam allowance.
The easiest way to measure and cut the seam allowance around the design is by using a quilting ruler and rotary cutter. If preferred, you can also measure and draw the seam allowance around the outside of the panel, and simply cut on that line with a scissor instead.
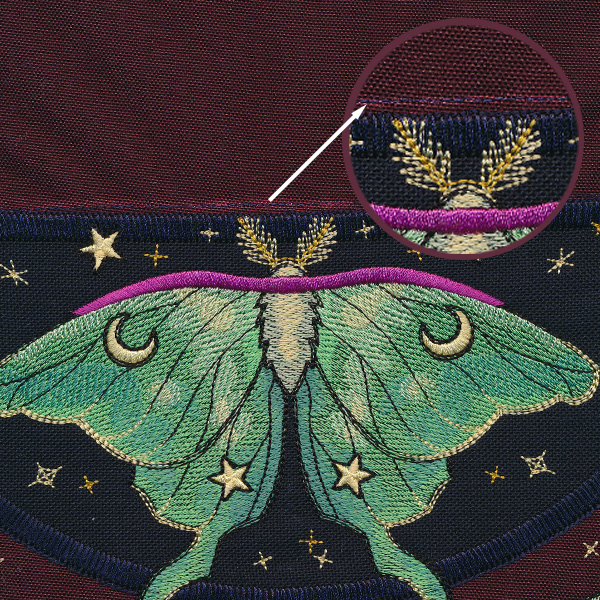
Due to the nature of embroidery and fabric, sometimes the design may shift leaving a gap between the edge of the applique piece & the final "outer box" that sewed around the design.
For cutting the seam allowance, measure and cut using the "outer box" as the outside of the design. When sewing later, we will reference this gapping again, as you will want to sew following the edge of the applique not the "outer box" to make your design look seamless.
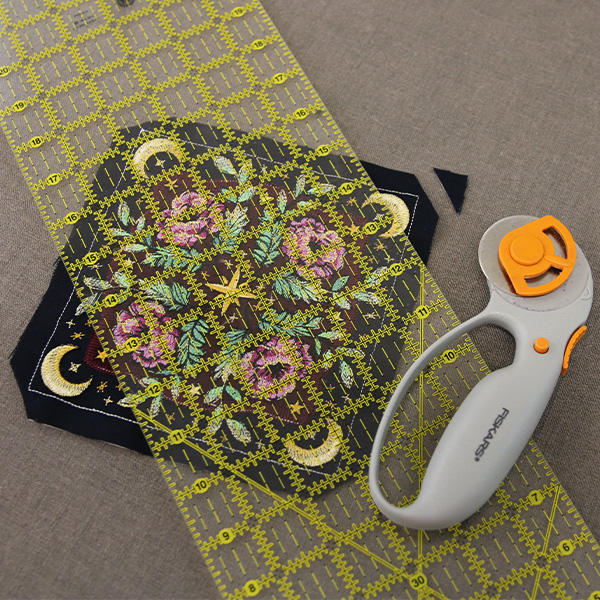
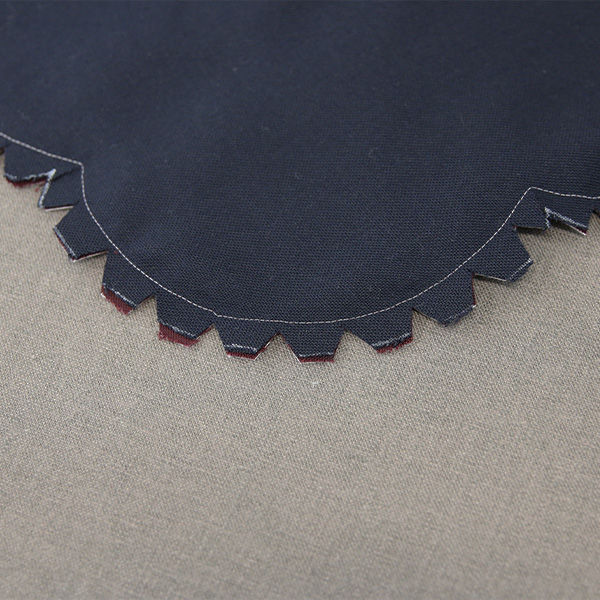
After the seam allowance is cut, also trim off all four corners of the seam allowance. This will reduce the amount of bulky fabric while sewing, and make the table center piece lay nicer.
Be careful to cut close to the outer box, but try not to cut into the embroidery at all. You will want to trim all four corners of every piece even if the adjacent sides are not straight.
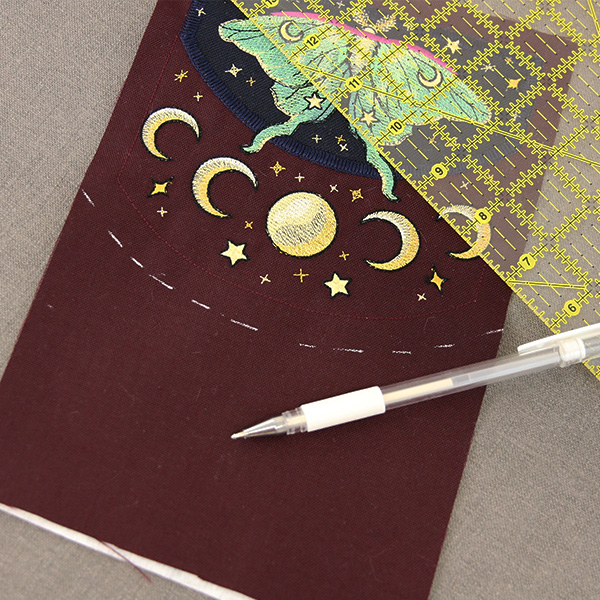
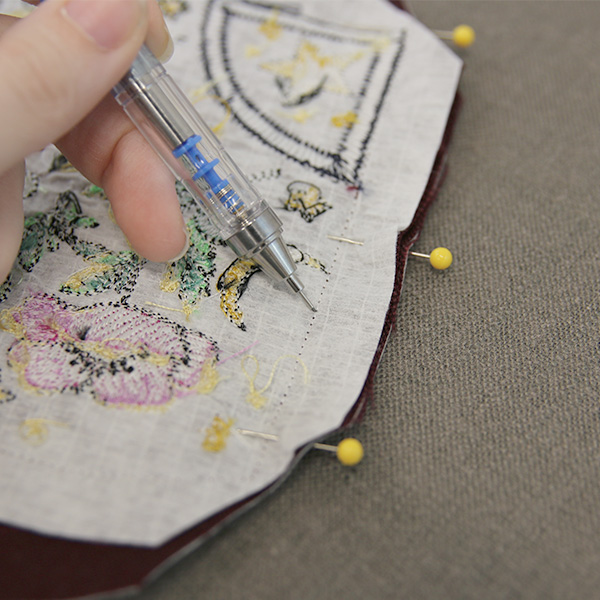
For the embroidered pieces with curved edges, using a marking tool and scissors is easiest. Use a marking tool and ruler to measure and mark the 1/2in seam allowance away from the curved edge. Then cut it with a scissor.
Repeat the previous steps to measure and cut the seam allowance for all of the pieces and duplicates. Make sure to cut all four corners off of every single embroidered piece being used.
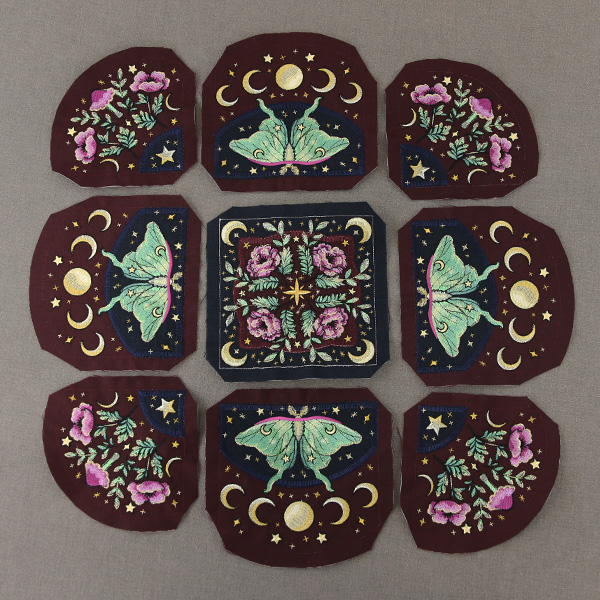
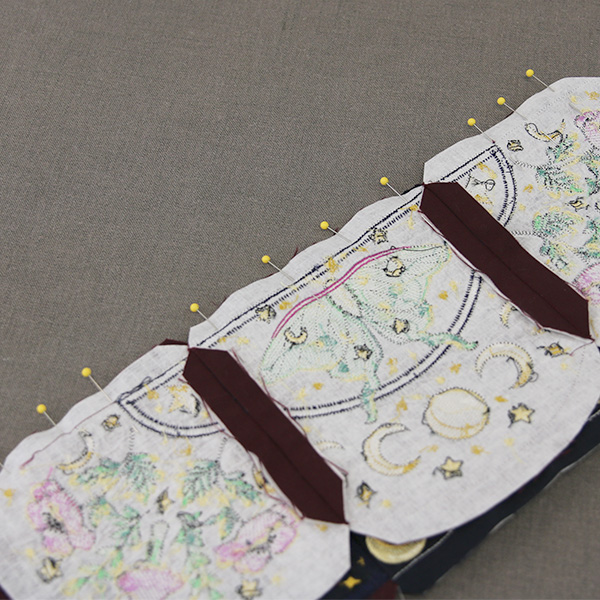
Once all the pieces are pressed and cut out, carefully arrange them on the work area to show which pieces go next to each other when the table center is lined up. Looking at them like this while you assemble will help you see which edges need to be sewn together. Keeping them arranged like this while you work will also help prevent them from being mixed up or sewn to the wrong pieces.
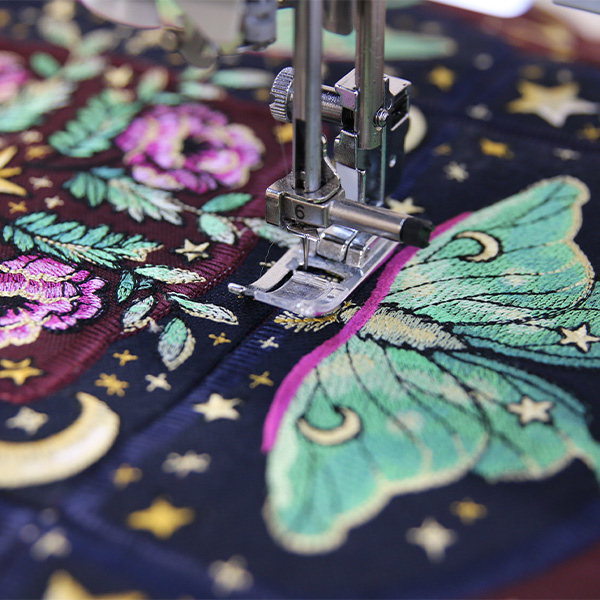
To begin assembly, take the two top left pieces and lay them on top of each other with right sides together. Match up the edges of the fabric. For best alignment, carefully look between the two embroidered pieces and match up the actual embroidered line of the outer box and corners of both embroidered pieces. Then pin or clip the two pieces together along the side that needs to be sewn together.
The trick to perfectly lining up your pieces and seams with the edge of the embroidery is to pay close attention to the embroidered outer box of the designs. When pinning any panel pieces together (like we did in the previous step), take extra care when matching up the outer borders and corners of the two pieces as best you can on top of each other. The closer they are lined up, the better the panels will be aligned once sewn.
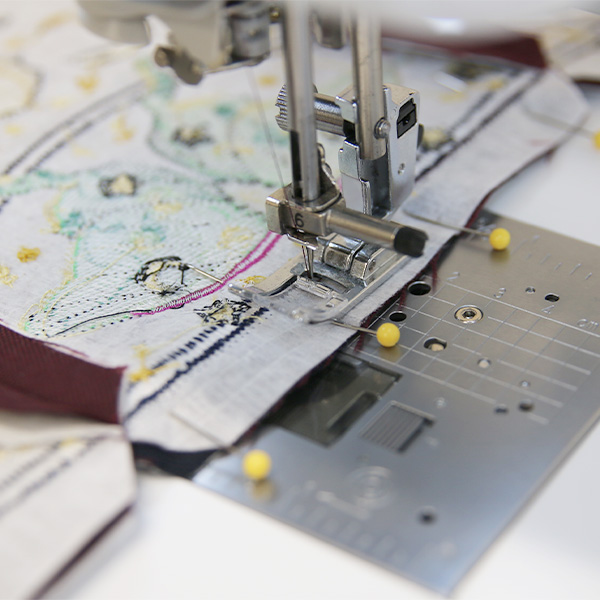
When sewing, you want to always sew with the backside of the embroidery facing up so you can see that outer box while you sew. Then, simply sew right along the inside edge of the embroidered border. Sewing there will look best, and leave no gaps. Since we measured the seam allowance from this line as well, sewing here also acts as a guide to sewing the correct seam allowance.
If the applique edge has shifted inwards and is leaving a gap between the applique and outer box like we discussed earlier, sew right on top of the edge of the applique in those sections rather than following the outer box for best results.
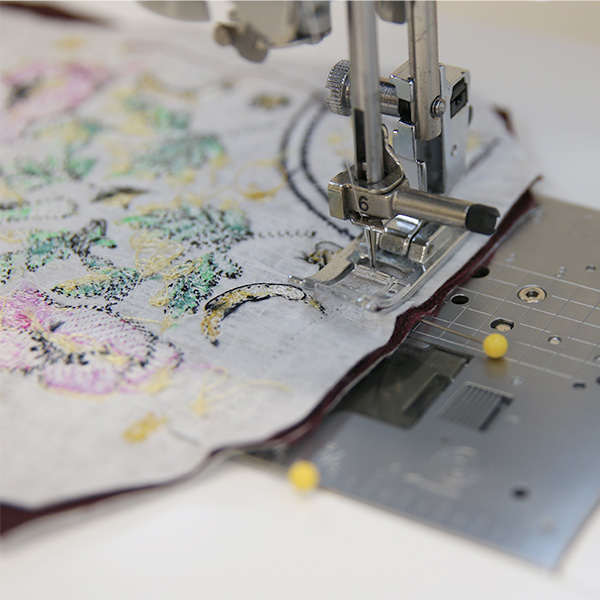
Place the pieces on the machine with the wrong side of the embroidery facing up. Sew the two pieces together following the outer box of the embroidered design and the edges of the applique.
After sewing the seam, look at the two sewn pieces from the right side of the embroidery, and double check that everything is lining up well.
If there is a gap showing between any applique pieces, place the pieces back onto the machine without seam ripping anything, and sew closer to the applique pieces in those areas.
If the pieces are simply not lining up well, seam rip them apart, and re-pin and sew them together again until you are happy with the alignment.
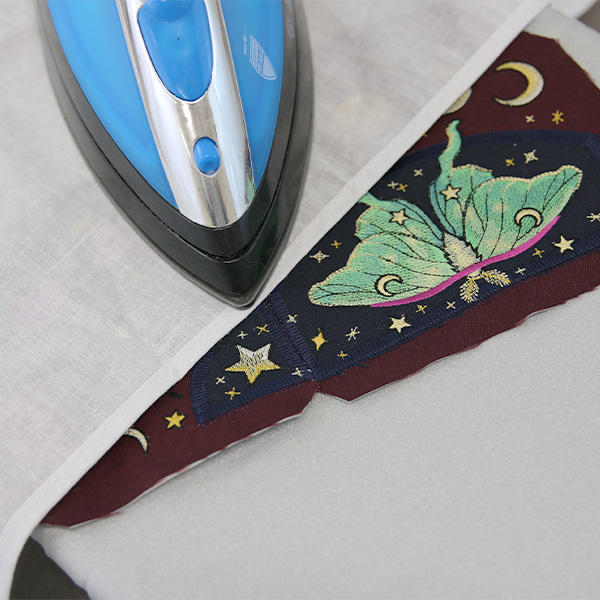
Once you are happy with how the pieces are sewn together, press the seam so the pieces lay nice and flat. You can either press the seams all to one side to help the corners line up more cleanly, or you can press the seams open to make the fabric lay more flat.
Always use a pressing cloth when ironing to protect the stabilizer and fabric from the iron.
Repeat the previous steps to carefully line up the last piece in the top row, pin the pieces together along the correct side, and sew the third piece onto the other two. Then press the seam with a pressing cloth.
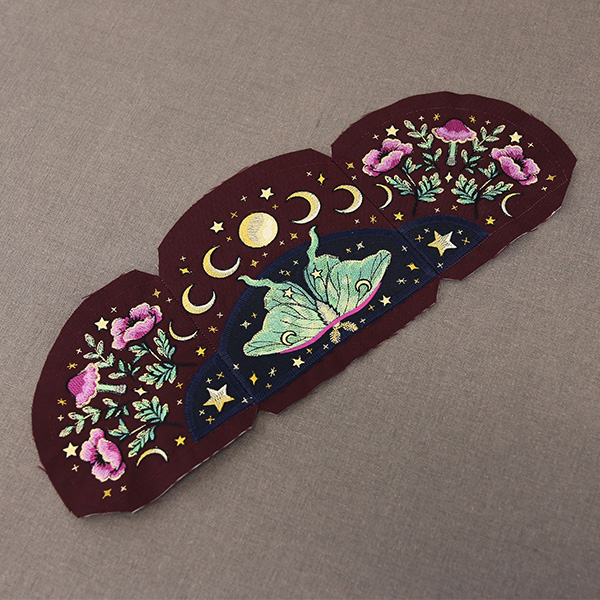
It is easiest to create the table center if you sew all of the horizontal rows first. Repeat the previous steps to make all three rows of the table center. Make sure to line up, pin, and sew each of them together carefully following the outer box and applique pieces. Always press the seams the same way.
Then lay the sewn top and middle rows on top of each other with right sides together. Match up the outer borders, the seams, and the applique edges on the pieces. Then pin or clip them together along the side that will be sewn together.
Sew the two rows together by sewing along the inner edge of the outer box or on the edge of the applique pieces as done earlier.
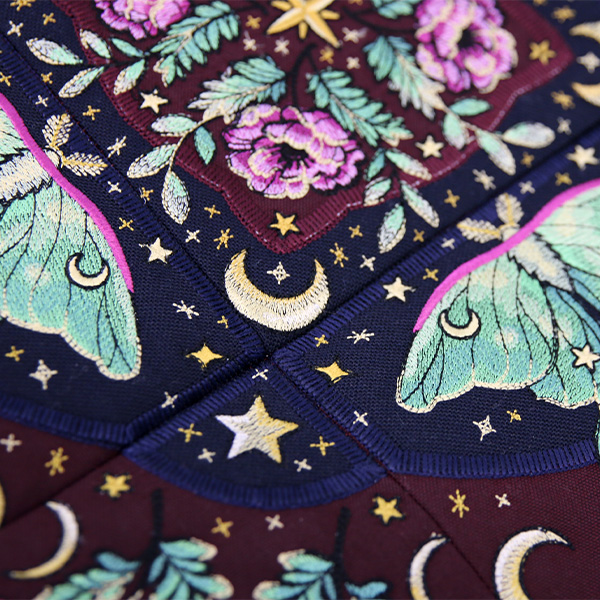
Before pressing, look at the sewn rows from the right side of the embroidery, and double check that everything is lining up well.
If there is a gap showing between any applique pieces, place the pieces back onto the machine without seam ripping anything, and sew closer to the applique pieces in those areas.
Once you are happy with how the pieces are sewn together, press the seam as you have previously.

Repeat the previous steps to carefully line up the middle and bottom rows. Pin the pieces together along the correct side and sew them together following the outer box and applique edges. Then press the seam with a pressing cloth.
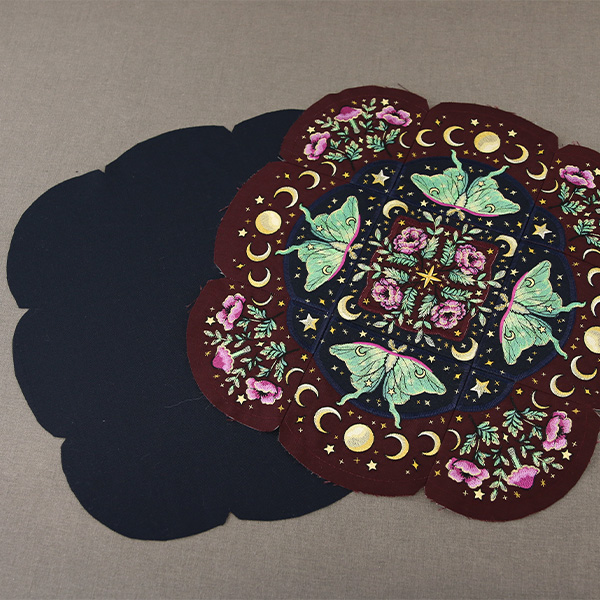
Now that all the pieces have been sewn together to create the front of the table center, we can cut out the back piece. Lay the assembled front piece on the back fabric, and trace around it to draw its shape on the back fabric using a fabric marking tool. Then cut on the drawn line to create a back piece that is the same shape and size as the assembled front piece.
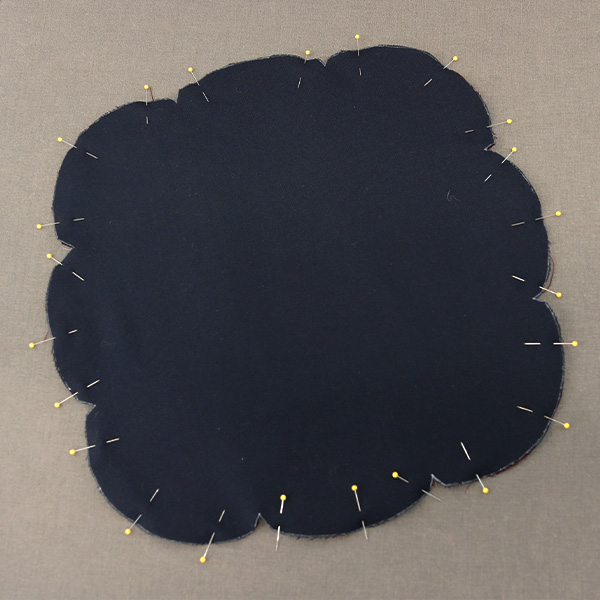
Lay the back piece on top of the front piece with right sides together. Then pin or clip the pieces together along all four sides.
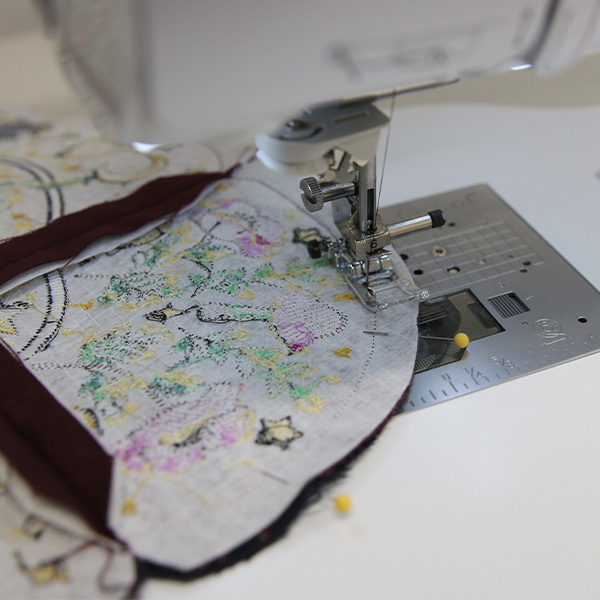
Place the pinned fabric on the machine so the wrong side of the embroidery is facing up. Sew the front and back pieces together by sewing along the embroidered outer box and applique edges just like we did when sewing all the embroidered pieces together.
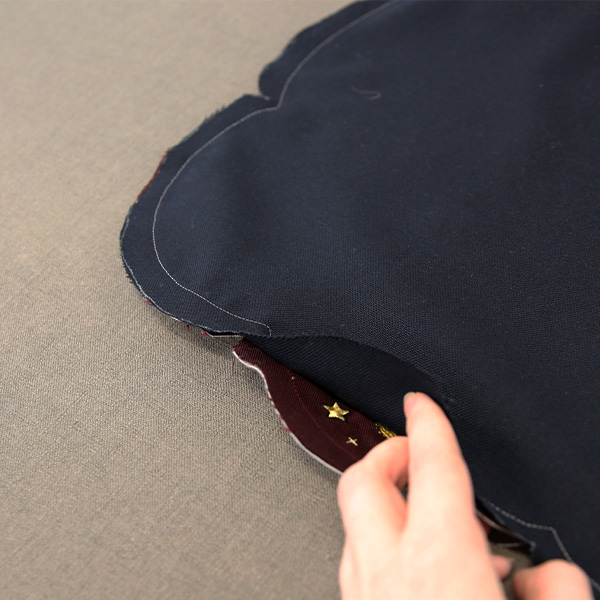
Make sure to leave a 6-8in opening along any side, so the table center can be turned right side out.
Once sewing is completed, carefully trim the outer seam allowance along any curved edges, points, and corners. This will help the edges of the table center lay nicely once turned right side out.
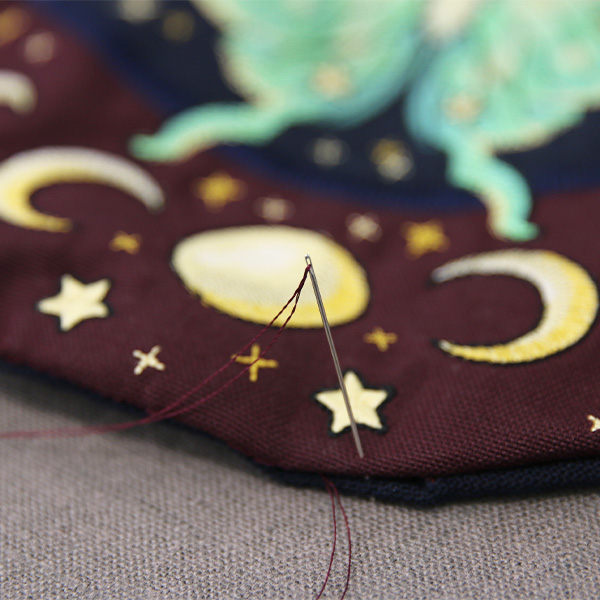
Turn the table center right side out, and use a pressing cloth and iron to press all the edges until they are crisp and lay nicely. Then press in the edges of the opening, and hand sew the opening closed.
If your table center is not laying flat very nicely, you can also top stitch along the outer edges or "stitch in the ditch" which means stitching in all the seams between the embroidered pieces to secure the front and back pieces together. This is optional and can be skipped as desired.
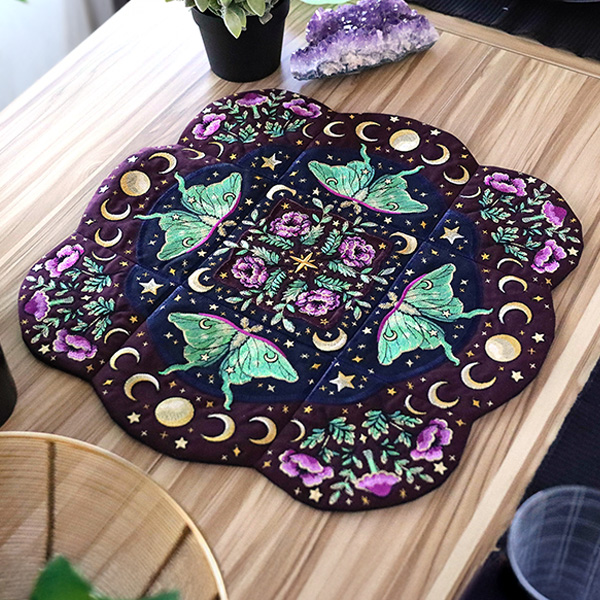
Now that the embroidered table center is completed, lay it on a table or coffee table to add some embroidered charm to your home or office. Our table centers also make beautiful handmade gifts for a friend or loved one.


