In the Blackthorn collection of embroidery designs, each piece was designed with shapes and styles that are perfect for adding gorgeous lace-like accents to apparel. These lace-inspired designs can be stitched directly onto fabric for a subtle effect, or on a sheer material to really bring their lacy qualities to life. We’ll give you some ideas as to how and where you can showcase these designs, and how mirroring and repeating can make even a small design become a statement piece, plus how to use them to upcycle a thermal top into something chic and new.
Supplies
So, now we have a couple of ideas of different ways you can use these designs, let’s grab a couple and get creative! I could just stitch the designs directly onto this tee, but I like the idea of adding in a sheer quality to really bring out the lacy look of these designs. So I’m going to upcycle this plain thermal into a new lacy creation. To make yours, you’ll need:
- Long sleeve tee
- Awesome lace-like Blackthorn embroidery designs (I’m using the medium size of the wedge design and the large size of the neckline accent
- Organza fabric
- Water-soluble stabilizer
- Seam ripper
- Scissors and pins
- Fabric glue (optional - depending on the sheer fabric you use, this can help prevent fraying edges)
Designs Used

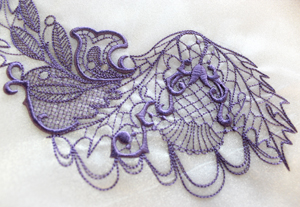
This collection was specially designed with flexible use in mind, utilizing mirroring and repeating to get a much larger effect. For example, this Blackthorn Neckline Accent piece is perfect for collar embellishments. Just mirror the design on either side of a scoop neck piece. Flowy, curving features work as beautiful accents on sleeves and lapels, and thin borders can be repeated to make one long lace-like edge.
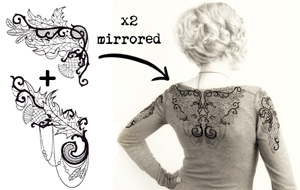
Other designs, like these two corner and drape designs, can interlock together, and when mirrored, make one giant statement piece draped down the front or back of a dress or tee. The designs are flexible enough to use on their own, but with some creative mirroring and repeating, can expand the impact of your hoop and let the embroidery really shine. Light stitches and delicate, looping details keep it friendly for all kinds of fabrics.
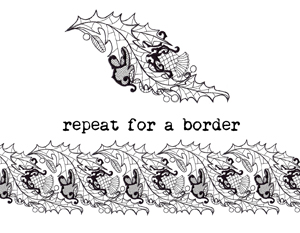
Other designs, like this “S” thistle curve, can interlock with itself, and repeat into a beautiful, wide border. The flexibility of all these pieces means you can use them standing alone or with creative re-hooping to make them something even more.

This is my basic thermal. The nice part of this technique is that because we’re using a sheer material to “float” our designs, your tee can be fairly stretchy or thin, because we’ll just sew everything on.
So, to start, you’ll want to hoop up your organza with a piece of water soluble stabilizer. Note: depending on whether you think you’ll ever see the back of your design through the organza, you may want to stitch it up using matching bobbin thread, as if you were stitching real lace. It’s not required, but ensures it looks great from both sides.
I’m stitching two different designs, but each one twice, and mirrored. I started with this long triangle-shaped design. It’s perfect for accenting sleeves. This is the piece right after I stitched it, with the stabilizer still on the back. I stitched two pieces, one for each sleeve.
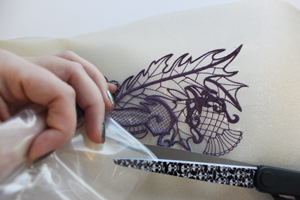
Once your pieces are stitched, turn them over and very carefully cut away as much excess stabilizer from the back of the organza as you can. This will leave less to dissolve and will be less likely to leave sticky gunk on your fabric.
Soak your embroidered fabric according to the directions on your stabilizer package, then pat them dry with some paper towels and let them dry all the way.
While I waited for those to dry, I also stitched up my two collar pieces. Important! Remember to mirror the design the second time you stitch it, so you can use it on either side of your collar. This is easy to do in all machines. Consult your manual if you’ve never tried it before.
Once these designs are done, trim and soak them too, then set them aside to dry out.
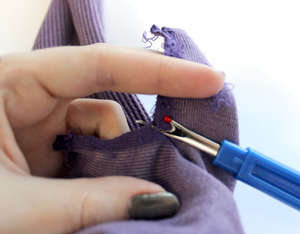
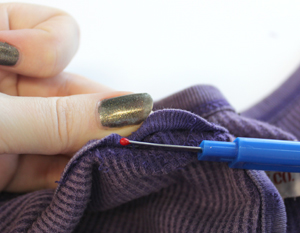
So, how do you get designs on sleeves? Well, you’re going to have to split your sleeve in order to get access to the area you want to stitch. This is incidentally the same thing you’d need to do if you wanted to stitch the design directly on your sleeve.
Rip up the seam about 8 inches or so, so your design area lays nice and flat.

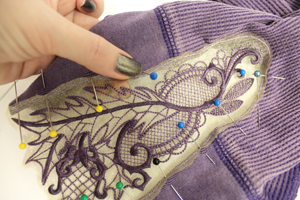
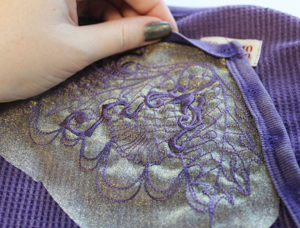
With your sleeve now flat, you can pin your organza piece in place. I lined the edge of the design just up to the edge of the sleeve.
Now, in this instance, I want to take advantage of the sheer quality of the material, and I want to be able to see “through” my blackthorn design like lace, so to speak. You’ll see what I mean in a moment.
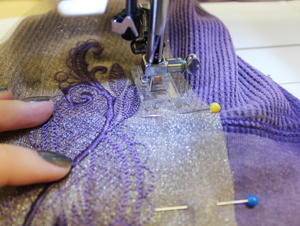
With your design pinned in place, stitch as close to the edge of your design as you can with matching thread, starting at the edge of the sleeve, around, and back again.
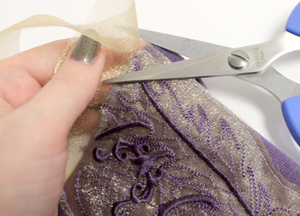
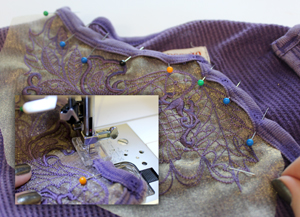
Once you’ve stitched the organza piece in place, trim as close to you can to your stitches, and then cut the excess off near the sleeve edge, just cutting around the shapes of your design.
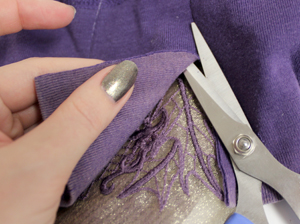
Now it’s time to let our design shine through! Turn your sleeve over and carefully cut away the excess fabric behind your design, leaving behind enough of an edge to fold over (maybe a half inch or less).
With the excess behind the organza removed, fold that raw edge under behind your design and pin it in place.
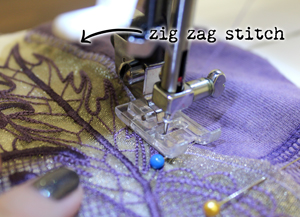
Now change your stitch to a zigzag, just wide enough to cover the raw edge of your organza. Stitch around your design a second time, but this time try and catch the raw edge of the organza along with the folded raw edge of your shirt underneath. This will keep the organza from fraying and hide your raw edges.
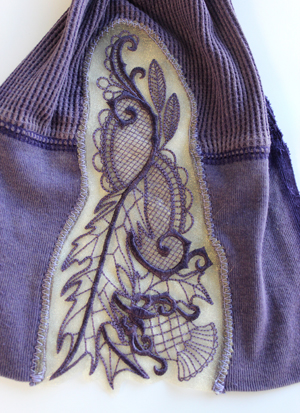
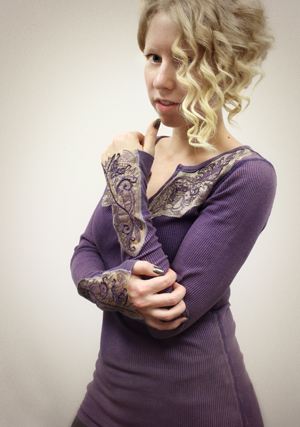
Now you have a beautiful organza “window” for you lace to float on, giving your sleeves a new romantic lace look. Repeat this effect on the other sleeve.

Once both sleeves have been stitched, turn your shirt inside out and pin the raw edges of your sleeve back together, right sides in.

Sew a seam back down the side of your sleeve, closing up what you ripped open earlier. If you were good with the seam ripper and didn’t lose any fabric, your sleeves should look the same as they did before you opened them up.
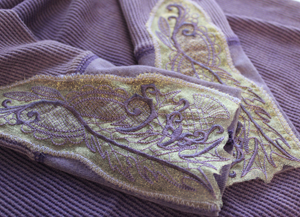
Turn your shirt and sleeves right side out again. Ta da! Beautiful new lacy sleeve accents.
Finally, let's stitch on those collar accents we made earlier. To give these more of a finished edge, I’m ripping open the folded seam at the collar of my shirt, so I can hide the raw edge of the fabric underneath. Rip this open on both sides.
Trim that edge to fit the shape of your collar, and slide the raw edge under the fold you just ripped up. Don’t worry about the rest of the fabric edge right now, we’ll get to that.
Pin that collar edge closed again, with the edge of your sheer organza tucked inside. Sew a seam over the same line you ripped up earlier.
Now, in addition to sewing the collar closed, sew a line around the edge of your design, like you did with the one on your sleeves.

Once it’s stitched in place, you can cut off the excess edge. Though I didn’t do it here, I would recommend adding the same zigzag stitch and maybe a little fabric glue to keep this edge from fraying too much.
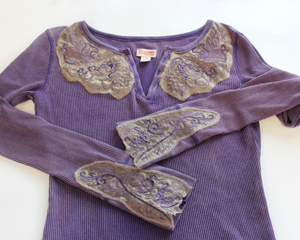
Repeat this on the other side of your collar for a chic new look. Your shirt is done! From sheer lace sleeves to a delicate organza applique with matching fabric, you plain old tee is no more.
I love my new thermal! What was once boring is now glam and new with delicate and dark lace like designs. Light stitching designs like these could go directly on a shirt like this, but I kinda liked the fun accent that the sheer material brought to the tee.
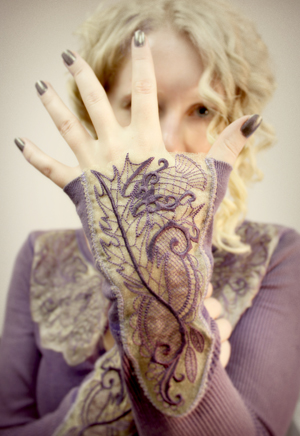
Plus I have to say, those sheer lace cuffs are my new favorite thing about the shirt! It’s such a simple update but really makes a big difference.
So have fun experimenting with how you can update all those old tees, tanks, dresses and jackets in the back of your closet. With embroidery designed to bring clothes to life, you’re bound to find some new way of using them!


