
Looking to add a little joy to your Christmas stitching? These satin edge in-the-hoop ornament designs are versatile and quick to use. Don’t think of them just as ornaments either! Any of these designs can be used as an ornament or traditional applique. That means you can stitch up Christmas cuteness for your tree or your tee.
Supplies & Materials:
- A machine embroidery design like the Kawaii Christmas embroidery designs
- Tearaway stabilizer
- Temporary spray adhesive
- Scissors
- Fabric for the ornament (back and front)
- Ribbon
- Tape
The designs used in this tutorial include:
To start, cut out your applique fabric shapes using the dieline files that came with the design . Be sure to cut out a back and front piece!
To make your design into an ornament, first hoop a piece of tearaway stabilizer. Once your machine starts stitching it will sew a dieline for fabric placement. Once this has stitched, remove the hoop (but do not unhoop your fabric). Spray the wrong side of your front fabric piece and place it inside the dieline. Place your hoop back onto your machine. A tackdown stitch and the inside details of your design will sew next.
Once the inside details are complete, but before the back piece tackdown step, carefully remove the hoop from your machine once again, but do not unhoop your fabric. To make this project into an ornament, add a loop of ribbon to the back with tape, making sure that the ends will be under the satin edge border. Then, add temporary spray adhesive to the back fabric piece, and smooth it onto the back side of the hooped embroidery inside the sewn dieline. The ends of your ribbon should be sandwiched between the front fabric piece and the back fabric piece. You will also want to change your bobbin to match your satin outline (in this case, black).

Place your hoop back on your machine, and it will sew a final satin stitch outline around everything, securing the back fabric and ribbon loop in place.

Tear your ornament free from the stabilizer, and it’s ready to hang!

It’s just that easy to make these designs into ornaments. So brighten up your tree and gifts this holiday season.
Want to get extra creative? Why not try something different with the little mini light bulb designs . Instead of stitching them with a loop, stitch a few across a long ribbon so they hang like a string of Christmas lights! These would make adorable garland all around the house or on the tree.

Stitching Ornament Designs as Applique
Did you know that this type of design can be used for applique, too? Doing so is another quick way to add festive details to T-shirts, stockings, and more! All you need to turn this type of design into applique is:
- A machine embroidery design like the Kawaii Christmas designs
- Stabilizer
- Front fabric piece, cut out using the dieline file that came with the design (you won’t need a back piece)
- Scissors
- Temporary spray adhesive

First, cut out only the front fabric piece dieline that comes with this type of machine embroidery design. Then, hoop a medium weight cutaway stabilizer and your chosen base fabric. Once you place your hoop onto the machine, a placement dieline will stitch first. Once this has stitched, remove the hoop from your embroidery machine, but do not unhoop your fabric. Spray the back of your front fabric piece with temporary spray adhesive and place it carefully inside the line. Place your hoop back onto the machine and proceed to follow the color change sheet specific to your chosen design.

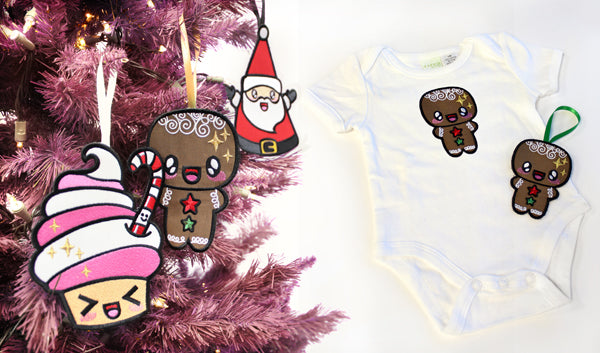
Here’s the same gingerbread man we used as an ornament, stitched out as applique on regular fabric. It’s quick and easy!

Make an adorable set of matching gifts, using both the ornament and regular applique technique.

Create gift towels, tees, onesies, tanks, bags, pillows and more! The simple style and applique nature of these designs means they’ll stitch up in a pinch -- even with Christmas just around the corner.

Bring some joy to Christmas this year!
