Monsters are truly misunderstood creatures. Despite their fearsome reputation of hiding under beds and devouring small children, all monsters really care to nibble on are cookies. That’s right, cookies. Cookie Monster has done his best to change public relations with monsters and get the truth out, but sadly, most people still give monsters a wide berth. Today I’m going to give you a lesson in Monsters 101, from making your very own monster, to proper feeding habits and care. Your little monster mitt will be happy to go to work for you, taking hot cookies and other tasty items out of the oven and promises not to devour any children.
Unless they’ve been naughty. Or they try and steal cookies before they’ve cooled. Monsters hate that.
Supplies
So, to make our monster mitt helper, you’re going to need:
- Hungry Monster Potholder design. This one comes with four files, three of which have "DL" in the name (for dieline). You will use these three files to get your ...
- Paper templates. Either open the three files with "DL" in the name in embroidery software and print them out, or hoop up a piece of paper (really) and "stitch" them out using a needle with no thread to let the perforations mark the shapes. Either that or you can skip the paper templates altogether and just stitch the dieline directly on the fabric, then cut out along the stitching line.
- Quilted cotton
- Lightweight cotton fabric
- Heat resistant thermal lining, like Insul-Bright
- Ironing board fabric
- Heavy duty wool felt
- Tearaway stabilizer
- Scissors
- Spray adhesive and some tape, who were out to lunch for the photo op
Remember, all your fabrics should either be natural or heat resistant! No synthetics. That makes monsters melty.
Designs Used
So, we’re going to play Dr. Frankenstein and assemble our awesome little monster. To start, you’re going to need monster templates. You can’t just create monsters willy-nilly. You never know what kind of monster you’ll get then.
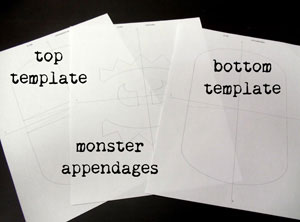
You have three dieline files. One is the top template (which will be the part with our monster features), the other is the template for monster appendages, and the last is the bottom template, which will be the main body and the heat resistant part of the monster. Remember, if you can’t print these templates, you can stitch them as we go along.
Monster assembly takes lots of cutting, so we need to have all the right monster pieces when we go to put him together.
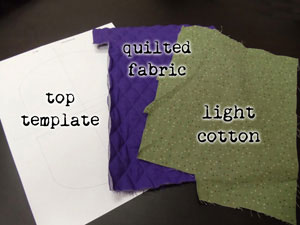
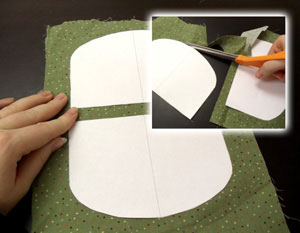
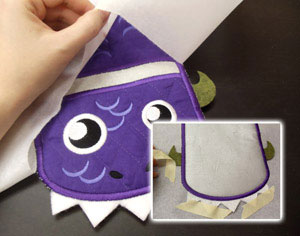
Let's start with the top template. For this part, you’ll need a piece of quilted fabric and a piece of light cotton, at least as large as the template design.
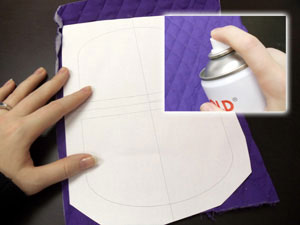
If you have a printed template, lightly spray the back of the paper with adhesive, and place it on top of your quilted fabric.
If you’re stitching your template, hoop up your quilted fabric and stitch the dieline on top of it.
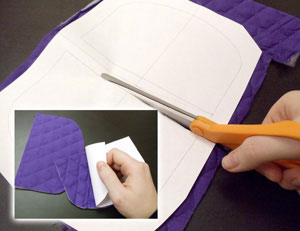
Carefully cut out your shapes along the template line, whether it’s stitched or printed. When you’re done, you should have two little monster pieces that will become our monster face!
Repeat this process for your cotton fabric, either using the paper template or stitching it on your machine.
This fabric is going to be the inside of our monster. I bet you thought monsters had internal organs like the rest of us, didn’t you? Not so. They are composed entirely of polka-dots. See, aren’t you learning a lot about monsters today?
OK, so now you should have all the pieces you need from that top template. Put these aside for now.
For the next part, we’re going to make a fabric sandwich to make assembly easier. Monsters love sandwiches! I bet you didn’t know that either. Not as much as cookies, but really, can you blame them?
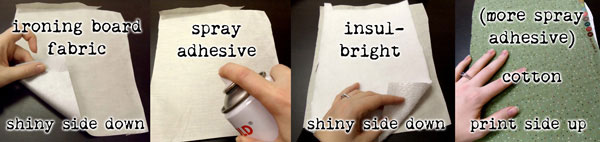
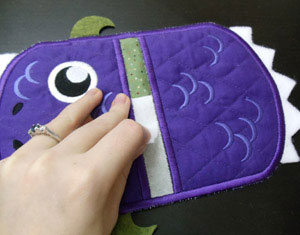
So, each of these pieces should be just a little bit larger than your template. Start with your ironing board fabric, shiny side down. Give it a light coating of spray adhesive, and then place your Insul-Bright on top, also shiny side down. Finally give that one more light coating of adhesive, and lay your cotton on top, print side up. Your monster sandwich is complete!
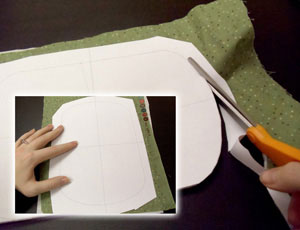
Finally, place your template on top and cut out all the layers at once, so you have a nice and neat monster fabric sandwich.
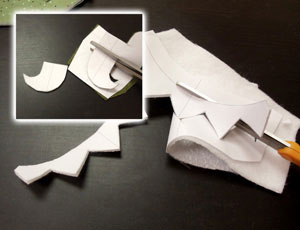
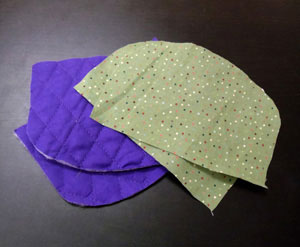
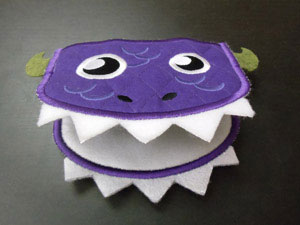
Don’t forget about your monster appendages! Your monster would not be able to eat his cookies without his teeth!
This is where your heavy wool felt comes in. These parts of your monster won’t come in contact with heat much, but when they do, we want to make sure they don’t melt, so that’s why we’re using the wool. I actually used the Insul-Bright for his teeth, which is heat resistant but a little fuzzy, so you might prefer wool for everything.
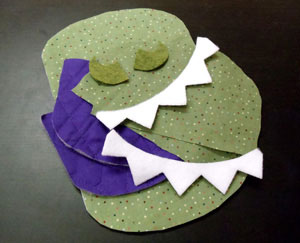
Our finished monster bits! Poor monster. He’s not in much of a state to eat cookies right now. Let’s fix that.
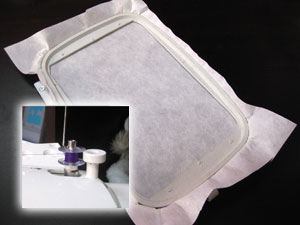
Hoop up some tearaway stabilizer for your monster. Also, because we’re going to want our final satin seams to match both front and back, wind a matching color bobbin for the satin seams. Mine is purple.

Assembly time! Start your machine a-stitchin’. The first thing that will stitch st the dieline. After it’s sewn, lightly spray the back of your quilted pieces and carefully lay them inside the stitched dielines. Start your machine again, and it will sew tackdown seams around both pieces to keep them in place. After that, it will start stitching your monster! All the inside elements will sew.
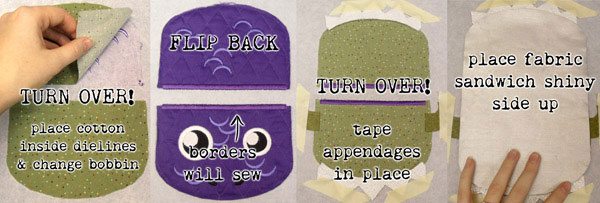
Once the inside elements are done, stop your machine and turn your hoop over. Lightly spray your cotton pieces and place them inside the dieline, so they’re directly behind the quilted cotton on the front. Now is also where you’ll want to switch your bobbin to match your borders. Flip your hoop right side up again and set it sewing under your machine. It will stitch two borders at the top and bottom of your quilted pieces. Stop the machine again, turn it over (again!) and now tape your appendages in place. Make sure a little overlaps the edge so they’re caught by the seam! Finally, lightly spray just the edges on the cotton side of your sandwich (otherwise it will be sticky when you put your hand in the mitt!), and place it shiny side up, inside the seams.
Turn your hoop right side up again, and your machine will stitch a final satin seam all the way around your monster (oops! monster ran away for this picture).
Once your monster is sewn, un-hoop him, remove the tape from the back, and tear him free from his stabilizer.
You'll also want to remove that little strip of stabilizer in the middle, so you can get your hand in there an use him as a mitt.
Now this next step is really important...
Tilt your head back and scream “It’s AAALIIIVVEEE” as loud as you can. Try to time it with a big crack of thunder during the dead of night to truly get the effect. And marvel at your creation.
He’s marveling right back at you. And hoping you have cookies.
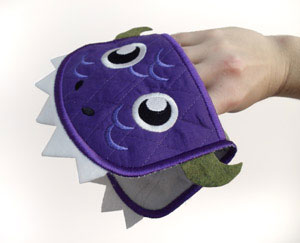
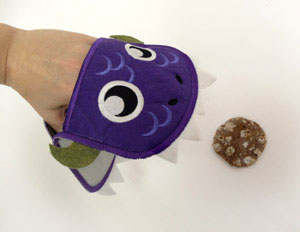
Your new little monster will be a hoot in the kitchen, helping you retrieve all sorts of hot tasty dishes from the oven. Just remember... monsters are heat RESISTANT, not heat PROOF. Monster doesn’t really like holding a 300 degree casserole dish for 5 minutes, and neither does your hand.
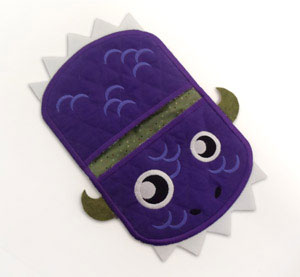
So now you know all there is to know about monsters. They’re harmless, helpful, and adore cookies, and they’re super easy to make yourself! You could make a whole monster army in an array of dazzling colors, just as long as you have a large stock of cookies to keep 'em happy.
*OMnOMNOm*


