Designs Used

It can start as early as May, and kicks into full gear through the summer, only ending with the last leaves of fall... wedding season. I’ve got a whole host of weddings I’m going to this year, and the one task we have as guests (besides eating too much and taking advantage of the free bar) is bringing a thoughtful gift for the happy new couple. Something unique, personal, and hopefully, useful. Not that casserole trays aren’t useful, but they’re not entirely unique. How about something custom? Something you make yourself? But what?
Embroidery machine to the rescue! Weddings are the perfect opportunity to whip out a beautiful customized gift for the happy couple to be. Names, dates, initials, even cute little his and hers towels are all perfect for the wedding season.
For this gift, I decided something to make something personal for the newlyweds, so they could remember their happy day for years to come... a wedding album!
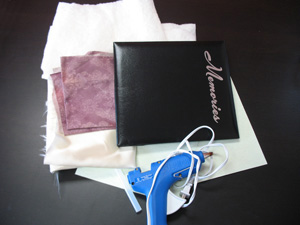
There are a few different kinds out there. I got one that has a removable cover (used so you can add more pages to the album if needed) because a removable cover is much easier to cover with cloth. No messing with the binding! You can also get these kinds of books as guest books, which would be equally useful for a wedding. Other supplies needed are satin to cover it, cotton batting, a hot glue gun, some card stock, fabric for the interior, some spray adhesive, and cutaway stabilizer.
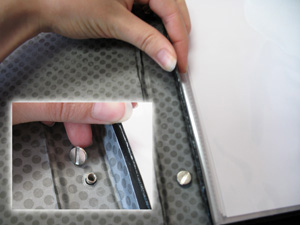
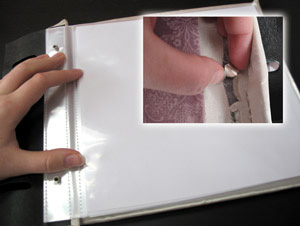
To begin, we’re going to take our little photo album apart and remove the covers, so they’re much easier to wrap with fabric. It can be a bit befuddling at first as to how to take it apart. I found a little flap that hid some screws, unscrewed ‘em, and removed the cover.
Grab your satin-y fabric you’re going to use for the cover. Satin-y shiny fabrics are perfect for wedding occasions, and add a festive, elegant flair. There are a few things to keep in mind when embroidering on satin, and I’ll keep you informed with some tricks as we go along.
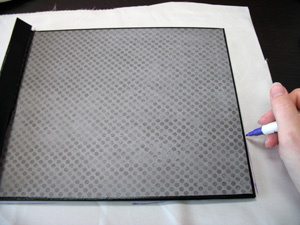
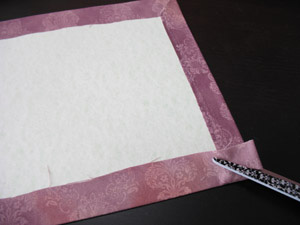
Take your now removed cover, and trace it onto your fabric. Mark both where the full edge of the cover is, and where it folds over. Be sure to mark that spot, because we don’t want our embroidery to go into the fold.
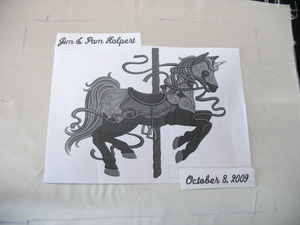
Once you’ve marked your cover out, you can mock up your cover with templates, if you can print them. As an extra touch, I thought it would be nice to add text to our lovely design, giving the names and the date of the happy couple’s day. Text is a great way of personalizing designs.
If you’re working with a light colored fabric like mine that might be a bit transparent, hoop up your design with a piece of stabilizer that’s at least as big as the cover. This is probably best no matter what you’re using. I’ll explain why in a moment...
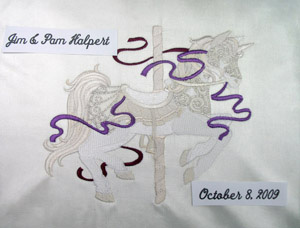
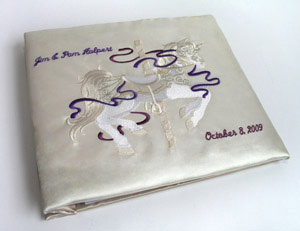
Once you’ve hooped up your design, grab your thread and set it to stitching. You might recognize our dark carousel horse, transformed for a wedding day with tone-on-tone cream and ivory colors. You can turn many designs into a more “wedding day” version just by changing the colors a bit. I left the ribbons as a flair of color, which is also a great opportunity to match the color scheme picked for the wedding.
I stitched my main design first, and then lined up the text templates again.
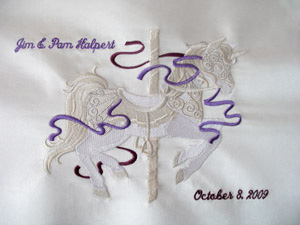
Here’s the design, all pretty and finished! Remove your design from the hoop, but don’t trim the excess stabilizer yet.
Because satin-y fabrics are often so thin and light, the edges of your stabilizer can sometimes show through. To hide that, place your cover over the back of your design (making sure it’s centered on the front), and trace out the shape of the cover on the back, then cut it out. That way your stabilizer matches the edges of the cover and stays invisible.
That's right, it's Jim and Pam's wedding album. I know. I'm a nerd.
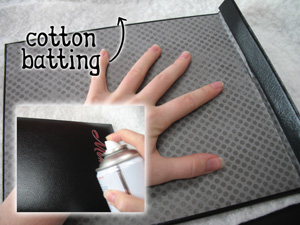
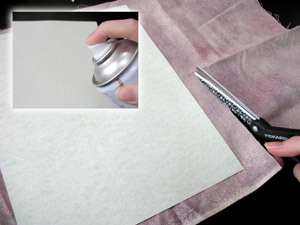
Satin and satin-like fabrics also have a tendency to pucker, so to hide this effect, and soften the wrapping of the fabric, we’re going to add a layer of cotton batting. Spray the cover of your album generously with spray adhesive, and then place it on top of some batting. Trim around your cover (just the immediate cover, the part that curves underneath doesn’t need batting). Now you have a layer of batting over your cover for a more forgiving surface to wrap your satin on.
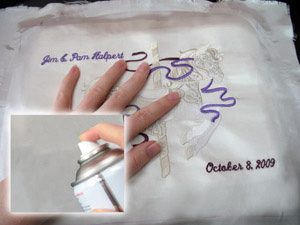
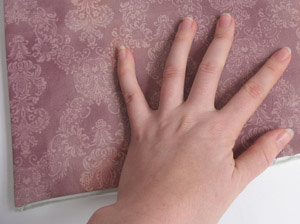
Spray the cover again, and carefully center your design on the cover. You should already have a good guide from where you trimmed the stabilizer. Smooth your design carefully over the cotton batting. Test your design placement a few times by folding in the corners and seeing how it looks.
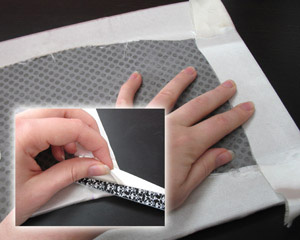
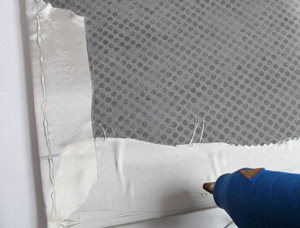
Once you’re happy with your design centering on the cover, flip your cover over, and spray the edges of the fabric. Pull them firmly over the edges and smooth them down onto the back of the cover. If it helps you can also spray the back of the cover a bit. Once you have the four edges folded over, pinch the excess and snip it with a scissors. If there are a few loose edges after you clip the corner, use some hot glue to secure them firmly down. Don’t worry if this doesn’t look very pretty right now; we’re going to cover it up.
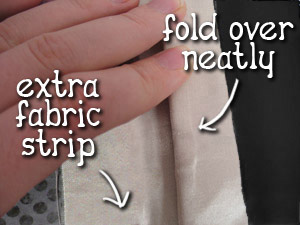
There’s one very important area you’ll want to cover properly. With that folded side (the one that hid the screws) make sure you’ve pulled the fabric neatly over the edge. Also, you’ll want to cut a strip of fabric that covers the small gap between where the cardstock cover won’t get to.
All you need is for the fabric to tuck far enough beneath the folded piece not to be seen, but doesn’t cover up where the screws need to be. That way once it’s all put together it will appear seamless. Use some spray adhesive to tack it down, and hot glue to keep the corners stuck down securely, folding the raw edges under on the sides so it has a clean look.
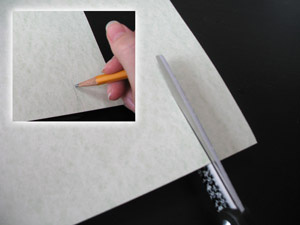
Now we’re going to make an inside piece to cover up the ugly folded in edges of the cover. Take a piece of card stock, and measure it out so it’s the same size as the inside of the cover. Cut it to size.
Spray one side of your card stock with some stabilizer, and smooth it on to some fabric. Snip the excess fabric away, leaving at least an inch around all sides.
As with the cover, spray the back of the edges of the fabric, and fold them carefully over on the other side. Snip the corners as you did before.
Now it’s time to cover up those ugly folds on the inside. Lay a line of hot glue around the edge of the back of the cover, and then a few swirls and lines in the middle, so you’ll have a secure bond.
Carefully line up the edges of your covered card stock and smooth it onto the back of the cover. See? No more icky fabric edges. Ta da.
Cover the back in the same way. You don’t need to add a layer of cotton batting to this side, unless you like the softness it gives the cover. You don’t technically need a snuggly photo album, but it never hurts.
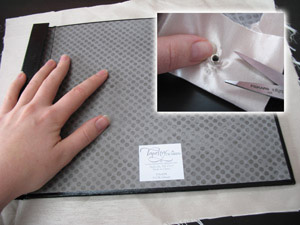
When you cover the back, remember that you need to leave the screw parts uncovered. Use your scissors to poke a hole through the cloth so it can come through. Use some hot glue to keep the fabric in place around these tricky areas. Cut and cover another piece of card stock, and glue it to the inside of the back cover as you did with the front.
Now it’s time to reassemble our photo book. Lay your plastic sheets back on top of the back cover, carefully lining up the holes. Then, line up your front cover with the holes, and re-screw the front cover in place.
You can see that underneath that flap the fabric isn’t very neat, but it doesn’t matter as long as it all looks tidy with the flap down. I’ve said it before... I’m not lazy, I’m resourceful.
Fold it all closed, and you have a beautiful personalized photo album ready and waiting for the happy couple to fill it with memories of their special day.
Yes, I wish Jim and Pam Halpert the very best on their happy day. You might be wondering who the heck Jim and Pam are. I should probably be wondering if I should watch “The Office” a little less.
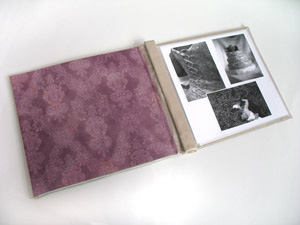
You could leave a special note on the inside cover to wish them the best, but otherwise your wedding album is ready to shine! The newlyweds can fill it will all the pretty pictures of shoving cake into each other’s faces, and all other such fond memories, in a beautiful book designed just for them!
Use this covering technique to make all sorts of personalized albums, guest books, scrapbooks, and sketchbooks. It’s simple and easy and offers hardly any headaches. Hopefully a lot like marriage....
right?


