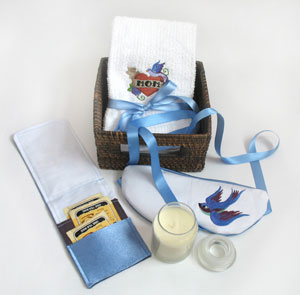
Mummy’s day is coming up, and there’s nothing more personal than a handmade gift. There’s also nothing nicer for Mom than getting a few minutes of relaxation.Give your mom the best of both worlds, with a little handmade relaxation kit you stitch up just for her.Mums of all ages can appreciate this little kit, and it stitches together in no time at all.There are three simple parts to this kit that you'll make: a soothing face mask cover, a cute little tea carrier, and some personalized hand towels for Mom to use anywhere.To package it all together, I got a cute napkin holder (that she can use later!) and a soothing scented candle. In no time at all your have an adorable personalized package.
Supplies
To make your kit, you’ll need a soothing but not so nice looking gel face mask, some ribbon, spray adhesive, a few pieces of tag board or sturdy paper, and a few different kinds of fabric.
I'm going to use the white fabric to make the front of my face mask.For the back of my face mask, I want something silky smooth so it feels nice when you’re actually using it.I also used these same fabrics in my little tea carrier.If you'd like, you might also want some sort of basket to put it all together, a soothing candle, and some of Mum’s favorite soothing tea.
Designs Used
You can create each of these pieces in any order.I’m starting with the tea wallet first.
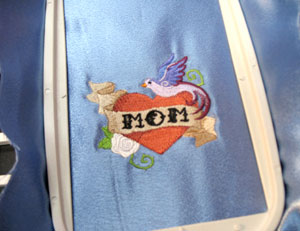
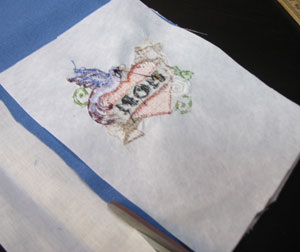
To celebrate Mom in proper urban fashion, I grabbed our Mom tattoo (or Mum!).Stitch it out on a piece of fabric that will be used for the cover of the tea book. It should be wide enough to hoop, and about 13 inches tall.I would stitch out your design before you cut anything out. Choose Mom’s favorite colors and personalize it to her.

Fold your fabric in half with the design centered where you want it on the cover of your booklet.Measure and cut it out so it’s about 6 1/2 inches tall when folded, and about 4 1/2 inches wide.
Lay your fabric embroidery side down on top of another piece of fabric that you wish to use for the inside of your little tea carrier.Pin the two pieces of fabric together (right sides facing), and snip around your already cut out fabric so you then have two long rectangles of fabric pinned together.

Sew a quarter inch seam around your long rectangle, leaving one short end open so you can turn it right side out again.
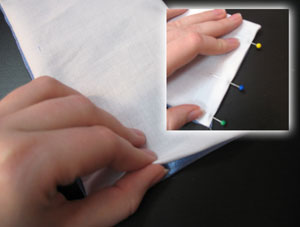
Turn your rectangle right side out, and if you'd like, press it flat with an iron.Take the raw open edge and fold it in, pinning it in place.

Now, we’re going to make the little pockets that hold the tea.Using some of your tag board, trace a rectangle that’s exactly as wide as your fabric, and about 2 inches to 2 1/2 inches tall. Then cut out another rectangle that’s at least 1 inch taller.It’s up to you how many pockets you want to make.I decided two would be enough to store a few packets of tea.

To cover your pockets, cut a piece of fabric a little bit larger than your tag board pieces. Spray both sides of your tag board with some adhesive, and press it onto your fabric.Then, fold the edges down onto the back of the tag board so the front is completely covered.You might have to snip the corners a bit to prevent bunching at the edges.

Lay your pockets on top of your cover to make sure everything lines up OK.

Before we sew it all together, pick one side of your newly covered rectangle to be the top of your pocket, and stitch a seam across the top to secure the fabric to the card stock.Do this with all pocket pieces you made.

Put your pockets in place on top of your fabric cover, and start your seam along the bottom (with the pinned edge) sewing your pockets in place and closing the raw edge at the same time.Continue your seam all the way around the cover.

To help your wallet close more easily, fold it in half and press along the seam, then open your book up again and sew along that pressed line. This will ensure your book always folds in the same place.

Pack your little wallet with soothing teas and fold it shut.Now your mum can easily carry her favorite teas with her wherever she likes!
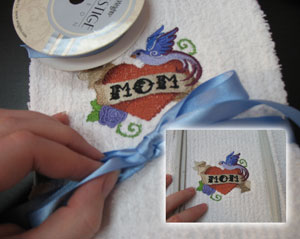
While you still have your Mom design loaded in your machine, you might as well stitch up a few hand towels to go in your basket.They’re fast and easy to make and help complement any gift basket.

For our mask, I first decided to snip off the awful plastic strap on the back.We don’t need it - we’ll make a much nicer strap and cover.

Lay your mask on top of the fabric you want to use for the front of the mask, and trace a 1/2 inch line around it.

Stitch your chosen design on the fabric.I used our new sparrow design, stitched out in similar colors to match the Mom tattoo.

Now we’re going to make the back pockets that we can use to slip the soothing mask inside easily.Cut out two pieces of fabric that are slightly longer than the mask, and can cover it completely with at least an inch of overlap.

Finish the edge of one side of each of these pieces by folding the raw edge under and sewing a 1/4 inch seam.

To prepare your design for sewing, cut it out along the line you drew.I folded my fabric and pinned it together because it was a bit too thin on its own.If you don’t need to double up on your fabric, just cut it out.

First we’re going to attach our ribbon, to replace that awful plastic one we cut off before.Cut two pieces of ribbon about 16 inches long, to give you plenty of extra length.Pin it in place on either side, with the excess ribbon folding in. To keep your ribbon from being sewn up with everything else, I would fold it up together and tape it in the middle.

Place the two back pieces over the mask, facing downwards, so the right sides of the fabric are touching the front piece.Make sure the pieces overlap by at least an inch.With these in place, carefully flip the whole thing over and pin everything in place from the other side.
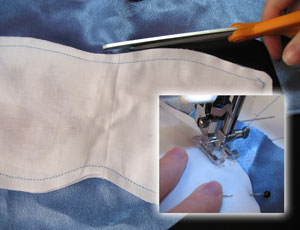
Sew a seam all the way around your mask. Make sure you don’t go in any further then the excess you gave yourself when you drew your line.Once it’s sewn shut, cut off the excess fabric.

Turn your mask right side out, press it flat, and slip your gel mask inside.

Now assemble your gift pack so it looks all pretty in your basket or container.

Your gift pack is finished!
Inside your mom will find a cute set of soothing teas, a yummy scented candle, a relaxing face mask, and some cute matching towels.Give your mom a little personalized, handmade, well deserved rest!
Happy Mother’s Day to all crafty moms!!


