The cold weather, at least around here, has well and truly settled in, and it’s got me dreaming of hot cocoa, warm blankets, and cozy socks.
Socks had been a bit of an embroidery conundrum to me. I always wanted to figure out how to embroider them, but there is just no way to really hoop them. Not once they’re made anyway...
Lucky for me, Karen is here with a guest tutorial to show us how to make some fuzzy slipper socks from scratch, so we can add any kind of cute embroidery we want!
Supplies
She’s created a simple template you can follow to upcycle your own pair of socks. To make these fuzzy contraptions, you’ll need:
- Slipper sock pattern PDF
- Fleece-type stretchy fabric (Karen is recycling an old sweater, but you can just use fleece if you want)
- Scissors and pins
- Marker
- Awesome embroidery design (Karen used Morning Monster)
- Cutaway stabilizer (if your design is on the lighter side, a sheer or no-show mesh is a great choice)
- Water soluble stabilizer for topping (if you’re using a fuzzy fabric)
Designs Used
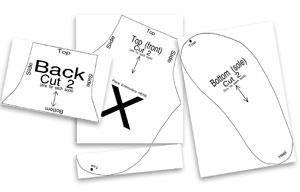
Karen created this pattern by tracing around her own feet, which are an American size 9 shoe. The finished sock is about 10.5” long.
“Yes, I have big feet!” Karen claims. Don’t worry Karen, 9 isn’t exactly Bigfoot.
Karen used 1/4” seams. For a smaller adult sock, she recommends using 1/2” seams, or cut some off the toe of the sock.
Print out the pattern pieces, and tape together the two pieces that make up the top section of the sock.

For the first sock, trace around the pattern onto your fabric. Then, turn the pattern piece over and trace around them again, for the second sock. This is important, so you don’t have two left feet! Cut through both layers of your sweater (or your folded fabric) so you have enough for two socks.
For the top and back piece, she cleverly used the already hemmed side of the sweater, so they’ll have a finished edge.
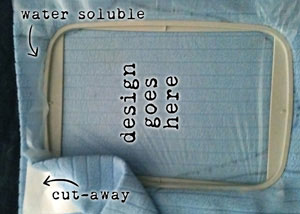
The best place to add the embroidery is somewhere on the top piece. Hoop it up with some cutaway stabilizer underneath. If your fleece is fuzzy enough to interfere with your stitches, Karen recommends adding a piece of water soluble stabilizer on the top. Be sure to mark where your design should go, orienting it like so.
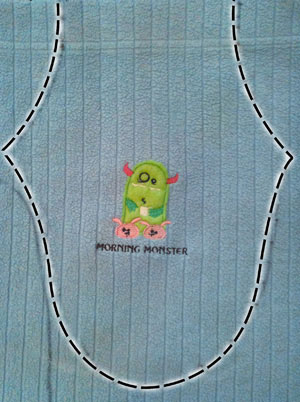
Sew out your design! Look at our little morning monster all cute on his little sock. Plus he’s wearing slippers on a slipper. That’s some kind of clever mind bender there, Karen.
Don’t forget to stitch your other sock!
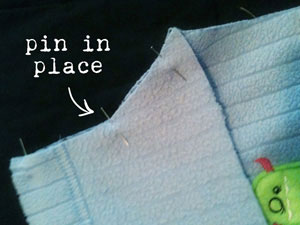
Now, grab your top piece (the one you just embroidered) and your back piece (the smallest one).
With right sides together, lay the back piece on top of the top piece and pin in place.
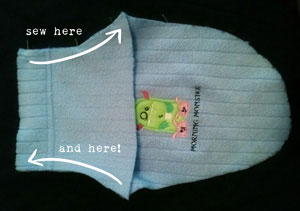
Sew a 1/4” inch seam up both sides.
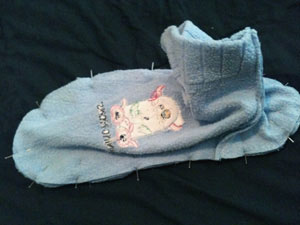
Grab your bottom piece.
With right sides together, pin the top of the sock onto the bottom, and sew all the way around the foot, again using a 1/4” inch seam.
Repeat these steps on the other sock.
Turn right side out!
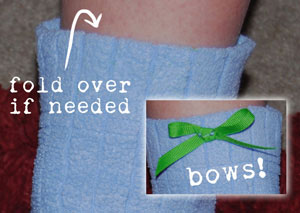
If you weren’t lucky enough to have an old sweater with finished seams, turn down 1/2” around the top opening, and stitch down. This will give the top a finished edge.
Add bows and you are done!
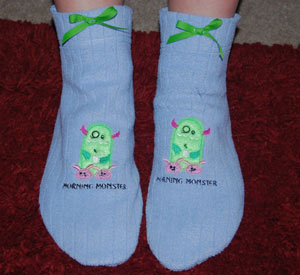
Super cute, totally cozy and magically embroidered socks! Karen has figured out the conundrum that has plagued me for ages. Plus, now that you know how to make socks, you’re totally going to go out and buy the fuzziest, warmest fabric you can find, and make a million embroidered pairs, right?
Thanks so much Karen for sharing this little tutorial with us. Our socks would be sad and sans embroidery without you!
Now if you’ll excuse me, I have some fuzzy fabric and hot cocoa to find...


