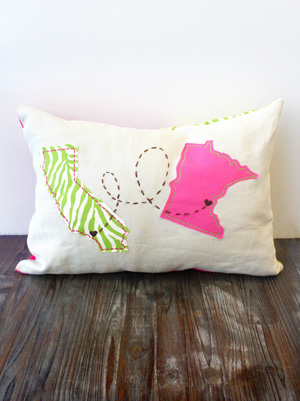
Hello gang! This is artist Caitlin here, poping in for another special tutorial inspired by family. Everyone comes from somewhere, and everyone has a place in their heart that’s a little more special than the rest. For many folks in the U.S., certain states are where important parts of our lives took place. You can find a special way to commemorate those moments with this simple pillow! The states I choose are important to me because the two people I love the most were born in them. My husband Justin was born in Los Angeles, and my daughter Olive was born here in Minnesota. I have lived in both places in my life and love them both with all my heart. This easy tutorial will show you how to “join” those two places in a simple, stitchy way.
Supplies
To make your State Love Pillow, you'll need...
- State of the Heart embroidery designs
- Pillow form
- Fabric for pillow cover, and fabric for your applique pieces
- Ribbon
- Embroidery needle with eye large enough for the ribbon you chose
- Printed templates of the design for placement (here’s how to print templates)
- Measuring tape, scissors, and pins
- Medium weight cutaway stabilizer and temporary spray adhesive
Designs Used
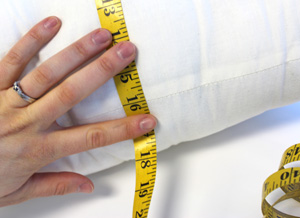
To start, measure your pillow form, from seam to seam.
My pillow form measured 23" x 16". IF you're commemorating two states, like I am, a longer pillow will suit your designs a little easier, but any shape will do! Make sure the fabric you're using to cover your pillow is at least 1" larger in all directions that the pillow.
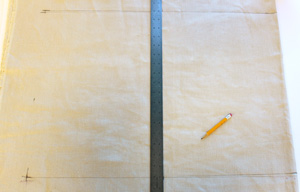
Now we'll mark the cutting lines for the pillow cover fabric. Add 0.5" on each side of the fabric for seam allowance. In this case, I measured my fabric out to 24" x 17". Leave the fabric uncut for now, to ensure you have enough room to hoop your designs. We will trim the fabric down to size once the embroidery is done.
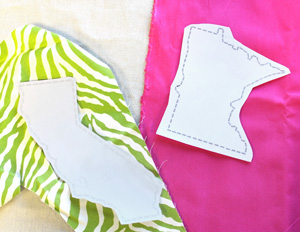
If you want more than just state outlines, it's super easy to add an applique underneath! (These aren't applique designs -- just the embroidered outlines -- but I'm adding extra fabric here.)
Using temporary spray adhesive, lightly spray your printed state templates and place them onto your chosen applique fabric. If you're unsure of how to print templates like these, click here.
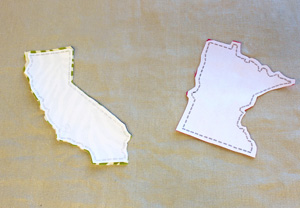
Cut out the states, leaving about 0.25" around the embroidery design. If you cut too close to the edge of the design, your embroidery may sew outside of your applique fabric.
After you have arranged the states where you would like them on your pillow, lightly spray the back of the applique fabric with your temporary spray adhesive, and smooth the designs onto your cover fabric.
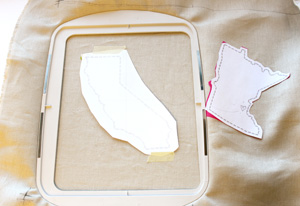
Hoop your first state. Make sure you remove the paper template before starting your machine!
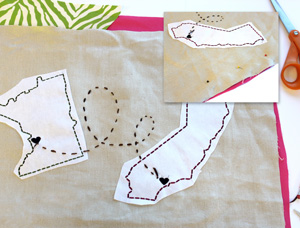
Once your first state is stitched, unhoop, and do your second state the same way. I also stitched a heart inside each state to symbolize the cities that I will be connecting.

Once you are done stitching your designs, it's time to add the cute "embroidered" ribbon effect to connect the cities.
For the hand embroidered doodle ribbon, I actually rehooped my fabric using the machine embroidery hoop (because why not? It works the same as a hand embroidery hoop!). I then drew a line with a pencil as a guide.

Thread your needle with the ribbon and follow your "doodle" line with large, quick stitches. This doesn't have to be perfect; the handmade nature of the pillow is part of its charm!
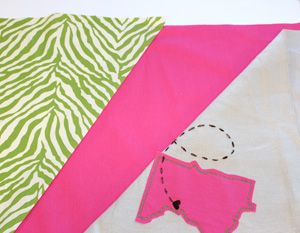
For the back of my pillow case, I wanted to use the extra fabric I had from my applique pieces, in a funk and funky way.
I placed the pink and green fabric together, with the back side of the fabric facing outward, and sewed a straight seam connecting the two. I then pressed them open to make a jaunty angle that would cover the 24" x 17" rectangle I needed.
As you can see here, the pink will make up half of the back of the pillow and the green will make up the other half of the back. Only the tan fabric will be visible on the front of the cover, with the states.
With your back and front pieces ready, pin together the front cover with the back cover (still inside out) on three sides, using a 0.5" seam allowance. Sew your seams.
Turn the pillow cover right side out and stuff your pillow form inside. Finally, you can slip stitch the last side of the pillow together.
Your pillow is done! A simple and sweet piece of home decor to always remember your roots, and those places that hold a special place in your heart.
It's time to add a cozy and personal touch to the place you call home, where that happens to be now, or in the future!


