Supplies
To make your patchwork skirt, you’ll need a pair of pants in need of some reinvention, fun fabric for patching, a scissors, and a cool scribbles design to add some fun to your skirt!
Designs Used
“Spring” is once again here at Urban Threads, and even though it’s lightly snowing outside, I’m an eternal optimist, and I’m going to celebrate. (Being an eternal optimist about weather in Minnesota can be a lonely existence...)
I decided as a symbolic gesture, I would transform something old into something springy and new. We’re going to turn a pair of pants into a cute skirt, and turn a scribble into an applique design. Spring is the season of reinvention! Forget spring cleaning, spring sewing is a lot more fun...

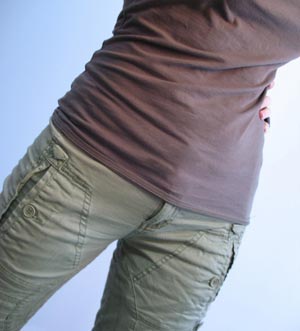
I love these pants, and I tried unsuccessfully a long time ago to try and sew and patch them together, in hopes of keeping them alive a little bit longer. When the structural stability of the pants started to deteriorate in less-than-stellar areas, I decided to give in. They sat unloved in my drawer for ages...
Well no more! Through the magic of sewing, we’re going to transform these cool cargo pants into a cool cargo patchwork skirt! There are still spots on them that need patching, why not have fun with the whole patchwork aesthetic? And while we’re at it, it’s a perfect place to try out a fun new trick... patchwork applique!
To begin, cut off the legs to the length you want your new skirt to be. Keep in mind you’ll want to add a bit of length if you want to hem the skirt when you’re done. It’s always best to cut lower first, in case you find yourself in a slightly more scandalous skirt than you intended. If you do, well it’s spring right? Live a little!
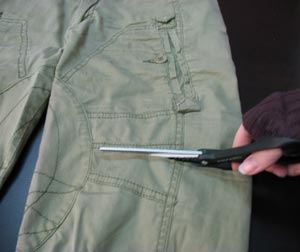
Begin by snipping out the inside seam of the pants. If you’re using jeans, there will probably be a finished seam on the inside, which you can keep if you like the look of a seam on the front of your skirt. These didn’t have much of a visible seam, so I just cut them open.
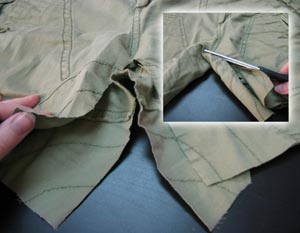
This is what your “skirt” should look like right now. A skirt with a big funky triangle cut out of the middle.

Snip up the middle seam up to the zipper, and then turn your skirt over and cut up roughly the same distance on the back.
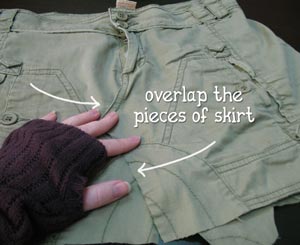
Overlap the two halves of the skirt, so it forms a roughly straight line across the bottom. Be careful not to bunch up the fabric, you’ll find it will lay a certain way once you get it flat.
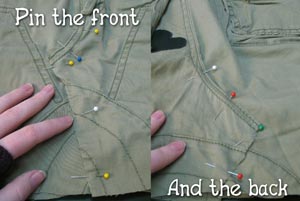
Pin your front flaps in place, and then flip your skirt over and do the same on the back.
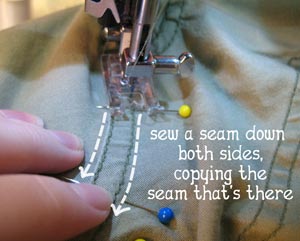
Now sew your skirt together, following the seams that are already there. You’ll probably want to find some thread that matches what was used on your skirt. Sew the seam on the front and the back.

Once your seam is sewn, turn your skirt inside out and trim off the excess. If you have pinking shears, use those to prevent the raw edge from fraying. The skirt is done! How easy was that?

Now it’s time to have some fun with patchwork. Since I need to patch my skirt anyway, and it’s already kind of got a piecemeal look, it’s the perfect opportunity to play with some fun fabric effects.
Scribble designs can be more than just scribbles. With a little careful patching, you can turn any scribble design into a DIY applique design! I’ll show you how. First, use a template of your design to figure out where you would most like to put it. I’m stitching mine over one of my pockets that has a hole and is useless anyway.
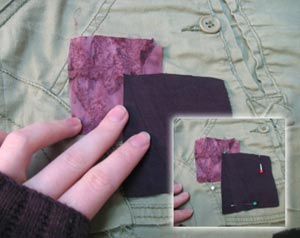
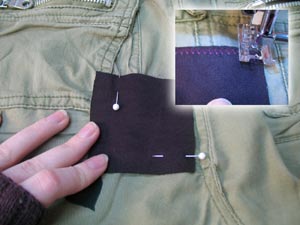
I thought it would be cute to give a bit of a patchwork background to my design. If you want your design to have a patched background, you’ll want to sew them on first. I cut out two fun pieces of fabric and pinned them on to my skirt.
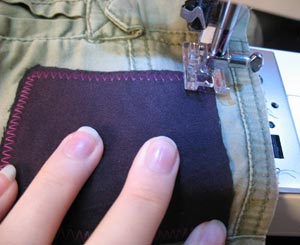
I stitched my patches on with some fun zigzag stitching to secure them in place. Remember, if you’re patching a really big hole, you might want to iron a real patch in place first to stop the hole from getting worse, and then stitch a fun decorative one on top.
Now it’s time to make some fun “patch” applique pieces for our scribble design. All we’re doing here is adding some fun fabric accents underneath our scribble, to give it some extra interest. Keep these fabric patches simple, because this process is meant to be a bit slap-dash. If you try to get too exact with this process you’re going to be disappointed.
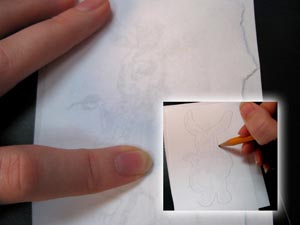
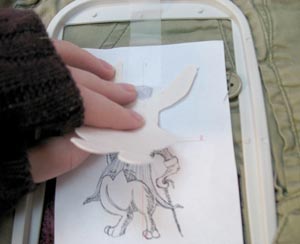
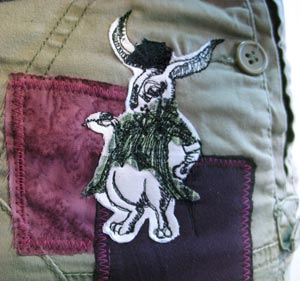
To make your applique pieces, take a scrap piece of paper and lay it over your printed template. First, I decided I wanted bunny to have some fabric behind him, so I traced a generous bunny shape around him. Keep it simple and leave lots of extra room.
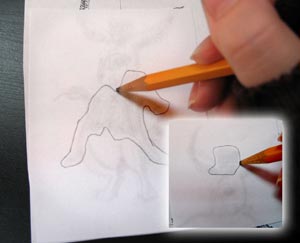
I also drew out a jacket shape, and a little top hat shape. Be sure you are tracing outside of the lines, leaving room for error when it actually stitches down. Little things like his top hat are probably as small as you’re going to want to try for applique, because they’re harder to line up. His little hat was problematic enough.
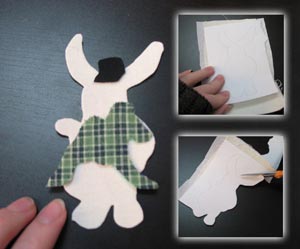
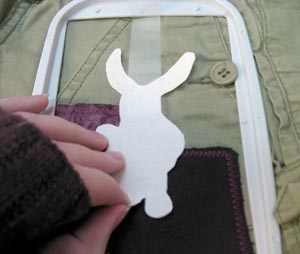
Once you have your new drawn “templates”, find the fabric you’d like to use for your bunny patches and back it with some stabilizer using spray fixative. Then spray a little fixative on the back of your template and cut out your new applique pieces. I laid mine out roughly how they will lay when it’s stitched.
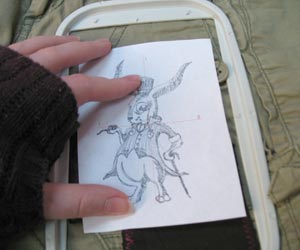
Hoop up your skirt with some stabilizer, and grab your printed template again. This is going to help us with placement for our applique pieces.
Lay your template down so the crosshairs on the template line up with the markings on your hoop. This should just show you exactly where your design is going to stitch.
Grab your largest applique piece (in this case the bunny shape) and lay it down on top of the template where it needs to go. When you have it where you want it, use a piece of tape and tape one end to the fabric piece and one end to your fabric and hoop, effectively creating a little “flap” so you can keep the design from moving around. I would actually recommend adding two “flaps” or strips of tape, a little bit apart from each other. This will keep your design from shifting about.
Lift your flap up, remove the template underneath, and spray the back of your bunny and lay it back down in place again. Make sure your bunny has a generous amount of adhesive on the back of him, because you don’t want him to move around once he’s stuck down. The flap should ensure that your bunny lays down in the same place he was before.
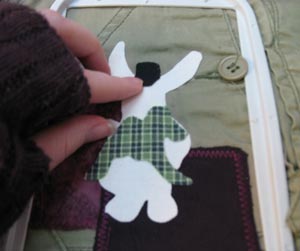
Once your main applique piece is down, it should be easy to place the rest of the pieces. Lay your paper template on top again if you’re really unsure about a piece. Make sure they’re sprayed generously with adhesive when you lay them down.
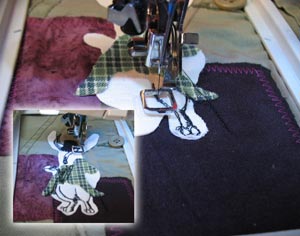
Stitch out your design! You can watch it as it begins to sew on top of your applique pieces. Remember that not everything will be perfect, and you can trim excess fabric off later. Be on the lookout also for where your design is stitching in relation to where your applique is. You might be able to stop your machine and shift some of the pieces down to get better placement once you know exactly where the design is going to be.
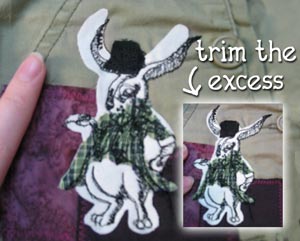
Once your bunny is finished stitching, there will probably be some areas that have too much fabric left over, like his ears. Just trim off these excess areas carefully, keeping in mind you want them to have roughly the same excess as everything else.
If you have any other holes that still need patching, cover those up with more of your funky fabric. With patches added decoratively all over the skirt, people won’t be able to tell if it’s really a repair or merely a cool fashion statement. All your repairs are instantly disguised! If you like, you can also hem the bottom of the skirt, if you’re not really into the raw edge effect.
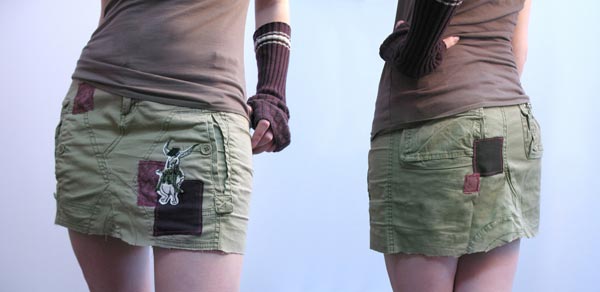
And now instead of spending your hard-earned cash on an expensive new skirt for the warmer months ahead, you’re recycled a dying pair of pants into a super cute patchwork skirt!
Holes are disguised, fun accents are added, and you now know how to turn any scribbles design into a fun patchwork accent! Try it on anything... soft fabrics and a light stitch count means that patchwork applique can go on everything from heavy bags to light T-shirts.
Enjoy your summer months in style, and save a little green by recycling your old clothes into cool new threads.


