This week, in honor of our new mini designs, we’re doing special two-for-the-price-of-one mini projects! These two quick projects show you a few of the many uses you can put your new bite-size embroidery to...
It also seemed the time to honor another long-held tradition of the holidays ... terrible or boring gifts, usually from your great-aunt Bertha, that you get every year and never use. Things like Christmas sweaters, ties for Dad, knickknacks and other random doodads. These things pop up over Christmas so many times you wonder if they’re just being recycled back into the system, not unlike fruitcake.
Well I have another idea. Instead of recycling them, and throwing them back into the mix for someone else to be unenthusiastic about, how about upcycling them into new handmade Christmas goodies?
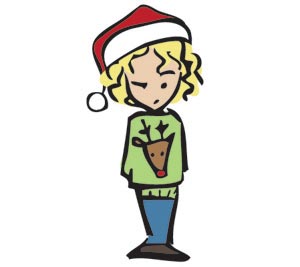
The gift-in-question for this upcycling session is the dreaded Christmas sweater...

Instead of a woolly Rudolph Christmas sweater, how about a nice pair of swank embroidered mittens? They’re far less embarrassing and far more useful unless you go to a lot of crazy Christmas sweater parties. All you need is an old sweater with a nice finished hem, like the one on the bottom of mine.
I don’t actually have a great-aunt Bertha who gives me Christmas sweaters, but if you don’t either, that shouldn’t stop you from joining in the upcycling revolution. I got this sweater at a thrift store for a few bucks. This is a great way to make a pair of “knitted” mittens even if you’re dangerous around knitting needles and usually avoid them. To make your mittens, you’ll need this handy mitten template so you can make your own.
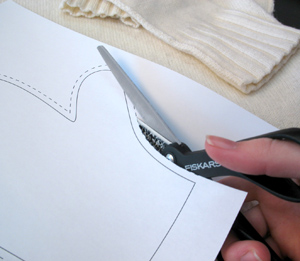
This mitten is a standard “female hand” size. You can also make your own mitten template simply by tracing around your hand on a piece of paper, mitten shaped. Presto! Instant custom mitten sizing.
To begin, cut out the mitten template along the dotted line. The inside line is roughly the size your mitten is going to be when it’s finished, depending on your seam size, so you might want to stick your hand on top of it to make sure it fits. If you’re making your own template, remember to add some seam allowance around your mitten shape.
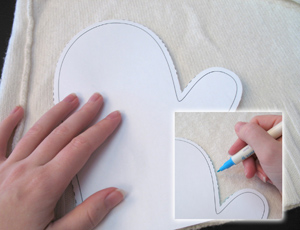
Take your sweater and turn it inside out. Now place your mitten template on top of your sweater, lining up the bottom with the bottom cuff of the sweater. The finished ridged hem from the sweater will give our mitten a nice looking cuff when it’s done – no knitting required!
Trace around your template with a fabric pen, then flip the template over and trace another once next to it, for your other mitten.
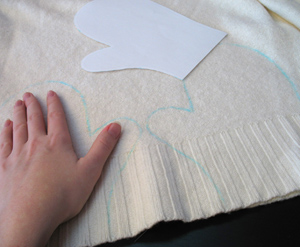
Now you have two mitten shapes, all ready to go. Now comes the embroidery...
To help when you’re figuring out your placement, and so you can hoop your sweater later, cut up either side of your sweater about maybe 8 inches or so, but don’t cut the two layers completely apart. Just enough so that you can pull the bottom part of the sweater back if you need to.
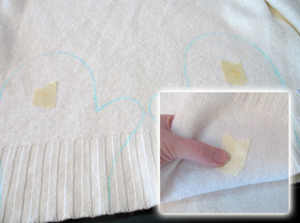
Take a gander at your mittens and decide where a little embroidery accent would look best. I’m putting mine on the middle of the mitten. Mark that spot with some tape, making sure that the two markings look like they’re roughly in the same place on each mitten.
Now lift up the fabric and mark that exact spot on the other side with another piece of tape, where the embroidery is actually going to be. You should be able to feel the tape on both sides to check that they’re lined up properly.
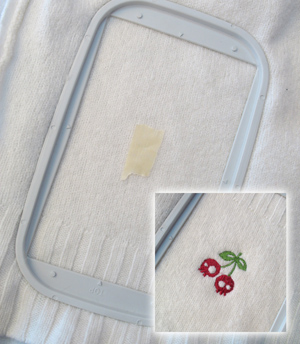
Hoop up your sweater with some stabilizer, and choose your favorite mini design to modify your mitten. If you haven’t already, you’ll have to cut up the side of your sweater to hoop it. In the spirit of the season, I picked a festive red and green design. In the spirit of Urban Threads, I picked one with skulls. See? The best of both worlds.
Keep the orientation of the image in mind when you’re embroidering your design. Do you want your cherry skulls to be facing you when you look at your mittens, or face the world when you’re wearing them?
Be sure also when you’re embroidering your two mittens that you keep the bottom half of your sweater out from under the hoop.
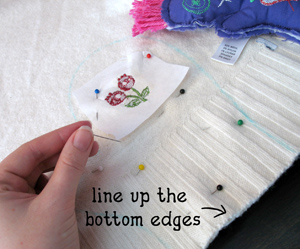
Once your minis are done embroidering, flip your sweater inside out again, back to the side with the mitten shape, and trim away the excess stabilizer.
Now carefully line up the bottom edges of the front and back of your sweater, and pin the two layers together so they stay together when we cut them out.
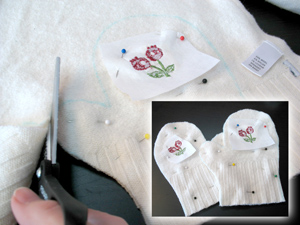
With your pins keeping your mitten pieces securely in place, cut out your mittens.
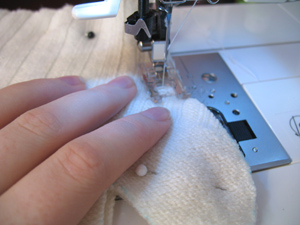
Stitch your mittens together, starting on one side of the cuff and going all the way around. Don’t let your seam get too wide, or your mittens will be too small. You may also want to snip the edges of any sharp corners so the fabric doesn’t bunch when you turn it right side out. Usually, though, stretchy knits are pretty forgiving.
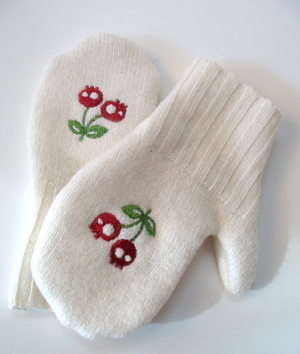
Turn them right side out, and you have a brand new pair of cozy mittens, made from an unwanted sweater that was too old or too ugly to be seen in public with anyway. Small touches of embroidery add some cute attitude to your mittens, and you can further embellish them with buttons and things to make them your own. With minis and a few old sweaters, you can make an army of mittens in no time at all. Aunt Bertha would be proud.


