Need a little zen in your life?
Nothing bursts your blissful state of nirvana more than wrestling with an unwieldy yoga mat. I did yoga on and off for about a year, and my yoga mat always managed to unfurl in my car on the way to class and seriously damage my attempt at inner calm. Well, take it from craft bunny, who at the moment is demonstrating a textbook version of the “Lotus Bunny” pose (it involves sitting still and occasionally eating things) that you to can find a balance in your love-hate relationship with your yoga mat by making it a cute customized carrier.
Supplies
To make your yoga mat bag, you’ll need some fun fabric, some D rings, a nice big cord stop (don’t get little ones, that was my mistake) and a bit of cord. You’ll also want your yoga mat around, so you can take measurements, and perhaps practice a few deep breathing exercises when your machine decides to be temperamental.
Designs Used
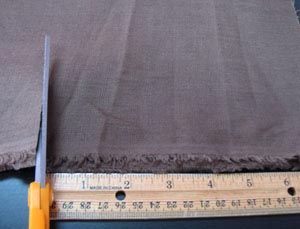
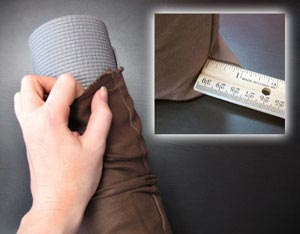
To begin, measure your mat. Mine was about 24 inches tall and 12 inches around, so about 6 inches wide. Add at least 3 inches to your height measurements, and 1-2 inches to your width, depending on how roomy you want your bag to be.
Fold your fabric in half, so it’s as tall as your height measurements, and then cut it into a long strip according to your width. That means I cut my fabric 26 inches tall (folded in half) and about 8 inches wide.
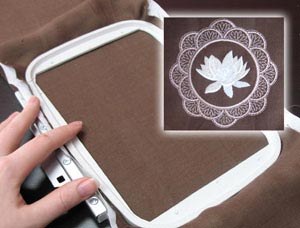
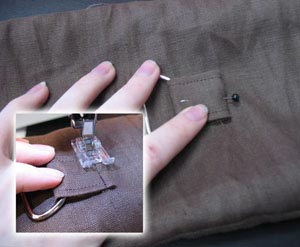
Hoop up your fabric with some stabilizer and stitch up your favorite nirvana-inducing design. I had to pick our lotus design, which inspired this project by fueling guilt about my unused yoga mat living in my basement. I thought if I made it a cute cover it would forget how much I’ve been neglecting it of late.
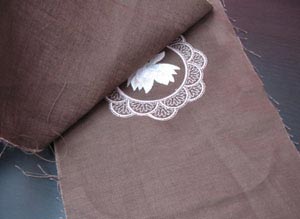
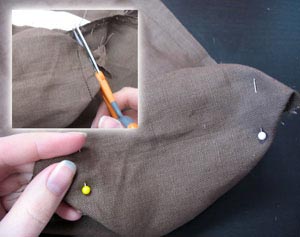
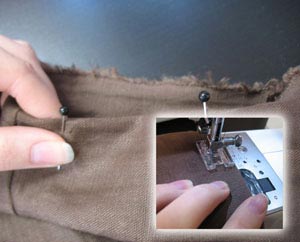
Once your design has stitched, trim away the stabilizer. Fold your fabric in half again, this time with the right sides facing in, so the design is hidden. Pin the two layers of fabric together, keeping the edges lined up.
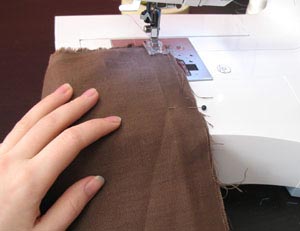
Sew a 1/4” inch seam down both sides of your bag.
Turn your bag right side out again, so we can taper in the corners. Slide your yoga mat inside the bag, and set it on top of a hard surface. You’ll notice some excess fabric at the bottom, since we have a square bag and a round mat. We’ll get rid of these easily. Measure how much excess you have on either side. Mine was about an inch.
Turn your bag inside out, and pinch the bottom of the bag again, pinning it in place using the measurements you just made. Make sure your two corners are even and in line with each other. Sew a seam across the bottom of the bag on either side, then snip off the excess fabric. Turn your bag right side out.
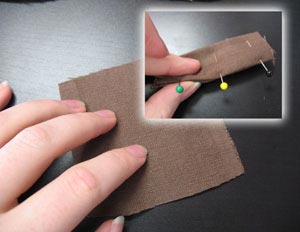
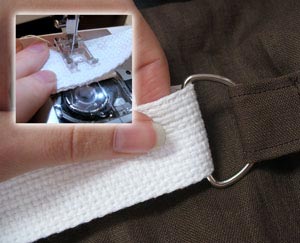
Now we’ll want to make the strap holders for the bag. Take a piece of fabric (mine was about 3 by 3 inches square) and fold the raw edges in, pinning in place to make your strap ready for sewing. How wide you make your strap depends on how big your D rings are, but you only need it to be about 3 inches long. You’ll need two of these straps.
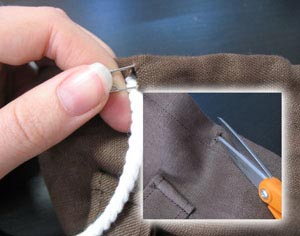
Sew a seam down either side of your strap, so it’s ready to be sewn on to your bag. Loop it around your D ring, fold the raw edge underneath, and pin it to the bottom of your bag.
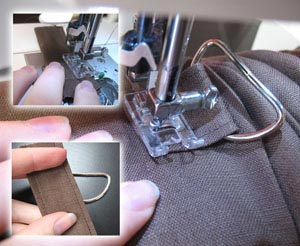
You’ll probably have to remove the extra part of your sewing machine in order to fit the bag around your sewing arm. I put my first strap on the back of the bag, on the opposite side of my design, so when I wear it the pretty lotus will face the world. Sew a seam at the bottom of your strap, securing it in place.
Set up the next strap holder to be stitched, folding under the raw edge and pinning it in place. Don’t put it too near the top – we still need to fold over the raw edge to make way for our drawstring. Leave a few inches of space.
Once you’re sure your two strap rings are lined up with each other, stitch the second one in place.
Fold the raw edge of the top of your fabric in, and fold it down far enough that there is at least a 1/2” inch gap in the folded fabric, so we can have room to cinch our cord.
Sew a seam all the way around the top of your bag, about 1/2” inch in, making sure there’s open space for the cord to be fed.
Snip a small hole in the top runner of your bag, so you can feed the cord through. If you like, it helps to put a safety pin through one side of your cord to help feed it through your bag. Carefully work it all the way around until you come back out where you started.
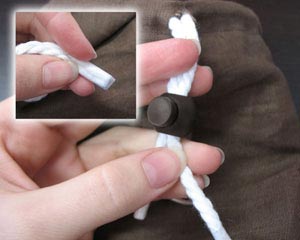
To be able to cinch your cord nice and tight, you’ll want a cord stopper on your bag. Pull your cord through your bag so the two ends come out evenly, and then feed them through your cord stopper. If you’re using a cord that doesn’t have a finished end (like the end of a shoelace) it helps to wrap some tape around the cords in order to feed them through the stopper easily.
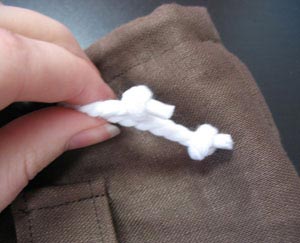
To keep your cords secure, tie a knot at the end of each cord so they don’t come out of your cord stopper.
Finally, grab your strap and feed it through both D rings, then fold the ends on top of each other and stitch them together to sew the strap closed.

Slip your yoga mat inside, and cinch up the top.
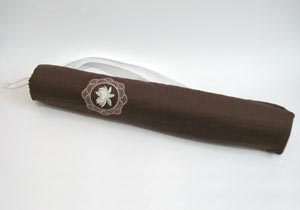
Your yoga bag enlightenment is complete! With some simple stitches and some groovy zen-like designs, you now have a cool carrying bag to inspire your yoga practice.

With my new stylin’ bag in tow, it’s a lot easier to imagine myself on the way to yoga and inner peace. They say a good way to inspire yourself into exercise is to buy a cute workout outfit; I’m banking on the same effect for my yoga practice with a new cute bag.

Try a tone on tone effect, or choose soothing colors to get you in a yoga mood. You don’t have to go in classic “namaste” fashion – you can add pirates and ninjas to your yoga bag if that’s what brings you inner peace. Yoga’s a very personal practice; you might as well personalize it to your tastes!


