Though it requires some tricks to get it to come out just the way you want it, leather and embroidery are a pretty magical combination. There's something wonderfully old-world and rustic about leather, and combining it with the age-old art of needle and thread (granted, modernized just a tad with the aid of robots) is always a classy combination. We'll show you all you need to know about how to embroider on leather, and even some tricks if you need to just make it look like you did.
This tutorial will cover all the basics -- choosing leather to stitch on, picking designs that will work well with leather, selecting needles and stabilizer to make your embroidery look great, and a special trick for hooping leather to minimize hoop burn. Read on for tips and tricks to help your leather embroidery look amazing!
Gather Materials:
First, let's talk about leather...
Leather comes in several different types. There's cowhide, lambskin, suede, buckskin, etc. -- a lot of variety. Each type has different qualities: thick, thin, stretchy, etc. Super thick leather will not work very well for embroidery. You want something more malleable. However, super soft and thin leather, like some lambskin, may actually be too delicate to hold up. A medium weight leather will be your best bet.
Note: Faux leather is very different from the real thing, and can handle a much wider variety of embroidery designs. More on this below!

Needles! This is an important one. A size 80/12 leather needle is a good choice when embroidering onto leather. This kind of needle has a wedged point that reduces the size of the hole or perforation made in the leather.
Why does that matter? Well, a needle will leave permanent holes in the leather -- the perforations won't draw back together like they do when embroidering on fabric. So we want to make our punctures as small as possible.

Next up is design choice!
When selecting design to embroider on real leather, very light and sheer designs are the key. Look for open running stitch designs, such as this anchor.
If you choose designs that are heavy or have closely placed stitches, the repeated actions of all those needle perforations may cause the design to "pop" right out of the leather.
Avoid designs with satin stitch, filled areas of stitching, even heavy running stitch -- anything with lots of needle penetrations very close together that could be likely perforate the leather.

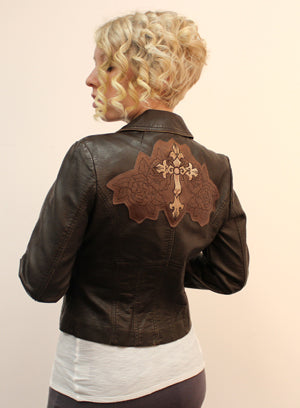
Confused by how we pulled off this jacket? Easy! This jacket is FAKE leather -- pleather! Pleather is a great alternative for when you want the look of leather but just can't resist those detailed, stitch-filled designs.
One tip: not all pleather is created equally either. Some of the hard, more plastic-y pleather can also leave holes like real leather, but softer, stretchy pleather is a dream to stitch on, and lets you work with all kinds of designs! In general, you can sew any design on pleather you normally would on fabric, so it's a great alternative when you want to use a more complicated design, or just don't like using real leather itself.

Start Embroidering:
So our next tip is hooping.
Hooping leather is actually easier than you might think. For one, real leather often has a more rough, raw side that takes to spray adhesive very well. To prepare it for hooping, cut a piece of medium weight cutaway stabilizer larger than your hoop, and generously spray it with temporary spray adhesive. Smooth your leather carefully over your stabilizer. You'll find it sticks pretty darn securely, and any edges not large enough to hoop are well and truly held in place for stitching.

Our next tip is super important if you don't want to ruin your material – avoiding hoop burn!
Now, though it is an admittedly creepy thought, leather is essentially skin, and doesn't like to be scratched any more than your skin does. This means hooping leather alone can sometimes cause a permanent mark of "hoop burn," where your embroidery hoop leaves an imprint around the edges. To lessen this a bit, cut some small strips of cotton fabric, and lay them on top of your leather where it will meet the hoop. This should help prevent the hoop from scratching up the surface.

Make sure that when you press your hoop in place, your fabric scraps don't cover any part of the area where your design will stitch.
They're not meant to be stitched into your project, just to keep it looking great, so keep them out of the way!

At Urban Threads, we use this fabric scrap trick anytime we work with real leather, like when we were stitching these cool leather cuffs. You may notice in both of these cases, not all edges of the leather are under our hoop.
Because leather can be adhered very securely to the stabilizer, as long as you have a least two edges very securely hooped, it's usually OK. Leather will shift a lot less than regular fabric. I mention this because lots of raw leather comes in scrap form, and may be harder to find a piece that is larger than your hoop. When you can, however, hoop as much leather as you are able, and know that partial hooping always runs a small risk of shifting.

Once your leather is hooped up with its protective scraps of fabric, it's time to stitch our design!
When you start stitching, you may see the leather pulling up slightly with each rise of the needle. This is because leather is thicker than fabric, and there can be more friction between the needle and the leather than your machine is used to.
To compensate for this increased friction, it helps to embroider at a slower speed, about 350 stitches per minute.

Get Inspired:
When you're done stitching, you're ready to turn your embroidered piece into a cool new project! We've made hip bags, cuffs, clutch purses... all kinds of things.

Still a bit worried about working with a temperamental material like leather, or a little concerned about stitching on that expensive leather jacket? Patching your embroidery is a great alternative!
We patched these heavier designs onto leather after stitching them on friendlier pleather. It's a great way to still get the look without the risk. Check out the tutorial here.

Designs on leather make beautiful, rustic projects. As long as you know the tips and tricks, there's no reason not to try it out for yourself!
