Holiday stitching fever is in full swing by November, and many of you have been feverishly stitching away to make amazing handmade gifts for loved ones. Wouldn’t it be special if you could share that handmade quality in the way they were presented too? Little stitched tags let recipients know just how much love and work went into each project, or let them know who crafted it by hand, in a way that will stay with your gift forever! The Made With Love design pack has lots of different kinds of stitched tags, and here are just a few different ways you can use them to give a project that perfect finishing touch.
Supplies
So, there are a couple of different supplies needed depending on the tag you’ll make:
- Tearaway stabilizer, for all tag types
- Scissors
- Hammer and grommets for freestanding tag
- Fabric for freestanding and fabric tag
- Ribbon for ribbon tag
- Temporary spray adhesive for ribbon tag
- Awesome Made with Love tag designs
Depending on how you label your finished ribbon, you may also want a fabric marker.
Designs Used

Fabric Tag
We’ll do each of these tags one at a time. Let’s start with the fabric tag...
Hoop up some fabric with your stabilizer. In this case it could be tearaway or cutaway.

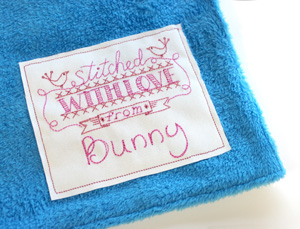
If your design is of the fill-in-the-blank variety, such as this "Stitched with Love From" design, you'll want to add your own text. Check out this tutorial to see how to do this using embroidery software and an embroidered alphabet (plus a few alternate options).
Pay close attention to the design sizes you'll be combining, to make sure they'll get along with each other. Here, I used the 3.86" x 2.05" size of the Stitched with Love From design, and the 0.94" x 0.98" size of the Handwriting Alphabet. (The cute, casual style of the Handwriting Alphabet will be a great match for any of these Made with Love designs.)
Stitch out your design onto the fabric, with any added text you desire.

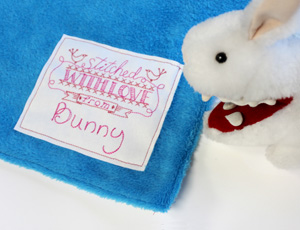
So who apparently made the project this is going on?
Oh, well Craft Bunny, of course. Regardless of the fact that he doesn’t have opposable thumbs. He’s a very talented bunny.

When your design is done stitching, un-hoop it and trim your new “tag” down to size.

Now all you need to do is stitch it on the back of whatever project you are giving! I used a regular straight stitch, but you could also secure it down with a zigzag.
This type of tag works very well on the back of quilts, pillows, blankets and even framed art.
Plus it’s a permanent stitched reminder of who made this handmade treasure, something that won’t wear off or fade with age.
Bunny is super proud to show off his amazing blanket making skills and wants to make sure everyone knows who made it.

Ribbon Tag
If you don’t want to simply “patch” the tag onto the back of your project, there’s another elegant way to add a permanent stitched reminder. A ribbon tag!
You’ll need a wide ribbon, large enough to fit the smallest of the tag designs on it. (Here I'm using a 2.5" wide ribbon and the 2.52" x 1.06" version of the Handmade By design.) Cut a length of ribbon just a bit longer than your hoop.

Spray the back of this ribbon with temporary spray adhesive, and smooth it down on top of a piece of tearaway stabilizer.

Hoop these two pieces tightly together.

Now you can stitch directly on the ribbon! Neat, huh? Make sure you place your design on the ribbon in a way that leaves room for you to write the name of the crafter.

Here it is, all stitched on the ribbon! Pretty slick, huh? This is also a super cool way to dress up gift wrapping. Just make sure you pick very light-stitching designs.

When you’re done, un-hoop it and tear away the excess stabilizer from the back.

If you didn’t add in stitched text like our previous tag, you can always write the name in with a fabric marker or even stitch it in by hand!

Once the name is added, fold your ribbon over and sew it into the seam of your gift.

Freestanding Tag
So, what if your project is too delicate or small for a big bold tag like these? Well, you can always turn a stitched design into a freestanding tag you can tie on to your project. It’s easy!
Start with a stitched design. (I'm using the Made by Hand design, which conveniently is a nifty tag shape!) It can save you some steps if you sew it on a fabric with a non-fraying edge, but if not, don’t fret! Just cut out your tag shape with a little bit of excess fabric all around the edges.
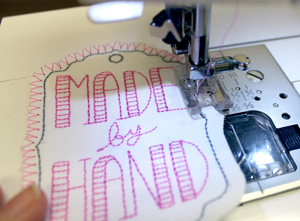
If you’re worried your edges will fray, sew a zigzag stitch over the edge of the fabric, all the way around. It’s easy and makes it look super crafty! I used matching thread.
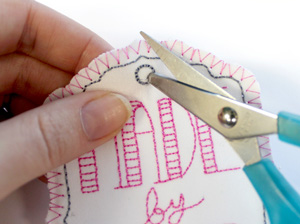
With your tag ready, you just need a hole for hanging. Use a scissors to punch a hole through the fabric. You’ll want it large enough to fit your grommet edges through.
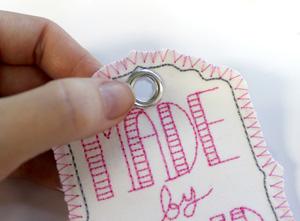
With the hole large enough, push one side of your grommet through.

Place the backing piece behind it, and use your grommet tool to hammer the two pieces together. Be sure to do this on a hard sturdy surface! Though you see this on my desk, it’s probably much better to do this on a hard floor.

Easy as pie! Add a loop of ribbon, and this little tag is ready to be added to any gift that needs a little help showing off its handmade credentials.

After all that work making handmade goods for the holidays, or any occasion, isn’t it nice to have an equally chic way to show off the hard work that went into it? These crafty tags will tell the tale of your handiwork for years to come, and let others treasure all the hard work that went into those amazing projects you make. There are all kinds of ways to use the Made With Love designs, but hopefully these examples show you how easy it is to do!
Another option, of course? Stitch these designs directly onto your project! Instant stitched tag, no extra project required. It’s really very simple to add that “handmade” touch for the holidays!


