Combine your favorite machine embroidery techniques to create this charming stocking! Stitch the freestanding lace trim separately, then incorporate it into an adorable in-the-hoop stocking. Perfect for presenting tiny gifts, or decorating the tree!
Supplies
To craft your stocking, you will need:
- Lace Trimmed Stocking (In-the-Hoop) embroidery design
- Fabric for the stocking (such as linen, cotton, or twill)
- Heavy duty water-soluble stabilizer, such as Vilene or Sulky Ultra Solvy
- Tear-away stabilizer
- 40 wt. rayon thread or metallic thread for your embroidery
- 30 wt. cotton thread for your embroidery
- Printed templates of the dieline files, which come with the design and have DL in the filename (here's how to print dieline templates, or stitch if you don't have embroidery software)
- Ribbon
- Scissors
- Masking tape
- Temporary spray adhesive
- Fabric glue
Designs Used
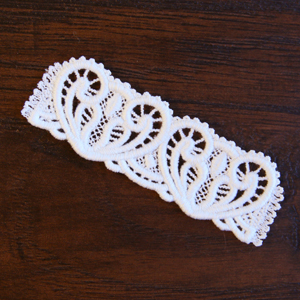
Begin by stitching the freestanding lace trim onto heavy duty water-soluble stabilizer using 30 wt. cotton thread. Once you're done stitching, rinse and dry the lace completely. (Here's more on stitching freestanding lace.)

Now that the lace is ready, take the two printed dielines, and cut around the shape. Lightly spray the back of each paper dieline with temporary spray adhesive and smooth it on the right side the chosen fabric.
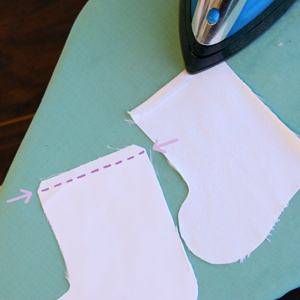
Then, locate the top corners on both the front piece and the back piece. The corners are cut at an angle to help hide the edges when they are folded over. Find the two lower points of the cut corners on either side of the stocking. Fold the top edge over at these points, making sure to fold the fabric so the wrong sides of the fabric touch. The top edge should be folded over 1/4" on the smaller stocking and 3/8" on the larger size. Use a little bit of fabric glue underneath the fold to hold it down.
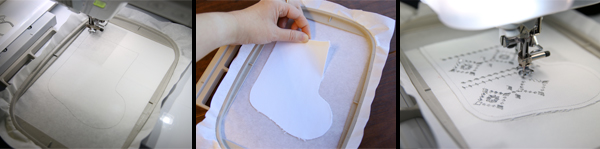
Hoop a piece of tearaway stabilizer, and load the stocking file into the machine. The first thing to embroider is the a dieline which shows where to place the fabric piece. Spray the backside of the front fabric piece with temporary adhesive, and carefully place it within the shape. Then continue to embroider the inner details onto the stocking.
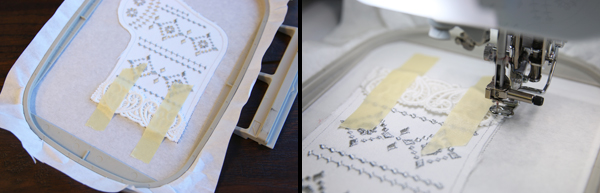
Watch the color change sheet, and stop before sewing the "lace topper tackdown." Take the lace piece, and place it on the top of the stocking, making sure it slightly overlaps the top edge. Use masking tape to tape it in place, return to the machine, and embroider the "lace topper tackdown" step. This will stitch on the two sides of the lace piece and hold it in place during the rest of the embroidery.
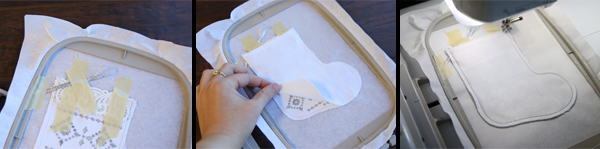
Then, cut a piece of ribbon about 7" long, and make it into a loop. Place it on top of the stocking at an angle, making sure the loop of the ribbon is pointed towards the inside of the stocking, and tape it in place. Then spray just the edges of the back piece of the stocking, but make sure to spray the right side of the fabric, and do not spray along the top edge. Place it on top of the hooped front piece with right sides together, and embroider the "finishing seam" step.
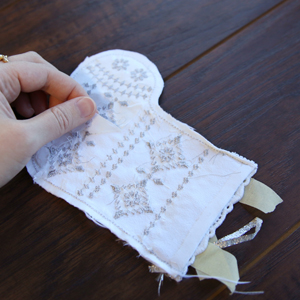
Once the embroidery is finished, remove the excess stabilizer from around the design. Then to make turning easier, remove as much of the tearaway stabilizer off of the back of the embroidery as possible.
Finally, turn the stocking right side out and remove the tape. If desired, use a few hand stitches or some fabric glue to adhere the rest of the lace piece to the front of the stocking.

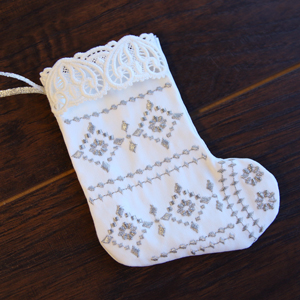
Hang up your little stocking on the tree! The pocket is just right to hold a gift card, candies, or any little surprises you like.


